Automated Test Harness
| Authors | Greg Shah Constantin Asofiei Tomasz Domin |
| Date | Frbruary 23, 2026 |
| Harness Version | 1.1 |
- Automated Test Harness
- Introduction
- Project Structure
- Installation
- License
- Prerequisites
- Building the Project
- Design
- Running the Harness
- Encoding Test Definitions
- Avoiding Test Failures
- Web Test Directive Reference
- Test Directive Reference
- acquire-mutex
- binary-file-comparison
- check-cursor-pos
- check-post-count
- check-screen-buffer
- check-variable
- clear-screen-buffer
- include
- junit-import
- log
- log-cursor-pos
- log-screen-buffer
- pause
- post-event-sem
- read-cursor-pos
- read-string
- release-mutex
- reset-event-sem
- rest
- run-code
- send-special-key
- send-text
- SFTP
- soap
- stream-read
- stream-wait-for
- stream-write
- text-file-comparison
- variable
- wait-event-sem
- wait-for-screen-buffer
- Test Plan Definition
- Project Index Definition
- Download Directory
- Remote Access
- Benchmark mode (Performance test support mode)
- TODOs (and Limitations)
- Credits
Introduction
This document provides the specification, design, implementation and usage details for both a language and a tool that provides an automated and non-interactive mechanism for testing terminal (TTY) based applications.
Main features:- Basic Usage
- Provides a language for encoding terminal application input and output processing in a manner that closely simulates how a user operates. The encoded input/output processing are known as test definitions.
- Using these encoded test definitions, it simulates user input (keyboard only, no mouse) to a terminal application (an application with a TTY or "character" interface) without a requiring an interactive user.
- Allows control over the timing of the input using methods such as pausing for a fixed interval or waiting for a specific visual response.
- Screen and report baselines (with optional exclusion regions) can be compared to screens or reports captured during testing, failing a test if any deviations are found.
- Allows controlling and working with locally started sub-proceses.
- Tests
- A test is an XML file that defines the simulated input, timing, output checks and other actions which allows a given result or results to be tested on a non-interactive basis.
- Tests can be grouped into related groups called test-sets (a list of one or more tests).
- Test Plans
- A test-plan is an XML file that defines the complete operation of a testing run.
- Test plans specify a list of test-sets to execute.
- Each test-set is associated with a specific target system to be tested. That target system has a specific configuration of how to connect and the terminal configuration to use.
- A project level index file can also be specified. This project index provides configuration of pathing, named rectangles and project level resource definitions (such as named variables or semaphores).
- A part of a test plan may be an externally generated JUnit compatible report in order to include it in generated Harness reports
- Sessions
- A session is a thread which has a terminal-based connection to a specific target system under test.
- Each session can be running a single test at a time.
- Multiple sessions can be run simultaneously.
- By default each test-set has 1 thread (and thus 1 session). The number of threads for a given test-set can be explicitly configured as any positive number.
- Possibility for remote sessions to access Harness API via an exposed socket API
- Job Queues
- A job queue is a list of tests which should be run on a specific target system. Each test-set has one and only one job queue. The tests for a test-set are the contents of the job queue.
- Multiple job queues can be in existence simultaneously, but only if you have multiple test-sets. You always have the same number of job queues as you have of test-sets.
- Each session is assigned to one and only one job queue.
- When needing a test to run, the session will read a test definition from its associated job queue.
- Multiple sessions can be associated with the same job queue by specifying a thread count > 1 for the given test-set.
- Dependencies
- Test Sets can be defined with one of the following dependency types:
- pre-condition (they execute first before other test sets and any failures abort the test plan run)
- none (they execute simultaneous with all other test sets)
- post-condition (they execute after all other test sets are complete)
- Tests can be specified to be dependent upon other named tests (or groups of tests) which constrains execution in the following ways:
- pre-condition (the test is executed first and will be executed on each session in the test-set)
- none (no constraints)
- critical path (execution of this test will stop any further tests from being dequeued/processed until this test has completed processing)
- concurrent (the test will be started at the same time as other tests marked concurrent and assigned to the same group name)
- sequential (the test will execute on the same session as others marked sequential and assigned to the same group name and the execution will be forced to be in the same order as encoded in the test-set)
- specific (this test will not run until the specifically named test has successfully completed; if the test upon which this one is dependent fails, then this test will be marked as a failed dependency and will not run)
- post-condition (the test is executed last and will be executed on each session in the test-set)
- Test Sets can be defined with one of the following dependency types:
- Failure Modes - tests can be marked to have the following behaviors when they fail:
- ignore (just mark this test as failed and continue processing other tests)
- abort thread (mark this test as failed and exit the session thread such that no other tests will execute on this thread)
- backout (mark this test as failed and execute a specified set of backout steps to attempt to leave the terminal session in a state where it is safe to execute further tests)
- Summary and detailed results reports are created for each test run. These reports are created as a set of hyperlinked HTML pages.
- Results can be exported as JUnit xml files for further processing
- Connections to back end systems can be made via SSH2 and SFTP.
- Terminal types supported are vt220 and vt320.
- Written in 100% Java.
In this document the "automated TTY test harness" is also referred to as the "harness".
Project Structure
The following is a list of the key files and directories in the project:
| Relative Path | Purpose |
|---|---|
| build/classes/ | Target location where compiled classes will be stored. |
| build/lib/ | Target location for the generated jar file and any dependent jar files (for jsch and jta). |
| build.xml | ANT build script. |
| diagrams/design.odp | High level design diagrams in OpenOffice.org format. |
| dist/ | Target location for generated JavaDoc. |
| docs/ | Non-JavaDoc documentation. |
| lib/ | Location to store dependent jar files. |
| license.txt | GPL v3 license |
| manifest/harness.mf | Manifest file for the harness.jar file. |
| other/ | Necessary source code patches for related projects. |
| src/com/goldencode/compile/ | Dynamic (in-memory, runtime) compilation helpers. |
| src/com/goldencode/harness/ | Main directory for the Automated TTY Harness Test which includes core base classes, interfaces, enums and the command line driver itself. |
| src/com/goldencode/harness/terminal/ | Terminal module that hides the implementation and usage of the terminal emulation layer. |
| src/com/goldencode/harness/test/ | Implementation of the tests and test directives. |
| src/com/goldencode/harness/transport/ | Networking module that implements a generic interface as well as the SSH2 session. |
| src/com/goldencode/html | HTML generation helpers. |
| src/com/goldencode/io/ | Stream and file system helper classes. |
| src/com/goldencode/lang/ | Runtime language processing. |
| src/com/goldencode/util | Miscellaneous utilities such as logging. |
Installation
For development and/or build purposes, the project can be installed by obtaining the project code in a zip or tarball form and unzipping/extracting the files into the file system.
For runtime usage, the only requirement is to obtain the main jar file (harness.jar) and any of the dependent jar files (see below). There are no other installation dependencies. The easiest way to handle this is to copy all of the jars in the build/lib/ directory of a development version of the project. Once available on a system, the harness tools can be run so long as the CLASSPATH is properly set. Note that the harness.jar manifest file will automatically resolve dependencies upon the other jar files so long as those files can be found in the same directory as the harness.jar.
License
The harness code is released using the Affero GPL v3 (AGPL).
Usage of the harness via the included user interfaces (e.g. command line driver programs) does not require the release of any technology by the user under the AGPL.
Programmatic usage of the harness code (e.g. creating your own user interface and calling harness Java classes to use their functionality) MAY require that the calling code be released using the same license. The reason for this is that using a Java class in this way is considered linking with the harness code, which creates a single work. By the terms of the AGPL, if such linked code is distributed outside of your organization or is accessed via a network , then all of the source code for that larger work (including the calling code) MUST also be released under the AGPL.
The test definitions or other data inputs to the harness are NEVER required to be released or licensed under the AGPL.
For more details, see License.
Prerequisites
TODO: Link to the original projects and their licenses.
TODO: Provide our own hosted versions of the source for these projects so that it is always available.
The following projects are required for this harness to compile and operate:
| Project | Version | Description | Compile/Use | License | Installation |
|---|---|---|---|---|---|
| ant | 1.6.1 or later | Apache ANT build tool for Java | Needed only for compilation. | Apache License v2.0 | Normally this can be installed using a platform-specific install tool. In Ubuntu, this is found in the package management repositories under the name "ant". |
| Java | 6.0 or later | Java Virtual Machine (JVM) and J2SE class libraries | A full Java Development Kit (JDK) is required for compilation. Only a Java runtime is needed for usage. |
? | Platform-specific Sun J2SE download and installer OR via package management system. In Ubuntu, this is found in the package management repositories under the name "sun-java6-jdk" (for the full Java Development Kit). |
| jsh | 0.1.41 or later With Java 7, 0.1.41 randomly generates ssh connection errors; this problem was fixed in 0.1.50 RC1. Use 0.1.50 RC1 or a later version on systems running Java 7. |
Java Secure Channel (provides SSH2 and SCP protocol support) | Needed for both compilation and use. | BSD style | Download the binary distribution (a single jar file), place it in the lib/ directory and edit the manifest/harness.mf to change the file name if needed. |
| jta | 2.6 with a custom patch | Java vt220 and vt320 Terminal Support | Needed for both compilation and use. | GPL v2 or later | Download the source distribution (jta26-src.jar) and unzip it. Apply the provided patches using the following commands (where jta26/ is the directory containing the unzipped JTA source code and harness/ is the directory containing the Harness project's source code): patch jta26/de/mud/terminal/vt320.java harness/other/jta26_screen_corruption_fix_20090521.patch patch jta26/de/mud/terminal/vt320.java harness/other/jta26_screen_corruption_fix_20090717.patch Then build a patched jar file using this command: cd jta26 mkdir jar ant dist The build does not automatically create the output directory for the jars. But you only have to create it once. Copy the jta26/jar/jta26.jar into the lib/ directory and edit the manifest/harness.mf to change the file name if needed. |
For all of the above listed dependencies, the code is NOT included with this project. You MUST "install" the code (per the instructions in the table above) BEFORE trying to compile or run the harness.
Building the Project
To build the project, change directory to the top-level project directory. This is the same directory in which the file build.xml resides. From that location, run the following:
ant all
The proper directory structure will be created if needed or if already existing, any previous results will be deleted. Then the Java source code will be compiled to the binary class file format and those classes will be turned into the build/lib/harness.jar file. The dependent jars will be copied from lib/ into the build/lib/ directory. Finally, the JavaDoc will be created in the dist/ directory.
Possible build targets (used with the command ant <target>):
- all
- clean
- prepare
- compile
- jar
- javadoc
Design
The harness project can be thought of in 2 parts:
- a language (in which programs can be written) to automate the input and output to a terminal (TTY) application
- a runtime environment that allows the execution of the harness programs and the reporting upon the success/failure and details of that execution run
The objective of the harness is to deterministically and reliably encode and execute testing of TTY applications on an automated basis. The complexity of this is easy to underestimate due to a wide variety of problems must be planned for, but which are naturally and easily handled when a user is sitting in front of the application. Please see the Avoiding Test Failures for details.
Each program in the harness language corresponds to a single test. A test is an ordered list of directives (i.e. test steps) which are executed sequentially. During execution, each step's results (success/failure, elapsed time and other details of the operation) are stored. The first step that fails causes the rest of the test to abort (subsequent steps do not execute). These programs are encoded in XML files known as "test definitions". See Encoding Test Definitions for more details. For details on all possible test directives, please see the Test Directive Reference.
Automating a single test is useful, but it is also important to allow the automation of arbitrarily large numbers of tests. To that end the harness language provides a mechanism for grouping tests called a "test set". Test sets are lists of tests which are to be processed against the same back-end target system AND which are processed by a common thread pool. The execution of a complete testing run can include one or more test sets and the configuration of this is encoded in an XML file known as a "test plan". See Test Plan Definition for more details.
The test plan is executed in 3 phases: pre-conditions, regular processing and post-conditions. Each test set can be assigned a "dependency" type from the following:
- PRE_CONDITION
- NONE
- POST_CONDITION
The 1st phase of execution will simultaneously execute all test sets marked as PRE_CONDITION dependencies. When all of these have completed processing, if any test sets have a FAILED status, then the remainder of the test plan will abort. This allows any environment preparation to be completed before the core testing occurs.
If the test plan does not abort, the 2nd phase of execution will simultaneously process all test sets that have no dependency (dependency type set to NONE which is the default).
No matter what the result of the 2nd phase, if the 2nd phase runs, then the 3rd phase will run as soon as the 2nd phase is complete. The 3rd phase executes all POST_CONDITION test sets simultaneously. This is a way to ensure that cleanup processing happens at the end of the test plan run.
The harness language also provides for configuration values that are global to an entire "project". These values are used for finding files (search paths) and for defining shared resources for all tests. This configuration is known as a "project index" and it is encoded in an XML file. See Project Index Definition for more details.
Given an encoded test plan, project index (which is optional) and the referenced test files, the user can launch a test run using the command line Java program called com.goldencode.harness.Harness. This program will do the following:
- Read the test plan which loads each test set, the list of tests and all configuration data. If valid, these definitions are all created as in-memory objects that are prepared for execution.
- If there is any missing information in regards to login information (userids and passwords can be encoded in the test plan but if they don't exist, the command line harness program will prompt the user). This allows different users to launch testing without editing definition files and without encoding sensitive data (like passwords) into files.
- The loaded test plan is then executed. The harness waits while test execution is done on separate threads. All the results of that execution run are stored and when all the processing is complete, the harness continues processing.
- A report generator is used to write the test results into a hyperlinked set of HTML documents.
For details on the command line launcher, see Running the Harness.
Besides the harness command line launcher, there is much more runtime support needed for the execution of a test plan. The following is a high level description of the components:
- Reportable - An interface that enables delegation of report generation to another class by providing access to report data that is specific to the instance. Graphs of objects that implement Reportable can be walked and inspected to obtain test results. These results can then be written into hyperlinked HTML report documents. This interface provides the report generator the ability to inspect start time, end time, elapsed time, name, description, test status, failure reasons and other critical reporting data.
- Report - The abstract base class which provides the core implementation of Reportable for test plans, test sets, tests and test steps (directives). These various entities are linked together in object graphs which the resulting HTML documents mirror. For example, this allows the reader of the reports to see a report on the test plan results and then link from there to each of the test set result documents. This base class centralizes much of the work of storing and retrieving the report details.
- Testable - A sub-interface of Reportable which enables delegating the execution of a testable activity. It has a single void execute(Terminal term) method which is used to run the testing of that object.
- Test - The base class which implements Testable and extends Report. This is a container for an ordered list of 1 or more Testable test steps that must be executed. When the Test.execute() is called, each of the Testable steps are executed in order. The report details of each step execution (timing, status, failure reasons...) are stored in each step. Likewise, the aggregated report details of the Test itself is stored in the Test object. This all works because the Test and all of the steps are Testable (which are Reportable).
- TestFactory - This is the class that reads the XML test definition and instantiates a Test (and all the contained Testable directives).
- TestSet - This is the class that contains the list of tests to be executed, manages the creation of the job queue, creates the threads that process the tests and then waits for these threads to complete. There must be at least 1 test set in a test plan. This is the object loaded from each test set portion of the test plan.
- Driver - This is a subclass of the Java Thread class which implements logic of worker threads in a TestSet thread pool. Each such thread is also known as a "session". Instances of this class are created by the TestSet class (1 for each thread in the thread pool). The thread then establishes its own Connection to the target system and creates a Terminal instance that uses that network transport to send input to the target system and to read the output sent back from the target system. Then, so long as there are more Test instances in the job queue, the Driver will get the next Test from the queue and then it will call Test.execute() (passing the thread-specific Terminal instance to the Testable). After Test.execute() returns (the test processing is complete for that test), the Driver handles any failure mode processing and then tries to get the next test (if the thread isn't marked to abort). When no more tests are available and the Driver is done processing its current test, it will notify the TestSet that it is done and it will exit. Notifications between the Driver threads and the TestSet are handled using a CountDownLatch. In case Driver thread fails completely it is restarted, so a total number of threads is kept as defined in master test plan.
- Thread Pool - Each TestSet has a pool of Driver threads which process the Test instances. These threads dequeue tests from a shared queue until there are no additional tests to process for this TestSet. Each thread pool is dedicated to processing tests only for a single TestSet.
- JobQueue - This manages the queuing of tests for it's TestSet. There is always only one instance of this class per TestSet. All the threads in the thread pool for this TestSet will use the JobQueue.dequeue() method to obtain the next Test to execute. This means that this instance is shared between all Driver threads in the same thread pool (i.e. in the same TestSet). Hidden inside this class is the usage of SubQueue elements. SubQueue instances implement a range of dependency types that allow Test processing to be constrained in various ways.
- Terminal - This represents a set of input and output primitives used for communicating with the back-end target system. Keys can be sent and the current screen can be read. Each thread Driver has its own instance (which means that each Driver thread is like a separate logical user of the target system). Many test directives use the Terminal instance to handle I/O with the target system or to implement synchronizing facilities (e.g. to block until certain results are received back from the server in response to previous input that was sent). The Terminal class uses facilities in the JTA project to provide the low level vt220 and vt320 emulation. The Terminal implements a non-visual terminal emulation client and hides the complexity of programming the JTA backing code. The primitive operations provided to the caller are independent of the terminal emulation type.
- Connection - An interface for providing a generic communications session with a back-end target system. SSH2Session is the only current implementation of this interface. This API allows the connection to be started, stopped and to obtain the associated InputStream and OutputStream for that connection. The SSH2Session uses the JSch project for this SSH2 support and it hides the complexity of those interfaces.
- TestPlan - This is the class that contains and manages the execution of multiple TestSet instances. It causes each TestSet to begin execution and it waits for all the TestSet instances to complete, using a CountDownLatch. The TestPlan is the in-memory executable representation of the XML test plan.
- TestPlanFactory - This is the class that reads the XML test plan definition and instantiates a TestPlan (and all the contained TestSet instances). During the loading of each TestSet, the TestFactory is called to load all Test instances into each TestSet. Thus a single call to load a test plan results in a complete loading of the entire graph of testing objects.
- ProjectIndex - An optional module that facilitates the use of project-level resources such as named rectangles and search paths for finding files. This is only used during the loading process of converting the XML definitions into the in-memory executable form. This class allows the language syntax to be shortened. For example, files can be referenced by a partial path and found during loading via a search algorithm.
- ProjectIndexLoader - This class reads the project index XML file and loads its contents into the ProjectIndex instance.
- ReportGenerator - This class is used by the Harness to create all of the HTML reports after a test run completes.
The following diagram depicts how a single session (thread) processes:
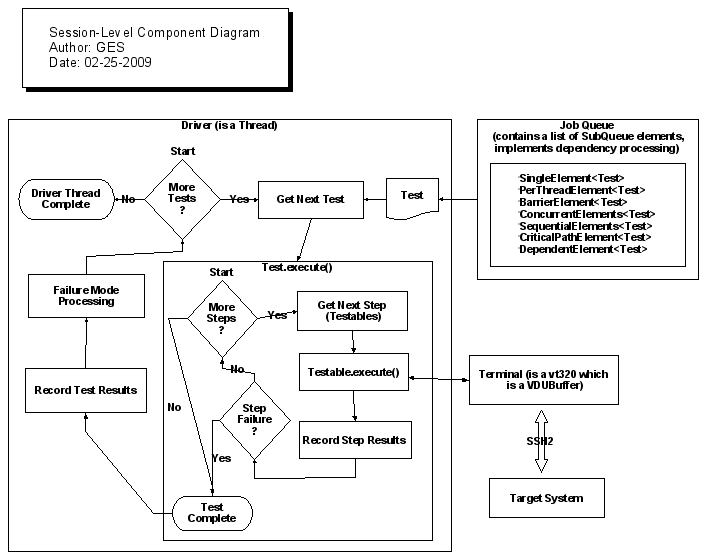
The above diagram shows the details of a single thread (potentially one of many in a test set's thread pool). It shows how the Driver processing loop works, how the Test.execute() method works and how the Terminal instance is used to communicate via SSH2 to the target system.
The Terminal object provides the low level primitives for programming/automating the interaction with the back-end target system. Here are the details of how the Terminal object works:

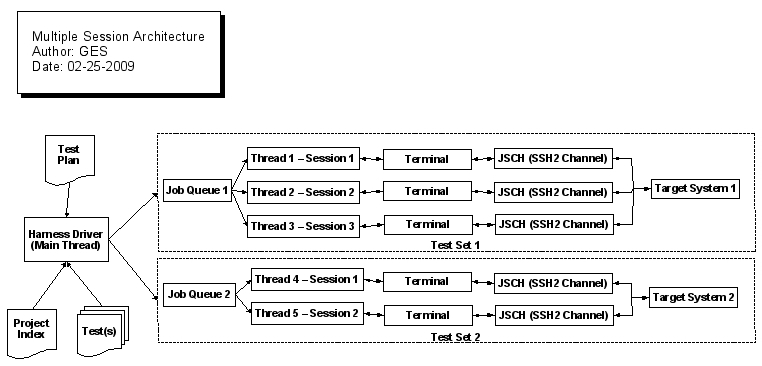
The following diagram demonstrates the overall Harness process, the XML input files that define the testing run and the structure of how test sets, job queues, sessions and target systems all interact.
Running the Harness
To run the harness, first change your current directory to the directory in which the test plan exists. This is considered the "root" directory for the associated testing project.
From there, run this command (this is valid for Linux or UNIX):
java -cp ../path/to/jarfiles/harness.jar:. com.goldencode.harness.Harness my_test_plan.xml
On Windows this might be:
java -cp ..\path\to\jarfiles\harness.jar;. com.goldencode.harness.Harness my_test_plan.xml
If there are any problems loading the tests, an error will be displayed and the harness will exit. If the test details can all be loaded properly, the harness will prompt you for userid and password if needed. Then it will execute the testing and exit.
You will then need to use your browser to look at the HTML reports for that run. This will be in the directory specified in the output-directory element of the test plan or if that was not specified, the reports will be found in a ./results/ sub-directory under the current directory.
Full syntax for the command line driver:
java com.goldencode.harness.Harness [options] <test_plan_filename>
Options:
| Option | Description |
|---|---|
| -? | display a help screen |
| -d | enable verbose output |
| -d -d | enable even more verbose output which is basically FINER tracing level |
| -l <log_level> | set log level: WARN,INFO,FINE,FINER |
| -g <float> | allows for multiplying all timeouts in test scenario by a factor, that allows executing timeout dependent tests on slower machines (e.g. for -g 2.0 all waits in tests are two times longer) |
| -q <integer> | maximum parallel TestSet, set 1 for sequential - that allows for reducing tests parallelizm in command line |
| -c | enable dumping reports on CTRL-C |
| -x | abort anytime when RC fails |
| -m | enable performance test mode |
| -s <skipListFile> | allow providing a list of tests to be skipped - all tests on the list are skipped |
| -shell <shell> | allow overriding scenario defined shell |
| -f <test_list> | comma separated names of tests to be included in the whitelist - if specified only those tests will be executed, tests are identified by name |
| -junit <junit_filename> | export test result to file in JUnit legacy format |
| -b <path_list> | specify a default set of baseline search paths; <path_list> is a list of one or more paths separated by the platform specific path separator character (e.g. on UNIX orLinux this would be the colon ':') |
| -e | force separate host/port/userid/password prompts for each target system (the default is to only prompt once and to use the same responses for each of the target definitions which don't have the values defined |
| -t <path_list> | specify a default set of test/include search paths; <path_list> has the same format as the -b option |
| -v <var=value> | specify values for variables which otherwise would need to be read from the console |
| -h <host> | specify the host to connect |
| -p <port> | specify the port to connect |
| -u <userid> | specify the userid used to connect |
| -w <password> | specify the password used to connect. WARNING! Setting the password in the command line will expose it in the process list. Use this option with care, as it can pose security problems. |
| -n <endpoint> | the override endpoint for web tests |
| -oauth1 <param1=value1 param2=value2 ... paramN=valueN> | list of override parameters for oauth1 authorization (web tests only) |
| -o <var1=value1 var2=value2 ... varN=valueN | list of override variable initialization values |
| -encoding <encoding_name> | setup underlying terminal encoding, default ISO-8859-1, suggested value for Unicode testing: UTF-8 |
Parameters:
| Parameter | Description |
|---|---|
| test_plan_filename | specific test plan to run (this is the relative or absolute filename of the XML test plan definition) |
See integer value obtained from ExitCode.getCode() will be used in the call to System.exit().
Encoding Test Definitions
Each test is a set of directives contained in a valid XML file. Here is the overall structure:
<?xml version="1.0"?>
<test name="example" description="This is an example test description." >
   <!-- test directives go here -->
</test>
The following attributes can be used in the <test> element:
| Name | Description | Required |
|---|---|---|
| backout | The name of a an XML test definition file that contains the steps to execute to backout (or cleanup) any processing for a failing test. The point of these steps is to leave the terminal application in a state where subsequent tests can process properly. This is only used with the failure mode BACKOUT. |
N (only required for failure mode BACKOUT) |
| dependency | One of the following (values are case-insensitive) dependency types: • NONE • PRE_CONDITION • CRITICAL_PATH • CONCURRENT • SEQUENTIAL • SPECIFIC • POST_CONDITION Each dependency type imposes specific constraints on how and/or when the test can execute. A NONE dependency means that the test runs in the order determined by its order in the test set AND by any constraints forced upon all tests by other tests with dependencies. In fact, all other dependency types can cause tests to execute in a different order than listed in the test set. Absent any influence of other dependencies, the NONE dependency does not cause any further modifications to test execution. A PRE_CONDITION is a test that must successfully run on every thread (session) in the test set. A duplicate of the test will be made for each thread in the test-set's thread pool. All pre-condition tests will be run first (in the relative order as compared with other post condition tests in the test-set definition). A test that is not a pre-condition can never run before a test that is a pre-condition. Since such tests run once on each of the threads in the thread pool AND before any other processing, pre-conditions are ideal for code that executes a login to an application, such that all subsequent tests don't have to login. A CRITICAL_PATH dependency generally causes all tests following it in definition order to wait for execution until the CRITICAL_PATH test is complete. The exceptions to this rule: 1. PRE_CONDITIONS execute first regardless of order. 2. CONCURRENT and SEQUENTIAL dependencies are "group" oriented. In other words, they have more than 1 test that is jointly controlled as a member of a named group. If one of the tests in a group has been defined before the CRITICAL_PATH test, then all of the other tests in that group will similarly be considered defined before the CRITICAL_PATH test. A CONCURRENT dependency forces all of the tests in that same group to start execution at the same time. This is a group oriented dependency and it requires a group attribute specifying an arbitrary group name to which to belong. No matter where the subsequent CONCURRENT tests are defined in the list, they will all be executed at the same time as the first one is executed, although multiple Driver threads will likely be blocked inside the JobQueue.dequeue() method while they wait for enough threads to be ready such that all the concurrent tests can start at the same time. There is no limit on when the tests end, this is a start constraint only. Please note that a deadlock can occur if there are more concurrent tests in the same group than threads (in that test set) to execute them. Even if the test set defines enough threads, tests that fail with a failure mode of ABORT_THREAD, will reduce the thread pool size dynamically which may cause there to be too few threads to allow the concurrent tests to execute. When there are not enough threads, a deadlock will occur and the test session will have to be aborted. A SEQUENTIAL dependency forces all of the tests in that same group to execute sequentially on the same exact thread. This is a group oriented dependency and it requires a group attribute specifying an arbitrary group name to which to belong. No matter where the subsequent SEQUENTIAL tests are defined in the list, they will all be executed starting at the same point as the first one in the list (it can make it look like these tests "jumped ahead" in line), however since the thread can only execute one at a time, each test in the same SEQUENTIAL group will be executed in order of definition on the same thread, until all of them are complete and then other tests can be dequeued and executed on that thread. If one of the sequential tests in the same group fails, then none of the following tests will execute and all of those following tests will be marked with a status of FAILED_DEPENDENCY. A SPECIFIC dependency forces the test to wait until a named other test completes successfully. The test upon which another test depends is specified usign the referent attribute. Execution of the dependent test is deferred until the referent test successfully completes. Since many tests can all refer to the same referent, and other tests can refer to the dependent tests (and so on), a tree of dependencies can be created using this dependency type. With each node in the tree that sucessfully completes. all dependent nodes then are freed to execute (from there on independently, possibly causing there to be independent sub-trees of dependencies). Any failure by a referent will cause the entire tree of dependencies (from that referent onward) to be marked as FAILED_DEPENDENCY and those so marked will not be executed. Please note that a SPECIFIC dependency does not force dependent tests to run on the same thread. Once the referent test is complete, the dependent test(s) will run on the first available thread from the thread pool. A POST_CONDITION dependency is a test that must successfully run on every thread (session) in the test set. A duplicate of the test will be made for each thread in the test-set's thread pool. All post-condition tests will be run last (in the relative order as compared with other post condition tests in the test-set definition). A test that is not a post-condition can never run after a test that is a post-condition. Post conditions will not run until there are no other tests to dequeue other than other post conditions. Since such tests run once on each of the threads in the thread pool AND at the end of all other processing, post-conditions are ideal for code that executes a logoff from an application. |
N (defaults to NONE) |
| description | The verbose description of the test. This can be any text that is useful for describing the test. | N |
| failure-mode | This tells the harness how to handle a test failure (which is detected as soon as any step fails). It must be one of the following: • IGNORE • ABORT_THREAD • BACKOUT An IGNORE failure mode marks the test as failed and has no effect on any subsequent test processing. All subsequent tests continue to process. An ABORT_THREAD failure mode marks the test as failed and then causes the current Driver thread to exit. As long as there are other threads remaining in the thread group, test execution will continue. However, there can be two problems: • If the last thread aborts, then the test set will end processing at that moment and any tests remaining in the queue will not be run. They will be marked NOT_RUN. • If there is a CONCURRENT dependency and the number of tests in the concurrent group is greater than the number of remaining threads, then test processing will deadlock waiting for enough threads to be available. A BACKOUT failure mode marks the test as failed and then runs the steps read from the XML test definition file specified by the backout attribute. Note there is a special mode ti terminate driver thread when in backout fails to prevent further failures - so failing backout threads do not accumulate, works only in debug mode |
N (defaults to IGNORE) |
| group | The name of the dependency group to which this test belongs. This group name can be any unique string that is shared between multiple tests with the same dependency type. This is only used for dependency types CONCURRENT and SEQUENTIAL. |
N (this is only required when the dependency is CONCURRENT or SEQUENTIAL) |
| name | The short name for the test. There are no spaces or special characters used in this name. It will be used for filenames and HTML links. | Y |
| referent | The filename of a test on which to be dependent. Only used for the SPECIFIC dependency type. The filename must be specified exactly the same (case and text) as was the filename attribute of the test that is being specified. In addition, that referent test must already have been defined. Lastly, since it is possible for the same filename to be defined multiple times, the referent can only refer to the most recent test definition that used that filename. | N (this is only required when the dependency is SPECIFIC) |
| repeat | A positive integer specifying the number of duplicate instances of this test to include in the test set. For example. if "5" is specified, then the test will be executed 5 times (and each test will be treated as a separate and independent test, potentially running on a separate thread). This is a load-time construct. The loading process will duplicate the test in the in-memory test set definition and then each test instance (though loaded from the same definition) will be treated separately at runtime. |
N (defaults to 1) |
| timeout | A 32-bit integer specifying the maximum number of milliseconds to allow for test execution before the test fails. Note that the test will not be interrupted at that time. Instead, the total elapsed time for the test is compared to this value at the end of test execution and if this elapsed time is greater than this timeout value, then the test will be set into a FAILED status, even if all of the test steps PASSED. This is a way to enforce that a successful functional run of the test must complete in within this timeout value in milliseconds. | N |
A directive is a single step of the test. These steps instruct the harness to execute some logic such as sending keystrokes to the target system or checking that the current terminal screen matches a captured baseline screen.
To encode a directive, it is created as a child node of the <test> element. The list of directives form the steps for the test. When the test is being run, each directive will be executed in its order of appearance in the file.
There is no parallelism or threading provided for a single test, however it is possible to execute and coordinate multiple tests running in different sessions (threads), such that a multi-user scenario can be simulated.
Test directives fall into the following categories:
- Input
- Send Terminal Keystrokes
- send-text
- send-special-key
- Terminal Cursor Position
- check-cursor-pos
- read-cursor-pos
- Stream Input
- stream-write
- Send Terminal Keystrokes
- Output Checking
- Terminal Screens
- check-screen-buffer
- clear-screen-buffer
- read-string
- wait-for-screen-buffer
- Streams
- stream-read
- stream-wait-for
- Files
- binary-file-comparison
- text-file-comparison
- Terminal Screens
- Timing
- pause
- Logging
- log
- log-cursor-pos
- log-screen-buffer
- Variable Definition and Processing
- check-variable
- variable
- Running User-Defined Logic
- run-code
- Include Processing
- include
- File System
- SFTP
- cd
- get
- lcd
- lpwd
- ls
- mkdir
- put
- pwd
- rename
- rm
- rmdir
- symlink
- SFTP
- Thread Coordination
- Mutex Semaphores
- acquire-mutex
- release-mutex
- Event Semaphores
- check-post-count
- post-event-sem
- reset-event-sem
- wait-event-sem
- Mutex Semaphores
- Import-Export
- Import JUnit test plan execution results
Please see the Test Directive Reference for details of the syntax for encoding specific directives.
Avoiding Test Failures
Without careful planning, it is easy for tests to be defined such that they are susceptible to 2 kinds of failures:
- false positives (tests which pass when they should really fail)
- false negatives (tests which fail when they should really pass)
The problems can be avoided with proper encoding of the test. It is important to:
- maximize data stability
- avoid certain bad practices
- frequently synchronize execution of the test with the current state of the server
Data stability is the concept that each time a test runs, the data is the same (or as close as possible) to the state of the state at the time the tests were originally encoded. This maximizes the amount of input data that can be hard coded into test definitions and greatly simplifies the coding of tests. An example of how to ensure data stability is to restore the application's database to a specific/known backup before running testing.
Bad practices to avoid:
- When test execution is at the login shell of the target system, DO NOT execute a command that would cause the shell to exit (this will disconnect the session with the back-end system and no further steps or other tests can run in that session/thread). For example, on Linux and most UNIX systems if you type "exit" and press the ENTER key, the login shell (and your communications session) will end.
- Screen buffer checks are a useful thing to separate into an include file so that the screen check can be implemented in many tests with very little code. However, it is important that the screen captures are EITHER not specific to the path by which the application took to get to the screen OR those portions of the screen that vary based on the previous navigation are excluded. Special attention to this prior state needs to be taken to avoid unexpected failures. The good news is that these are usually found at development time rather (when the new usage of the screen check is first tested) than at the time the official testing is run.
- It is easy to encode a test which is dependent upon the state of the file system, security permissions/rights, the specific user's configured environment or other application state that is variable over time, user or other criteria. If an application changes its behavior based on state that is variable, this state must be controlled carefully before testing is run to avoid failures. For example, a reporting application (which writes a report in a text file in response to some user input) may work one way the first time the report is generated and may add additional prompts in subsequent runs. In this example, if the report file already exists (due to a prior run) the application may prompt the user to confirm that it should overwrite the report file. This variablity of the applications behavior must be made deterministic, through careful control over the environment and state of the system and application.
- Many applications will have different behavior (and appearance) on the first time a particular screen or function is accessed than in subsequent times. This means that some screen baselines cannot/should not be re-used. Or if reuse is important, then subsequent usage may need additional exclusion regions to allow the screens to match. Such failures are usually found and fixed during development.
Test step synchronization is the process by which the execution of subsequent test directives (test steps) is not allowed to continue until it is confirmed that the server has fully and successfully responded to all prior input. For example, many applications provide some mechanism of type-ahead. However, some applications don't provide type-ahead and even some applications that do support type-ahead, have limits on how type-ahead can be used. This inherently limits the speed with which key input can be sent to the server because the harness can easily overrun the server (sending keys that will be discarded). In addition, since the server's response time is variable (and under load or other conditions it may vary widely), most applications have significant limitations on how much can be typed ahead before the user must wait for the server to catch up.
In interactive usage, this is part of the end-user's job. They naturally have to wait at specific points for the server to catch up before proceeding. This is absolutely essential to do with great frequency in automating testing. If this is not done, the test execution will appear unreliable or will fail based on timing of responses from the server. The harness includes a variety of synchronization mechanisms that can be used to fully avoid failures by frequent synchronization.
Synchronization tools:
- for all target types
- pause - This is a fixed (hard coded) pause for a specific amount of time. It is very crude and has the same limitations as the interkey delay. Avoid it as much as possible.
- for
target type="terminal"- check-screen-buffer - This is the best, most useful synchronization tool. When the wait option is used, it allows the harness to pause test execution until a specific screen or partial screen is matched coming back from the server. There is a timeout such that the test fails if a response has not be received at that time.
- Keystroke response draining - the send-text and send-special-key directives support a draining option. This tells the harness to block further execution until some amount of output has been read back from the server AND for some period of time there has been no more output sent from the server. This quiecence is detected and excution resumes. This also is controllable via a timeout to allow failures to be detected. Note that this is dependent on knowing the amount of output to expect back, which is not the same as the number of characters that change on the screen. This is measured in raw bytes sent by the server, which includes escape sequences and terminal processing (attributes, cursor movements...) in addition the the modified text content. This is useful for certain cases and can be used reliably, but it is not a powerful as the check-screen-buffer.
- wait-for-screen-buffer - This can be used to detect that any output has been recieved (when combined with a previous clear-screen-buffer) OR it can be used to wait for a specific string of text (not a multiple-row rectangle, but a section of text on one row) appears anywhere on the screen. This is useful in cases where there is some known text but its location on the screen cannot be predetermined (possibly due to scrolling of the screen or unknown prior state).
- Inter-key delay - the send-text directive can have an inter-key pause specified to slow down the pace of sending keys. This can have some use but it is quite weak and should be avoided if possible in preference to the mechanisms above. In particular, it doesn't handle variability at all without significantly degrading the time it takes to execute a test (by specifying a very large interkey delay).
- for
target type="stream"- stream-wait-for - the tool to use for checking for stream output in order to synchronize with commands executed on the cotrolled stream
Web Test Directive Reference
The supported web services are REST and SOAP. These can be tested via the rest and soap test directive, which have the exact same syntax and definition - the only differences exist at runtime, how the request and response payloads are interpreted and some other differences.
The rest or soap test directive have this structure:
   <soap|rest service="optional, vars-aware" method="post|get|put|...[optional,default GET/REST or POST/SOAP]">
      <authorization type="oauth1"> <!-- optional -->
         <parameter name="oauth_consumer_key" value="optional"/>
         <parameter name="oauth_consumer_secret" value="optional"/>
         <parameter name="oauth_token" value="optional"/>
         <parameter name="oauth_token_secret" value="optional"/>
         <parameter name="realm" value="optional"/>
         <parameter name="oauth_callback" value="optional"/>
         <parameter name="oauth_verifier" value="optional"/>
      </authorization>

      <query name="vars-aware" value="vars-aware" /> <!-- optional -->

      <header name="vars-aware" value="vars-aware" /> <!-- optional -->

      <body filename="path/to/request/body.xml|json"> <!-- optional -->
         <![CDATA[
            JSON or SOAP body, can't be both filename and cdata
         ]]>

         <replace path="" variable="" value="" />  <!-- optional -->
      </body>

      <response filename="path/to/response/body.xml|json"> <!-- optional -->
         <![CDATA[
            JSON or SOAP expected body, can't be both filename and cdata
         ]]>

         <status code="optional" reason="optional" /> <!-- optional -->

         <header name="" value="optional" save="optional" /> <!-- optional -->

         <body save="optional"> <!-- optional -->
            <exclude path="" /> <!-- optional -->

            <include path="" /> <!-- optional -->
         </body>

         <exists path="" save="optional" /> <!-- optional -->

         <regex path="" value="" save="optional" /> <!-- optional -->

         <exact path="" value="" save="optional" /> <!-- optional -->
      </response>
   </soap|rest>
Each configuration or attribute will be described below, but in the template above the following can be interpreted as:
soap|restmeans this is either thesoaporrestdirective.optionalmeans either the attribute or the entire node is optional.vars-awaremeans an attribute will have all variable references replaced with their current, runtime value, before being used to build the request. To use this variable substitution, reference the variable in the attribute likeendpoint="${REST_ENDPOINT}/path/to/service". This means the variable must be specified in uppercase always (regardless how it was defined), enclosed in curly braces and starting with the $ sign.
rest or soap. For these, the service and method attributes can be specified, where:
service, if missing, defaults to theendpointattribute from the web target configuration. Otherwise, if after replacing all variable references the service doesn't start withhttp://orhttps://, the default endpoint will be pre-pended.method, which if missing defaults toGETforrestandPOSTforsoap.
authorization, optional. Onlyoauth1type can be specified at this time. Theparameterchild node will specify anoauth1setting. Ifvalueis missing or empty, the parameter will be ignored.query, zero or more entries with the query parameters set at the http request. Both thenameandvaluewill have all variable references processed.header, zero or more entries with the request headers set at the http request. TheContent-typeheader will always be set and will default totext/xmlfor SOAP and toapplication/jsonfor REST. Both thenameandvaluewill have all variable references processed.body, optional, with the request body. This can be specified either viafilenameor the CDATA, but not both. Thereplacetag (zero or more entries) can be used to replace either aXPathorJsonPath, if thepathattribute is set or a variable reference, if thevariableis set. You can't specify bothvariableandpath. The target will be replaced with the specifiedvalue.response, optional, with the expected response. This can be specified either viafilenameor the CDATA, but not both. If noresponsetag exists, then the test is considered passed. Otherwise, the test can check for:status, a single entry with the response status code and reason match. Both are optional.header, zero or more entries to check for header values. If the header matches the expected value or thevalueis not specified at the test, the header's value will be saved in the variable.exists, zero or more entries to check if a certain path in the received body exists. If it exists, its value will be saved in the specifiedvariable.regex, zero or more entries to check if a certain path matches the specifiedregexvalue. If the path exists as a leaf and resolves to a single value, which matches the expected one, its value will be saved in the specifiedvariable.exact, zero or more entries for an exact match for a certain path. If the path exists as a leaf and resolves to a single value, which matches the expected one, its value will be saved in the specifiedvariable.body, zero or one entry which will check the entire response body against the template one. If it matches, the body will be saved in the specified variable. Before the match, the body will be processed to include all paths resolved frominclude(0 or more entries) and then exclude all paths resolved fromexclude(0 or more entries) all specified paths. Whatever paths remain in the template and body after this processing will be matched exactly.
When 'paths' are mentioned, these must follow the XPath or JsonPath syntax ( https://github.com/json-path/JsonPath ) .
Test Directive Reference
The following defines an alphabetical reference guide to all test directives. Each entry provides complete documentation on how to encode the corresponding directive in XML form.
acquire-mutex
binary-file-comparison
check-cursor-pos
check-post-count
check-screen-buffer
check-variable
clear-screen-buffer
include
junit-import
log
log-cursor-pos
log-screen-buffer
pause
post-event-sem
read-cursor-pos
read-string
release-mutex
reset-event-sem
rest
run-code
send-special-key
send-text
SFTP
cd
get
lcd
lpwd
ls
mkdir
pwd
put
rename
rm
rmdir
symlink
soap
stream-read
stream-write
stream-wait-for
text-file-comparison
variable
wait-event-sem
wait-for-screen-buffer
acquire-mutex
Element Tag
acquire-mutex
Description
Acquires ownership of the mutex semaphore, blocking until that ownership is obtained. The only way this step fails is if it is interrupted while waiting for ownership.
Mutex (or mutual exclusion) semaphores are a tool for synchronizing access to a shared resource between two or more threads. To protect any given resource, make a call to acquire-mutex on the specific accessing thread before that thread reads, writes or otherwise accesses that resource. Any other thread which executes acquire-mutex will block while another thread has ownership. When access to the resource is finished, the thread must call release-mutex to relinquish its ownership. If there are threads blocked waiting for ownership at the time it is released, one of those threads will be unblocked and will obtain ownership before continuing.
The contract of the acquire-mutex is that it will not return until the current thread has ownership of the semaphore. That means it may block an indefinite amount of time. If no thread has ownership of the semaphore on invocation of acquire-mutex, then the calling thread will be given ownership and the call will immediately return without blocking.
Recursion is allowed and if acquire-mutex is called multiple times before release-mutex, then the use counter of the semaphore will be incremented but otherwise acquire-mutex will immediately return (because by definition, if acquire-mutex has been previously called without a corresponding release-mutex, then the current thread already owns the semaphore). To release ownership, the same number of release-mutex calls must occur as there were acquire-mutex. In other words, it is very important to pair up all calls to acquire-mutex with a corresponding call to release-mutex. Each release-mutex call decrements the use count. When the use count reaches zero, the ownership of the semaphore will be released (and another waiting thread, if any, will be unblocked and acquire ownership).
Mutex semaphores are created using a <create-mutex> element in a <resource> element inside a test plan or a specific test set. See Test Plan Definition for more details.
Contained Element(s)
none
Containing Element(s)
test
Attributes
| Name | Description | Required |
|---|---|---|
| name | A text string with the case-insensitive name of the semaphore. | Y |
| repeat | A positive integer specifying the number of sequential duplicate instances of this step to include in the test. For example. if "5" is specified, then the step will be executed 5 times sequentially (and each step will be treated as a separate and independent step). If the 3rd repetition fails, then the reports will show that the first two instances succeeded and the 3rd failed and the last two were not run. This is a load-time construct that is not specific to this directive. The loading process will duplicate the step in the in-memory test definition and then each step (though loaded from the same definition) will be treated separately at runtime. |
N (defaults to 1) |
Example(s)
<acquire-mutex name="myMutexSemaphore" />
binary-file-comparison
Element Tag
binary-file-comparison
Description
Compare the contents of two binary files to determine if each matching index position in the stream they are the same bytes. Excluded regions (ranges of bytes specified by start and end index positions that are relative to the beginning of the file) can be specified. Any data in excluded regions is not compared (it is assumed to be the same).
The comparisons are done on a byte for byte basis. The data is not read as characters nor is the data interpreted in any manner. Control characters and other non-visible characters are treated exactly the same as any other character, since there is no distinction.
The baseline file is the captured file that defines the expected data. The "actual" file is usually something generated as a result of input processing on the server.
This step will fail at the first byte that is different between the baseline and actual files, outside of exclusion regions.
The actual file can be specified with a local file name (using the actual attribute) or it can be specified as a remote file on the target system (using the remote attribute). In remote mode, the file specified is either an absolute path on the server side or it is a relative path based on the current directory on the server side. The specified server side file will be copied from that system to the local system (in the output directory) using SFTP.
If the actual file is specified as a local file, then the file will have to have been transferred there via some previous processing during the test cycle. The SFTP test directives can be used for this purpose.
If the baseline file or the actual/remote file cannot be found or the filenames don't reference files (e.g. a name references a directory), this step will fail. Likewise, any I/O failure during step processing will fail the step.
Exclusion regions are specified by 0 or more sub-elements of the following form:
<exclude start="100" end="102" />
The start and end indexes are relative to the beginning of the file and are 0-based. If there are 0 exclude sub-elements, then there are no excluded regions and every byte of the files must match.
If one of the comparison files is larger than the other file, then the step will fail without even comparing the data since by definition the contents must be different somewhere.
Contained Element(s)
exclude
Containing Element(s)
test
Attributes
| Name | Description | Required |
|---|---|---|
| actual | The local filename of the file to compare against the baseline. If specified, the file is assumed to exist and to have been explicitly copied from the target system to the specified file before this step executes. It is the responsibility of the test developer to ensure that the file exists. | N except that at least one (and only one) of the actual or remote attributes MUST be present |
| baseline | This specifies the absolute or relative filename of the file that contains the expected bytes. This file is usually pre-captured and is stored along with test definitions. The project index "baseline" search path is a list of paths to search for baseline files. The ProjectIndex.findBaseLine() method is used for that search. See Project Index Definition for more details. | Y |
| repeat | A positive integer specifying the number of sequential duplicate instances of this step to include in the test. For example. if "5" is specified, then the step will be executed 5 times sequentially (and each step will be treated as a separate and independent step). If the 3rd repetition fails, then the reports will show that the first two instances succeeded and the 3rd failed and the last two were not run. This is a load-time construct that is not specific to this directive. The loading process will duplicate the step in the in-memory test definition and then each step (though loaded from the same definition) will be treated separately at runtime. |
N (defaults to 1) |
| remote | The file name on the target system (the server) which contains the data to be compared against the contents of the baseline. This file will be downloaded at step execution via SFTP from the target system to the local system. It will be stored in the download directory of the results (output directory) which will be interrogated from the project index via ProjectIndex.getDownloadDirectory(). See Download Directory for more details. | N except that at least one (and only one) of the actual or remote attributes MUST be present |
Example(s)
Compares two local binary files (some previous step must have created/copied the actual file to the proper location.
< binary-file-comparison baseline="test5/details_rpt.out" actual="results/download/test5_details_rpt.out" />
Compares a local binary file (the baseline) with a file on the target system (which is downloaded via SFTP at step execution).
< binary-file-comparison baseline="test5/details_rpt.out" remote="test5_details_rpt.out" />
Same as the previous example, except that certain byte ranges are excluded from the comparison.
< binary-file-comparison baseline="test5/details_rpt.out" remote="test5_details_rpt.out">
   <exclude start="399" end="399" />
   <exclude start="409" end="457" />
</binary-file-comparison>
check-cursor-pos
Element Tag
check-cursor-pos
Description
Compare the current cursor position (row and/or column) against a given expected row and/or column. Fails if the compared values don't match.
All row and column indexes are 0-based. The coordinate system is based on the upper left corner of the screen. So (0,0) is the first column of the first row of the terminal which is also the upper left character on the display.
Contained Element(s)
none
Containing Element(s)
test
Attributes
| Name | Description | Required |
|---|---|---|
| column | A 0-based integer index specifying the column number to compare against. Use -1 to disable column comparisons. | N except that at least one of the row/column attributes MUST be present (defaults to -1) |
| repeat | A positive integer specifying the number of sequential duplicate instances of this step to include in the test. For example. if "5" is specified, then the step will be executed 5 times sequentially (and each step will be treated as a separate and independent step). If the 3rd repetition fails, then the reports will show that the first two instances succeeded and the 3rd failed and the last two were not run. This is a load-time construct that is not specific to this directive. The loading process will duplicate the step in the in-memory test definition and then each step (though loaded from the same definition) will be treated separately at runtime. |
N (defaults to 1) |
| row | A 0-based integer index specifying the column number to compare against. Use -1 to disable column comparisons. | N except that at least one of the row/column attributes MUST be present (defaults to -1) |
Example(s)
Fail if the actual cursor row position is not on the 24th row (bottommost of the terminal if the terminal height is 24 lines).
<check-cursor-pos row="23" />
Fail if the actual cursor column position is not in the sixth column.
<check-cursor-pos column="5" />
Fail if the actual cursor row and column position is not in the upper left corner.
<check-cursor-pos row="0" column="0" />
check-post-count
Element Tag
check-post-count
Description
Compare the post count of the named event semaphore and fail if the actual post count is not greater than the expected post count.
Event semaphores provide safe signalling and coordination of a specific event across multiple threads. It is a concurrency primitive.
Event semaphores are created using a <create-event-sem> element in a <resource> element inside a test plan or a specific test set. See Test Plan Definition for more details. When created, an event semaphore can be in a "set" state (threads that call the wait-event-sem will block) or it can be in a "posted" state (the event has occurred and any threads that call wait-event-sem will immediately return).
The event can be triggered by calling post-event-sem which will release any currently waiting threads (threads blocked in wait-event-sem). Posting can occur 0 or more times before the state is reset via reset-event-sem. Reset causes the semaphore's state to be "set" again, no matter whether it was previously in a set or posted state. A post count is kept which is the number of times the event has been posted since the last reset. Each reset clears the post count to zero.
Contained Element(s)
none
Containing Element(s)
test
Attributes
| Name | Description | Required |
|---|---|---|
| name | A text string with the case-insensitive name of the semaphore. | Y |
| repeat | A positive integer specifying the number of sequential duplicate instances of this step to include in the test. For example. if "5" is specified, then the step will be executed 5 times sequentially (and each step will be treated as a separate and independent step). If the 3rd repetition fails, then the reports will show that the first two instances succeeded and the 3rd failed and the last two were not run. This is a load-time construct that is not specific to this directive. The loading process will duplicate the step in the in-memory test definition and then each step (though loaded from the same definition) will be treated separately at runtime. |
N (defaults to 1) |
| expected | An integer specifying the post count which must be exceeded for the step to pass. A negative expected value will always pass since the post count is either 0 ("set" state) or it is some positive number ("posted" state). | N (defaults to -1) |
Example(s)
Fail if the semaphore is still "set" (has never been posted).
< check-post-count name="myEventSem" expected="0" />
Fail if the semaphore has not been posted at least 3 times.
< check-post-count name="myOtherEventSem" expected="2" />
check-screen-buffer
Element Tag
check-screen-buffer
Description
Compare the current terminal's screen with previously captured screen content (the "expected" contents or "baseline").
This can operate in 2 modes wait mode and non-wait mode.
In wait mode, the comparion processing will wait until the described screen becomes available OR the maximum timeout has occurred. This means that even if a screen is already there to check, if it doesn't match this directive will wait up to a maximum milliseconds value for the matching screen to become available. In this mode, there can never be a failure before the maximum timeout occurs, since it will just continue to wait and recheck.
In non-wait mode, a single check is made against the first screen found and if that check fails, the directive fails. The milliseconds value is simply the maximum milliseconds to wait for there to be ANY screen to check. In this mode, it is important to have previously used the clear-screen-buffer directive to allow a new screen to be detected. If the terminal's screen buffer has not been cleared, then so long as any output has ever been received by the harness, there will be a screen to check and the check will not wait at all.
If a timeout or interruption occurs before a screen becomes available or (in wait mode) before the expected screen becomes available, this directive will fail.
There may also be a rectangle definition (in attributes) in the check-screen-buffer element. This rectangle defines the "absolute" rectangle of the terminal screen which will be compared with the baseline data AND it defines the row/column offset at which the upper left portion of the baseline screen text is mapped for comparison. These are just 2 sides of the same idea. If an entire screen is being compared, then this rectangle must also be set to the terminal size (and positioned at (0,0) coordinates. If a partial screen is being compared, then the size of the rectangle will be smaller than the terminal screen and the coordinate position MAY be anywhere that is less than (TERMINAL_WIDTH - RECTANGLE_WIDTH, TERMINAL_HEIGHT - RECTANGLE_HEIGHT) - including (0,0) of course.
The coordinate system uses indexes that are 0-based and the (0,0) coordinate is the character in the upper left corner of the screen. In other words, the topmost and leftmost character is (0,0).
In comparing the baseline data to the actual screen data, the characters themselves are compared for equivalence. The encoding of the XML files and/or any screen capture text files is of critical importance. If the character data is encoded in one character set and then read back in a Java enironment with a different encoding, then the data will very likely be mismatching and the results will fail badly. In addition, it is expected that many screens will have varying data in certain locations which will naturally differ from the baseline data. For example, date or timestamps cannot be compared between captured and actual screens. To resolve this, a set of exclusion regions can be defined. Any character that is inside any of the exclusion regions (which is just a list of rectangles) is ignored (not compared) for the purposes of screen comparisons. The result of the step will depend only on data that is inside the overall comparison rectangle but not in any exclusion region.
Specifying Screen Text:
The screen text can be thought of as a 2 dimensional array of characters with the first dimension as the "y" and the second dimension as the "x". The actual screen data is read from the terminal's screen buffer. But to compare against the actual, the step must have the proper baseline screen data.
There are 3 ways to define the expected screen text.
1. In a separate file which is referenced using the filename attribute. This is simple to code into the XML, but it requires a separate file to be created. The easiest way is to cut and paste the rectangle of text from a terminal emulator into a text file. Each line in the file will be read into the screen definition as a separate row of the screen data. The order will be top to bottom just as it would normally appear on the screen. The newlines are dropped and all other data is copied into the screen baseline. Do NOT add extra lines to the end of the file. Do NOT leave extra whitespace at the end of the line. Minimize the contents to the smallest rectangle that will show all portions of the screen that need to be matched. Use exclusion regions to ignore other portions, but it is a good practice to "blank out" those portions (overwrite characters that will be excluded with the same exact number of spaces). This makes it easier to see the data that is going to be compared, though it has no impact on the overall comparison. This is the best approach for comparing entire screens or large portions of screens.
As a good practice, it may make sense to "blank" out unnecessary contents of a screen capture in the text file. To "blank" something, just replace the characters with an equivalent number of space characters. This is useful for any data which is being excluded AND which has no documentation value in the screen capture. This is opposed to a case where the text being ignored is a date, time, transaction number or some other data that is normally part of the screen but which is naturally varying, then leaving it (not blanked) will help others in the future who look at the screen. They will quickly see the exclusion region and understand what the data is that is being ignored.
The place where it is useful to blank it is when the data is "garbage" from some prior screen that was captured but has no real value in understanding the exclusion region. The idea is only to maximize the readability of the screen files. In practice, whatever you specify as an exclusion region is fully ignored (it isn't compared at all). The code that honors exclusions is in ScreenRegion.java.
2. In a set of one or more sub-elements with the element tag line. Each line element must have a single value attribute which contains the left justified text of that row of screen data. The entire list of lines is read into memory with the first line element being the top row of the baseline screen and the last line element being the bottom row of the baseline screen. This is useful for a small screen rectangle, but it has the drawback of requiring certain characters to be encoded as XML entities (e.g. the < or & characters).
3. As a simple string using the value attribute (and optionally positioning that string somewhere on the screen using the row and/or column attributes. The row and column values default to 0 and 0. But if either is specified, this sets the row and the leftmost column for the comparison. Since a string is inherently a single row concept (don't try to use newlines in the string), the ending row is always the same as the starting row. The width of the string is known so the rightmost column is automatically calculated. This is the only method of specifying screen text that does not require a complete rectangle definition as part of the check-screen-buffer element since the ending row and ending columns can always be calculated. This is useful for clean and quick definitions of a partial row of text, but it has the drawback of requiring certain characters to be encoded as XML entities (e.g. the < or & characters).
Please note that in all 3 methods, the baseline data being compared is only the text itself. Colors and terminal attributes (underlines, blinking, reverse highlights...) are NOT captured and NOT compared at this time. If you cut and paste from a terminal, normally you will only see the text and the other attributes are missing. You may find portions of the screen that are only spaces that are drawn with a particular color/terminal attribute. For example, a some entry fields in character applications draw with the underline attribute using spaces for the output character.
Defining Rectangles:
Rectangles are used to define the portion of the screen being compared as well as any exclusion regions to be ignored.
If not otherwise specified, the rectangle will be created with the terminal's screen size. Any specified attributes will override the associated defaults for that same coordinate of the rectangle, but any unspecified attributes will still be defaulted.
There are 3 ways to specify a rectangle via attributes:
1. Reference to a well known "named" rectangle. This is accomplished by a named-rectangle attribute. The named rectangle will be looked up using ProjectIndex.getRectangle(). See Project Index Definition for more details.
2. Explicit Coordinates (by specifying the upper-left and lower-right points). Attribute names: left, right, top, bottom. Example:
<check-screen-buffer filename="my_screen.txt" wait="true" millis="5000" left="3" right="70" top="0" bottom="5" />
3. Relative Coordinates (by specifying the starting row/column and a height and width). Attribute names: row, column, height, width. Example:
<check-screen-buffer filename="my_screen.txt" wait="true" millis="5000" row="0" column="3" height="6" width="68" />
The above order is the order in which a rectangle is loaded. If there is a named-rectangle attribute, the first attempt is to find a named rectangle. If that fails, explicit coordinates are checked. Between options 2 and 3, preference is given to the explicit coordinates approach. If any of the attributes for that approach exist, then that is the method used. This means that any relative coordinates attributes that exist would be ignored in that case.
The origin of any rectangle is zero-based and (0,0) is the upper-left corner of the screen.
Specifying Exclusion Regions:
A list of 0 or more exclusion regions can be specified. To specify an exclusion region, use the exclude sub-element like this:
<exclude named-rectangle="rect_name" />
<exclude left="0" right="5" top="17" bottom="23" />
<exclude row="17" height="7" column="0" width="6" />
Note that any form of rectangle definition can be used in an exclusion definition. The list of exclusions can mix and match rectangle definitions, without any issue.
Contained Element(s)
line
exclude
Containing Element(s)
test
Attributes
| Name | Description | Required |
|---|---|---|
| bottom | Part of an "explicit coordinates" rectangle definition. The 0-based integer number of the row that is closest to the bottom of the screen. The origin is in the upper left of the screen so bottom is a larger number (or equal if the rectangle only covers a single row) than top. | N (defaults to one less than the screen height) |
| column | Part of a "relative coordinates" rectangle definition. The 0-based integer number of the leftmost column. To find the rightmost column number, add (height - 1) to the column value. | N (defaults to 0) |
| filename | A text string with the relative name of the text file that encodes the screen capture baseline. This baseline data represents a rectangle of screen text that can be as large as the entire terminal screen or as small as one character of one row. This value will be used in a search of the paths using ProjectIndex.findBaseLine(). This mechanism allows a partially qualified (or unqualified) filename to be found somewhere in the "baseline search path", making it possible to encode less path-specific knowledge into the directive. To control the search paths, please see Project Index Definition. |
N (except that either this or the value attribute or the line sub-elements must be present to provide the screen baseline data) |
| height | Part of a "relative coordinates" rectangle definition. The number of rows in the rectangle. | N (defaults to the screen height) |
| left | Part of an "explicit coordinates" rectangle definition. The 0-based integer number of the leftmost column. The origin is in the upper left of the screen so left is smaller than (or equal if the rectangle only covers a single column) than right. | N (defaults to 0) |
| millis | In wait mode this is the maximum number of milliseconds to wait for the specific screen to appear. Use -1 to for an indefinite wait (no timeout) and use 0 to check the current screen and immediately return. In non-wait mode, this is the number of milliseconds to wait for the first screen buffer to become available and that screen will be checked (and will immediately pass or fail on that screen's results without waiting further). Use -1 for an indefinite wait and 0 for no wait. Notice that 0 acts the same way regardless of the wait mode. |
N (defaults to 0) |
| named-rectangle | The text name of a rectangle as defined in the project index. Please see Project Index Definition. | N |
| repeat | A positive integer specifying the number of sequential duplicate instances of this step to include in the test. For example. if "5" is specified, then the step will be executed 5 times sequentially (and each step will be treated as a separate and independent step). If the 3rd repetition fails, then the reports will show that the first two instances succeeded and the 3rd failed and the last two were not run. This is a load-time construct that is not specific to this directive. The loading process will duplicate the step in the in-memory test definition and then each step (though loaded from the same definition) will be treated separately at runtime. |
N (defaults to 1) |
| right | Part of an "explicit coordinates" rectangle definition. The 0-based integer number of the rightmost column. The origin is in the upper left of the screen so left is larger than (or equal if the rectangle only covers a single column) than left. | N (defaults to the one less than the screen width) |
| row | Part of a "relative coordinates" rectangle definition. The 0-based integer number of the uppermost row. To find the bottom row number, add (width - 1) to the row value. | N (defaults to 0) |
| top | Part of an "explicit coordinates" rectangle definition. The 0-based integer number of the row that is closest to the top of the screen. The origin is in the upper left of the screen so top is a smaller number (or equal if the rectangle only covers a single row) than bottom. | N (defaults to 0) |
| value | A text string that provides a simple (one row) "rectangle" of data to compare against. | N (except that either this or the filename attribute or the line sub-elements must be present to provide the screen baseline data) |
| wait | Boolean "true" to enable wait mode and "false" to force non-wait mode. | N (defaults to true) |
| width | Part of a "relative coordinates" rectangle definition. The number of columns in the rectangle | N (defaults to the screen width) |
Example(s)
Wait up to 5 seconds for the baseline data in my_screen.txt to be received from the server. Assuming the screen size is 80 by 24, this comparison is with the entire screen.
<check-screen-buffer filename="my_screen.txt" wait="true" millis="5000" left="0" right="79" top="0" bottom="23" />
Same as the previous example, but with a different form of rectangle definition (assumes that "some_rectangle_name" is the name of a rectangle with the entire screen as its coordinates).
<check-screen-buffer filename="my_screen.txt" wait="true" millis="5000" named-rectangle="some_rectangle_name" />
Same as the previous example, but with a different form of rectangle definition.
<check-screen-buffer filename="my_screen.txt" wait="true" millis="5000" column="0" width="80" row="0" height="24" />
Wait up to 5 seconds for the baseline data in my_screen.txt to be received from the server. The comparison is only on a partial screen.
<check-screen-buffer filename="my_screen.txt" wait="true" millis="5000" left="3" right="70" top="0" bottom="5" />
Same as the previous example, but with a different form of rectangle definition.
<check-screen-buffer filename="my_screen.txt" wait="true" millis="5000" column="3" width="68" row="0" height="6" />
Wait up to 5 seconds for any screen to be available to check, then check that screen and either pass or fail based on the contents of the first screen to be available.
<check-screen-buffer filename="my_screen.txt" wait="false" millis="5000" left="0" right="79" top="0" bottom="23" />
Same as previous example.
<check-screen-buffer filename="my_screen.txt" millis="5000" left="0" right="79" top="0" bottom="23" />
Same with exclusions.
<check-screen-buffer filename="my_screen.txt" millis="5000" left="0" right="79" top="0" bottom="23">
   <exclude named-rectangle="rect_name" />
   <exclude left="0" right="5" top="17" bottom="23" />
   <exclude row="17" height="7" column="0" width="6" />
</check-screen-buffer>
Use of line sub-elements to specify the screen contents.
<check-screen-buffer wait="true" millis="5000" column="3" width="30" row="0" height="3">
   <line value="some text on the first line   " />
   <line value="2nd line of stuff ...sdshdkshd" />
   <line value="more more more motext 3rd line" />
</check-screen-buffer>
Same with a single exclusion (excludes the text "sdshdkshd").
<check-screen-buffer wait="true" millis="5000" column="3" width="30" row="0" height="3">
   <line value="some text on the first line   " />
   <line value="2nd line of stuff ...sdshdkshd" />
   <line value="more more more motext 3rd line" />
   <exclude row="1" column="24" height="1" width="9" />
</check-screen-buffer>
Use of the value attribute to specify the screen contents.
<check-screen-buffer wait="true" millis="5000" value="this is some text" row="20" column="3" />
Same with an exclusion that ignores the word "some".
<check-screen-buffer wait="true" millis="5000" value="this is some text" row="20" column="3">
   <exclude row="20" column="11" height="1" width="4" />
</check-screen-buffer>
check-variable
Element Tag
check-variable
Description
Check if the value of a boolean or Boolean variable is true. If it is true, the step will pass, if false the step will fail.
Contained Element(s)
none
Containing Element(s)
test
Attributes
| Name | Description | Required |
|---|---|---|
| name | The name of the boolean or Boolean variable to test. | Y |
| repeat | A positive integer specifying the number of sequential duplicate instances of this step to include in the test. For example. if "5" is specified, then the step will be executed 5 times sequentially (and each step will be treated as a separate and independent step). If the 3rd repetition fails, then the reports will show that the first two instances succeeded and the 3rd failed and the last two were not run. This is a load-time construct that is not specific to this directive. The loading process will duplicate the step in the in-memory test definition and then each step (though loaded from the same definition) will be treated separately at runtime. |
N (defaults to 1) |
Example(s)
<check-variable name="myBooleanVar" />
clear-screen-buffer
Element Tag
clear-screen-buffer
Description
Clear the buffered screen contents for the terminal so that the next screen change can be detected. This is useful in conjuntion with the wait-for-screen-buffer directive (when no text value is specified) or with the check-screen-buffer directive when in non-wait mode.
This does not clear the terminal screen. It just resets the buffered copy of the terminal screen so that the next time a new terminal screen is received, the new buffer will be non-null and can be easily detected as a change.
Contained Element(s)
none
Containing Element(s)
test
Attributes
| Name | Description | Required |
|---|---|---|
| repeat | A positive integer specifying the number of sequential duplicate instances of this step to include in the test. For example. if "5" is specified, then the step will be executed 5 times sequentially (and each step will be treated as a separate and independent step). If the 3rd repetition fails, then the reports will show that the first two instances succeeded and the 3rd failed and the last two were not run. This is a load-time construct that is not specific to this directive. The loading process will duplicate the step in the in-memory test definition and then each step (though loaded from the same definition) will be treated separately at runtime. |
N (defaults to 1) |
Example(s)
<clear-screen-buffer />
include
Element Tag
include
Description
Copy the contents of another test file into this one at this exact point in the XML tree. The <test> node of the included file is dropped and any contents are copied into this tree and executed in line.
This is not a Testable directive, but rather it will expand into some arbitrary number (1 or more) of directives that are contained in the included file.
Contained Element(s)
none
Containing Element(s)
test
Attributes
| Name | Description | Required |
|---|---|---|
| filename | A text string with the relative name of the test file to include. This value will be used in a search of the paths using ProjectIndex.findTest(). This mechanism allows a partial include filename to be found somewhere in the "test search path", making it possible to encode less path-specific knowledge into the directive. To control the search paths, please see Project Index Definition. |
Y |
| repeat | A positive integer specifying the number of sequential duplicate instances of this step to include in the test. For example. if "5" is specified, then the step will be executed 5 times sequentially (and each step will be treated as a separate and independent step). If the 3rd repetition fails, then the reports will show that the first two instances succeeded and the 3rd failed and the last two were not run. This is a load-time construct that is not specific to this directive. The loading process will duplicate the step in the in-memory test definition and then each step (though loaded from the same definition) will be treated separately at runtime. |
N (defaults to 1) |
Example(s)
<include filename="menus/check_some_menu.xml" />
junit-import
Element Tag
junit-import
Description
Import results of external test execution from a local filesystem to include them into Harness report.
Imported report is merged into Harness test-plan just before report generation - so it does not affect testing itself.
The legacy JUnit format consists of elements of three levels: testsuites/testsuite/testcase.
Harness allows for four levels: TestPlan/TestSuite/Test/TestStep.
The difference is lack of TestStep level in Junit which should be a report of every assertion in specific testcase.
Due to that following mapping has been implemented:
JUnit      -> Harness
testsuites -> TestPlan
testsuite  -> TestSuite
testcase   -> Test which consists single step JUnitTestcase
Note that every Harness Test report for imported Junit testcase@ consists of a single step indicating it was executed as *JUnit test.
There are 2 forms of junit-import:
1. The file name is hard coded into the value attribute. Whatever text is in that attribute will be output to the reports.
<junit-import filename="junit.xml" testset="start_tests_main"/>
2. Simple substitutions. The filename attribute is interpreted as a String.format() style format specification. A list of substitution sub-elements describes the variable names that are make up the parameter list to the String.format() processing of the specification. Note that each substitution element must have a variable attribute. The order of the variables is the order they will be substituted in. Just as with other substitutions, the variable data types must match the type specifiers in the format specification.
<junit-import filename="%s/%s" testset="start_tests_main">
   <substitution variable="testDirectory" />
   <substitution variable="resultsXml" />
</junit-import>
Contained Element(s)
none
Containing Element(s)
test
Attributes
| Name | Description | Required |
|---|---|---|
| filename | A text string with the relative name of the junit results file to import. If the file does not exists under specified file name the test will fail. |
Y |
| testset | Name of a test-set to import junit results file into. In case a test-set of a given name already exisits imported results will be merged into, otherwise a new test-set with provided name will be created. |
Y |
Example(s)
Import junit tests result from file junit.xml into test-set having a name start_tests_main.
<junit-import filename="junit.xml" testset="start_tests_main"/>
log
Element Tag
log
Description
Stores a text to be output into the reports. This is especially useful for debugging.
There are 2 forms:
1. The text is hard coded into the value attribute. Whatever text is in that attribute will be output to the reports.
<log value="Some hard coded text!" />
2. Simple substitutions. The value attribute is interpreted as a String.format() style format specification. A list of substitution sub-elements describes the variable names that are make up the parameter list to the String.format() processing of the specification. Note that each substitution element must have a variable attribute. The order of the variables is the order they will be substituted in. Just as with other substitutions, the variable data types must match the type specifiers in the format specification.
<log value="My great %s spec #%d!">
   <substitution variable="myTextVar" />
   <substitution variable="myNumberVar" />
</log>
If myTextVar is "format" and myNumberVar is 14, the output into the log would be "My great format spec #14!".
Contained Element(s)
none
Containing Element(s)
test
Attributes
| Name | Description | Required |
|---|---|---|
| repeat | A positive integer specifying the number of sequential duplicate instances of this step to include in the test. For example. if "5" is specified, then the step will be executed 5 times sequentially (and each step will be treated as a separate and independent step). If the 3rd repetition fails, then the reports will show that the first two instances succeeded and the 3rd failed and the last two were not run. This is a load-time construct that is not specific to this directive. The loading process will duplicate the step in the in-memory test definition and then each step (though loaded from the same definition) will be treated separately at runtime. |
N (defaults to 1) |
Example(s)
Output some hard coded text into the report.
<log value="Some hard coded text!" />
If myTextVar is "format" and myNumberVar is 14, the output into the log would be "My great format spec #14!".
<log value="My great %s spec #%d!">
   <substitution variable="myTextVar" />
   <substitution variable="myNumberVar" />
</log>
log-cursor-pos
Element Tag
log-cursor-pos
Description
Stores a copy of the current cursor row number and column number and when reports are generated, the these numbers will be output into the reports. This is especially useful for debugging.
Contained Element(s)
none
Containing Element(s)
test
Attributes
| Name | Description | Required |
|---|---|---|
| repeat | A positive integer specifying the number of sequential duplicate instances of this step to include in the test. For example. if "5" is specified, then the step will be executed 5 times sequentially (and each step will be treated as a separate and independent step). If the 3rd repetition fails, then the reports will show that the first two instances succeeded and the 3rd failed and the last two were not run. This is a load-time construct that is not specific to this directive. The loading process will duplicate the step in the in-memory test definition and then each step (though loaded from the same definition) will be treated separately at runtime. |
N (defaults to 1) |
Example(s)
<log-cursor-pos />
log-screen-buffer
Element Tag
log-screen-buffer
Description
Stores a copy of the current terminal screen and when reports are generated, the screen will be output into the reports. This is especially useful for debugging.
Contained Element(s)
none
Containing Element(s)
test
Attributes
| Name | Description | Required |
|---|---|---|
| repeat | A positive integer specifying the number of sequential duplicate instances of this step to include in the test. For example. if "5" is specified, then the step will be executed 5 times sequentially (and each step will be treated as a separate and independent step). If the 3rd repetition fails, then the reports will show that the first two instances succeeded and the 3rd failed and the last two were not run. This is a load-time construct that is not specific to this directive. The loading process will duplicate the step in the in-memory test definition and then each step (though loaded from the same definition) will be treated separately at runtime. |
N (defaults to 1) |
Example(s)
<log-screen-buffer />
pause
Element Tag
pause
Description
Suspend processing of the current thread for the specified number of milliseconds.
Contained Element(s)
none
Containing Element(s)
test
Attributes
| Name | Description | Required |
|---|---|---|
| millis | An integer specifying the number of milliseconds to pause. | Y |
| repeat | A positive integer specifying the number of sequential duplicate instances of this step to include in the test. For example. if "5" is specified, then the step will be executed 5 times sequentially (and each step will be treated as a separate and independent step). If the 3rd repetition fails, then the reports will show that the first two instances succeeded and the 3rd failed and the last two were not run. This is a load-time construct that is not specific to this directive. The loading process will duplicate the step in the in-memory test definition and then each step (though loaded from the same definition) will be treated separately at runtime. |
N (defaults to 1) |
Example(s)
Pause execution for 4.4 seconds.
<pause millis="4400" />
post-event-sem
Element Tag
post-event-sem
Description
Post the event semaphore (signal that the associated event has occurred). Increment the post count. If the semaphore state was previous "set" (it had a post count of 0 at the time of this step's execution), any waiting threads are unblocked. The optional reset attribute provides an auto-reset feature. This eliminates the need to reset the semaphore after a post by handling that reset automatically after all waiting threads are released.
Event semaphores provide safe signalling and coordination of a specific event across multiple threads. It is a concurrency primitive.
Event semaphores are created using a <create-event-sem> element in a <resource> element inside a test plan or a specific test set. See Test Plan Definition for more details. When created, an event semaphore can be in a "set" state (threads that call the wait-event-sem will block) or it can be in a "posted" state (the event has occurred and any threads that call wait-event-sem will immediately return).
The event can be triggered by calling post-event-sem which will release any currently waiting threads (threads blocked in wait-event-sem). Posting can occur 0 or more times before the state is reset via reset-event-sem. Reset causes the semaphore's state to be "set" again, no matter whether it was previously in a set or posted state. A post count is kept which is the number of times the event has been posted since the last reset. Each reset clears the post count to zero. The post count can be checked via check-post-count.
Contained Element(s)
none
Containing Element(s)
test
Attributes
| Name | Description | Required |
|---|---|---|
| name | A text string with the case-insensitive name of the semaphore. | Y |
| repeat | A positive integer specifying the number of sequential duplicate instances of this step to include in the test. For example. if "5" is specified, then the step will be executed 5 times sequentially (and each step will be treated as a separate and independent step). If the 3rd repetition fails, then the reports will show that the first two instances succeeded and the 3rd failed and the last two were not run. This is a load-time construct that is not specific to this directive. The loading process will duplicate the step in the in-memory test definition and then each step (though loaded from the same definition) will be treated separately at runtime. |
N (defaults to 1) |
| reset | A boolean flag. If true, then after all waiting threads are released, the semaphore will automatically reset to the "set" state. The next call to wait-event-sem would then block. | N (defaults to false) |
Example(s)
Cause the associated event to be signalled and any blocked threads to be released.
< post-event-sem name="myEventSem" />
read-cursor-pos
Element Tag
read-cursor-pos
Description
Reads the current row and/or column position of the cursor into the specified numeric variables. The variables must be able to accept integer data. At least one of the row or column variable names must be specified.
Contained Element(s)
none
Containing Element(s)
test
Attributes
| Name | Description | Required |
|---|---|---|
| column-variable | The variable name of a numeric variable that will be assigned the current cursor's column position when the step executes. | N (but if this is not specified, then the row-variable must be specified) |
| repeat | A positive integer specifying the number of sequential duplicate instances of this step to include in the test. For example. if "5" is specified, then the step will be executed 5 times sequentially (and each step will be treated as a separate and independent step). If the 3rd repetition fails, then the reports will show that the first two instances succeeded and the 3rd failed and the last two were not run. This is a load-time construct that is not specific to this directive. The loading process will duplicate the step in the in-memory test definition and then each step (though loaded from the same definition) will be treated separately at runtime. |
N (defaults to 1) |
| row-variable | The variable name of a numeric variable that will be assigned the current cursor's row position when the step executes. | N (but if this is not specified, then the column-variable must be specified) |
Example(s)
<read-cursor-post row-variable="myRowNum" column-variable="myColNum" />
read-string
Element Tag
read-string
Description
Reads text of a known size from the specified location on the screen. The text is assigned into the specified variable honoring any possible conversions from text inot the type of the variable. These conversions are done in the same manner as the initial value attribute of a variable definition. The content of the variable will be completely replaced.
This does not read text from multiple lines at once. This directive only reads from a single row on the screen. That is why there is no height attribute.
Contained Element(s)
none
Containing Element(s)
test
Attributes
| Name | Description | Required |
|---|---|---|
| column | The column of the first character to read. | Y |
| name | The variable name in which to assign the text. The content of the variable will be completely replaced. Any conversion from a string to the proper data type will be attempted. | Y |
| repeat | A positive integer specifying the number of sequential duplicate instances of this step to include in the test. For example. if "5" is specified, then the step will be executed 5 times sequentially (and each step will be treated as a separate and independent step). If the 3rd repetition fails, then the reports will show that the first two instances succeeded and the 3rd failed and the last two were not run. This is a load-time construct that is not specific to this directive. The loading process will duplicate the step in the in-memory test definition and then each step (though loaded from the same definition) will be treated separately at runtime. |
N (defaults to 1) |
| row | The row from which the data will be read. | Y |
| width | The number of characters to read. | Y |
Example(s)
<read-string name="myVar" row="5" column="1" width="4" />
release-mutex
Element Tag
release-mutex
Description
Releases ownership of the mutex semaphore.
Mutex (or mutual exclusion) semaphores are a tool for synchronizing access to a shared resource between two or more threads. To protect any given resource, make a call to acquire-mutex on the specific accessing thread before that thread reads, writes or otherwise accesses that resource. Any other thread which executes acquire-mutex will block while another thread has ownership. When access to the resource is finished, the thread must call release-mutex to relinquish its ownership. If there are threads blocked waiting for ownership at the time it is released, one of those threads will be unblocked and will obtain ownership before continuing.
Recursion is allowed and if acquire-mutex is called multiple times before release-mutex, then the use counter of the semaphore will be incremented but otherwise acquire-mutex will immediately return (because by definition, if acquire-mutex has been previously called without a corresponding release-mutex, then the current thread already owns the semaphore). To release ownership, the same number of release-mutex calls must occur as there were acquire-mutex. In other words, it is very important to pair up all calls to acquire-mutex with a corresponding call to release-mutex. Each release-mutex call decrements the use count. When the use count reaches zero, the ownership of the semaphore will be released (and another waiting thread, if any, will be unblocked and acquire ownership).
Mutex semaphores are created using a <create-mutex> element in a <resource> element inside a test plan or a specific test set. See Test Plan Definition for more details.
Contained Element(s)
none
Containing Element(s)
test
Attributes
| Name | Description | Required |
|---|---|---|
| name | A text string with the case-insensitive name of the semaphore. | Y |
| repeat | A positive integer specifying the number of sequential duplicate instances of this step to include in the test. For example. if "5" is specified, then the step will be executed 5 times sequentially (and each step will be treated as a separate and independent step). If the 3rd repetition fails, then the reports will show that the first two instances succeeded and the 3rd failed and the last two were not run. This is a load-time construct that is not specific to this directive. The loading process will duplicate the step in the in-memory test definition and then each step (though loaded from the same definition) will be treated separately at runtime. |
N (defaults to 1) |
Example(s)
<release-mutex name="myMutexSemaphore" />
reset-event-sem
Element Tag
reset-event-sem
Description
Reset the post count of the named event semaphore to 0 (shift the semaphore into "set" state). Subsequent invocations of wait-event-sem will block until the semaphore has been posted again using post-event-sem.
Event semaphores provide safe signalling and coordination of a specific event across multiple threads. It is a concurrency primitive.
Event semaphores are created using a <create-event-sem> element in a <resource> element inside a test plan or a specific test set. See Test Plan Definition for more details. When created, an event semaphore can be in a "set" state (threads that call the wait-event-sem will block) or it can be in a "posted" state (the event has occurred and any threads that call wait-event-sem will immediately return).
The event can be triggered by calling post-event-sem which will release any currently waiting threads (threads blocked in wait-event-sem). Posting can occur 0 or more times before the state is reset via reset-event-sem. Reset causes the semaphore's state to be "set" again, no matter whether it was previously in a set or posted state. A post count is kept which is the number of times the event has been posted since the last reset. Each reset clears the post count to zero. The post count can be checked via check-post-count.
Contained Element(s)
none
Containing Element(s)
test
Attributes
| Name | Description | Required |
|---|---|---|
| name | A text string with the case-insensitive name of the semaphore. | Y |
| repeat | A positive integer specifying the number of sequential duplicate instances of this step to include in the test. For example. if "5" is specified, then the step will be executed 5 times sequentially (and each step will be treated as a separate and independent step). If the 3rd repetition fails, then the reports will show that the first two instances succeeded and the 3rd failed and the last two were not run. This is a load-time construct that is not specific to this directive. The loading process will duplicate the step in the in-memory test definition and then each step (though loaded from the same definition) will be treated separately at runtime. |
N (defaults to 1) |
Example(s)
Cause the associated event semaphore to be reset.
< reset-event-sem name="myEventSem" />
rest
See Web Test Directive Reference.
run-code
Element Tag
run-code
Description
This directive allows arbitrary Java source code to be executed as a step in a test. Any named variables that are currently in-scope can be directly referenced (the values can be read and written). The variable access allows state to be stored and retrieved, and more importantly it allows state to be shared with other tests and other steps of this test (before and after this code runs).
The code is inserted inside a generated class that implements the interface DynamicCode. In particular, all of the specified code is treated as the core of the following method:
public void execute(Variable[] vars, Terminal term, StringBuilder sb);
The variable array is the list of named variables that are referenced in the embedded source code. During the loading process, the source code is inspected to find any matches to known named variables that are currently in scope (defined at the test plan, test set or inside the current test). These variables are gathered into this array and passed to the method. The generated method will have additional prefix code to create local variables of the same name, to copy the current value of each Variable into that local instance. Likewise in a finally block at the end of the generated method, the current value of the local variables will be copied back to the Variable instances to which they correspond. The vars[] is not something that is normally needed to be accessed directly. To be a valid reference, the name (on a case-sensitive basis) must exactly match the original name specified for the variable.
The Terminal variable provides direct, low-level access to the primitives for accessing the target system. Use this at your own peril, as it would be easy to corrupt the state of that instance which would potentially cause problems (maybe subtle and hard to detect) downstream on this same thread.
The StringBuilder instance is provided to allow arbitrary text to be placed into the HTML report output that is associated with this step.
The Java code is encoded inside a CDATA section which is a child node of the run-code element. Here is an example:
   <run-code >
      <import value="java.util.*" />
      <![CDATA[
         ArrayList<String> myList = new ArrayList<String>();

         myList.add(String.format("%d", bogus1));
         myList.add(String.format("%d", bogus2));
         myList.add(String.format("%s", bogus3));

         Iterator<String> iter = myList.iterator();

         while (iter.hasNext())
         {
            sb.append("stuff ").append(iter.next()).append("\n");
         }
         bogus3 = sb.toString();
         shouldIStayOrShouldIGo = true;
         /* throw new RuntimeException("Bad mojo! This test will fail if this is thrown."); */
      ]]>
   </run-code>
There may only be 1 CDATA section. The source code that is placed in this section can be any valid Java source code with the following restrictions:
- Do not place any class definitions or the method signature in the code. The class definition and both the beginning and end of the method will be generated automatically. ONLY THE METHOD BODY ITSELF can be specified.
- Named harness variables that are currently in scope can be directly referenced WITHOUT ANY NEED TO DEFINE THEM IN THE EMBEDDED JAVA CODE. In fact, you MUST NOT try to duplicate or hide any of these named variables by adding conflicting variable definitions of the same name. This is because corresponding definitions will be automatically generated and these will cause the embedded code to fail Java compilation. The types of the variables will be exactly the same as the type originally specified in the XML variable definition.
- Note that in the example above, the following are named variable references (of different types):
- bogus1
- bogus2
- bogus3
- shouldIStayOrShouldIGo
- Any valid method body code is OK, including non-conflicting variable definitions, embedded try/catch/finally blocks and arbitrary control flow/logic/expression processing and static and instance method calls to other classes.
- The step will pass so long as no exceptions are thrown. If you want to fail the test, just throw an exception.
- No checked exceptions may be thrown (because the DynamicCode interface is not defined to allow it). For this reason, use RuntimeException (or sub-classes) to fail a test.
Any code that requires import statements in Java will require import statements here, except for the following packages which are always imported:
- com.goldencode.harness.*
- com.goldencode.harness.terminal.*
- com.goldencode.harness.test.*
To specify your own import, use a sub-element of run-code such as the following (there must be a single value attribute without the import keyword and without the following semicolon):
<import value="java.util.*" />
There can be 0 or more import elements specified, depending solely on the needs of the embedded code.
On a failure or anytime the debug attribute is set to true, the entire source code of the generated class will be output into the HTML report. This is very useful for debugging problems with the embedded code.
Contained Element(s)
import
CDATA
Containing Element(s)
test
Attributes
| Name | Description | Required |
|---|---|---|
| debug | A boolean which if true, specifies if the source code for the generated class should be output into the result reports for debugging purposes. |
N (defaults to false) |
| description | A description of what the code is suppose to do. | N |
| repeat | A positive integer specifying the number of sequential duplicate instances of this step to include in the test. For example. if "5" is specified, then the step will be executed 5 times sequentially (and each step will be treated as a separate and independent step). If the 3rd repetition fails, then the reports will show that the first two instances succeeded and the 3rd failed and the last two were not run. This is a load-time construct that is not specific to this directive. The loading process will duplicate the step in the in-memory test definition and then each step (though loaded from the same definition) will be treated separately at runtime. |
N (defaults to 1) |
Example(s)
Calculate a custom date format using named variables and store it back into a named variable.
<run-code description="Calculate a formatted date value using queried variables." >
   <import value="java.util.*" />
   <![CDATA[
      myDateInput = String.format("%Tm/%Td/%TY", myMonthVar, myDayVar, myYearVar);
   ]]>
</run-code>
Check state from named variables and fail the test if specific conditions aren't held.
<run-code debug="true" description="Check that something or other has happened." >
   <import value="java.util.*" />
   <![CDATA[
      int someNum = myNum1 + myNum2 + Math.min(myNum3, myNum4);

      if (someNum < 0)
      {
         throw new RuntimeException(String.format("Invalid someNum %d!", someNum));
      }
   ]]>
</run-code>
Global variables with System Properties
Harness does not support global variables nor variables shared between client sessions in order to avoid concurrency issues. For specific scenarios that require limited global/shared variables one of possible ways of implementation is to support them with System Properties. This way allows for providing variables initial values with -Dproperty=value on harness command line. As this code needs to synchronized its strongly recommended to retrieve global variables only during scenario initialization and copy its values to script variables to avoid unnecesary scripts locking.
   <variable name="sessionNumber" type="long" />
   <run-code>
      <![CDATA[
         int sessionPort = 2190;
         synchronized(System.class)
         {
            String sessionId = System.getProperty("debugClientPort");
            if (sessionId != null)
            {
               sessionPort = Integer.parseInt(sessionId);
            }
            sessionNumber = sessionPort ++;
            System.setProperty("debugClientPort", Integer.toString(sessionPort));
         }
      ]]>
   </run-code>
The script can be used to spawn client sessions in remote debug mode with preconfigured port range in following way:
   <send-text special="VK_ENTER">
      <substitution name="value" spec="%s%sclient/client.sh -i%d -d%d " >
         <parameter variable="buildPath" />
         <parameter variable="runDir" />
         <parameter variable="instanceNum" />
         <parameter variable="sessionNumber" />
      </substitution>
   </send-text>
send-special-key
Element Tag
send-special-key
Description
Send a single key to the server from a limited list of symbolic special keys.
There are 2 forms for specifying the parmeters, which can be intermixed. The first form is to hard code the parameters via attributes of the send-special-key element. The second form allows specific parameters to be specified as runtime substitutions (using named variables).
Runtime Substitutions:
The way the second form works is via substitution sub-elements. Each substitution sub-element has a name attribute, a spec attribute and then a list of contained parameter sub-elements which identify the variable names that will be substituted. Each parameter sub-element must have a variable attribute.
For example:
<send-special-key>
   <substitution name="value" spec="VK_F%d" >
      <parameter variable="namedVar1" />
   </substitution>
</send-special-key>
The name attribute specifies the directive's variable which will be calculated at runtime. In this example, instead of using a hard-coded value attribute in the send-special-key element, the value variable will be replaced with a version calculated at the time the directive executes (and NOT at the time the directive is loaded/instantiated).
The spec attribute is a String.format() style format string specifier (similar to printf() in C, but this is the Java equivalent). This spec will be processed at runtime with the list of substitution parameters as defined in the parameter sub-elements. Those parameter elements must have a variable attribute that has the variable name that is referenced. The order of the parameters is the order of the variables will be passed to the String.format() method. The data types of each of the variables must match the type of the format specifier in the spec. For example, the first format specifier in the example spec is %s will be substituted with the first variable, which must be a String. The second specifier is %d so the second substitution parameter must be the name of a variable which is a number.
If namedVar1 is an int with the value 4, then the key sent over to the server will be equivalent of the symbolic name "VK_F4". The value of these variables will be read at the moment this directive is executed, not before. Thus, as long as the state of the variables are properly maintained by previous steps, the results can be used in crafting keystroke input.
All of the variables can be modified at runtime with this technique except for "repeat" which is load time construct:
- minimum
- modifiers
- timeout
- value
See the attributes list below for details on the meaning of each variable.
The test developer may arbitrarily code some or all variables as attributes and some or all via substitutions. Hard coding is simpler but substitutions provide complete flexibility. Mixing and matching gives the best of both worlds.
Drain Mode:
This directive offers a useful synchronization primitive, called drain mode. This facility allows the directive to detect when screen changes have been made in response to the sent keys. When all screen changes have been processed and the terminal has no more screen output to read, then the directive will complete. This draining facility is purely optional and is specified by providing a maximum timeout and the number of bytes to watch for.
If the timeout value is specified, drain mode synching will be enabled. In this mode, before any keys are sent, the terminal's counter of read bytes (the drain counter) will be reset to zero. Then after the keys are sent, the drain counter will be polled to detect when any bytes are read. Once the minimum number of bytes have been read and one polling interval has elapsed without any additional bytes being read, then the terminal will be determined to have drained all output that was
caused by the sent keys. At that point the directive will complete. This is a useful synching mechanism to use in place of a specific screen check. In particular, it allows a more complex set of key input to be specified in between screen checks without danger of overrunning the terminal or getting out of synch. It also can replace the less flexible fixed pause directive when used for the same purpose (waiting for the expected output of some sent keys before doing something else like sending more keys).
To provide some safety, a timeout is also specified. This is the maximum number of milliseconds to wait for draining to occur. If the expected bytes are not read by that time, then the step will be placed into FAILED status. It is ignored if drain mode is not active.
Contained Element(s)
substitution
Containing Element(s)
test
Attributes
| Name | Description | Required |
|---|---|---|
| minimum | In drain mode, this is the minimum number of bytes to read from the back end before the timeout occurs. | N (defaults to 0 in drain mode, ignored if not in drain mode) |
| modifiers | This is a comma-separated list, including any of the following values: • CTRL • ALT • SHIFT These keys will be encoded as modifiers (which can occur in any combination) and will be sent with each of the keys. For example, if the value attribute is set to "rt" and the modifiers attribute is set to "CTRL,ALT", the result would be the same as if the user typed CTRL+ALT+r and then CTRL+ALT+t. Modifiers cannot be sent as a separate key (by themselves). Rather they are considered as pressed or not pressed during the processing of another key. For more details on modifiers, please see modifiers. |
N (by default no modifiers are sent) |
| repeat | A positive integer specifying the number of sequential duplicate instances of this step to include in the test. For example. if "5" is specified, then the step will be executed 5 times sequentially (and each step will be treated as a separate and independent step). If the 3rd repetition fails, then the reports will show that the first two instances succeeded and the 3rd failed and the last two were not run. This is a load-time construct that is not specific to this directive. The loading process will duplicate the step in the in-memory test definition and then each step (though loaded from the same definition) will be treated separately at runtime. |
N (defaults to 1) |
| timeout | Enables "drain" mode. This is a synchronization primitive. The timeout is the maximum number of milliseconds to wait for draining to occur. Use -1 for an indefinite wait (it never times out). Otherwise this needs to be a positive number large enough to safelyread the minimum number of expected bytes of output. See minimum attribute below. | N (defaults to no draining) |
| value | One of the following symbolic names: • VK_ESCAPE • VK_F1 • VK_F2 • VK_F3 • VK_F4 • VK_F5 • VK_F6 • VK_F7 • VK_F8 • VK_F9 • VK_F10 • VK_F11 • VK_F12 • VK_UP • VK_DOWN • VK_LEFT • VK_RIGHT • VK_PAGE_DOWN • VK_PAGE_UP • VK_INSERT • VK_DELETE • VK_BACK_SPACE • VK_HOME • VK_END • VK_NUM_LOCK - note that this key does nothing today (nothing is sent to the back-end) • VK_CAPS_LOCK - note that this key does nothing today (nothing is sent to the back-end) • VK_PAUSE - note that this key does nothing today (nothing is sent to the back-end) • VK_TAB • VK_ENTER For keys where there is a printable equivalent, please use the send-text directive. |
Y |
Example(s)
Sends an enter key to the server.
<send-special-key value=="VK_ENTER" />
This will have the same effect as the last example, except directive processing will wait up to 5 seconds for 50 bytes to be read. If they are read in that time period (and the terminal is not sending any more data), then the test will complete (and it will be in a PASSED status). If less than 50 bytes are read by the 5 second timeout, then the directive will complete, but it will be placed in FAILED status.
<send-special-key value="VK_ENTER" timeout="5000" minimum="50" />
This sends the "ALT-ESC" key.
<send-special-key value="VK_ESCAPE" modifiers="ALT" />
This sends the "CTRL-ALT-DEL" key.
<send-special-key value="VK_DELETE" modifiers="CTRL,ALT" />
Runtime substitution example.
<send-special-key>
   <substitution name="value" spec="%s">
      <parameter variable="mySymbolicKeyNameVar" />
   </substitution>
</send-special-key>
send-text
Element Tag
send-text
Description
Send the contents of a text string to the server. Each character in the string is sent as a separate. Each key will be delayed for 50ms, if the delay parameter is less than 50ms; else, the specified delay is used.
There are 2 forms for specifying the parmeters, which can be intermixed. The first form is to hard code the parameters via attributes of the send-text element. The second form allows specific parameters to be specified as runtime substitutions (using named variables).
Runtime Substitutions:
The way the second form works is via substitution sub-elements. Each substitution sub-element has a name attribute, a spec attribute and then a list of contained parameter sub-elements which identify the variable names that will be substituted. Each parameter sub-element must have a variable attribute.
For example:
<send-text>
   <substitution name="value" spec="Here %s hard coded stuff then a number %d!" >
      <parameter variable="namedVar1" />
      <parameter variable="namedVar2" />
   </substitution>
</send-text>
The name attribute specifies the directive's variable which will be calculated at runtime. In this example, instead of using a hard-coded value attribute in the send-text element, the value variable will be replaced with a version calculated at the time the directive executes (and NOT at the time the directive is loaded/instantiated).
The spec attribute is a String.format() style format string specifier (similar to printf() in C, but this is the Java equivalent). This spec will be processed at runtime with the list of substitution parameters as defined in the parameter sub-elements. Those parameter elements must have a variable attribute that has the variable name that is referenced. The order of the parameters is the order of the variables will be passed to the String.format() method. The data types of each of the variables must match the type of the format specifier in the spec. For example, the first format specifier in the example spec is %s will be substituted with the first variable, which must be a String. The second specifier is %d so the second substitution parameter must be the name of a variable which is a number.
If namedVar1 is a String variable with the text "is" and namedVar2 is an int with the value 14, then the text sent over to the server will be "Here is hard coded stuff then a number 14!". The value of these variables will be read at the moment this directive is executed, not before. Thus, as long as the state of the variables are properly maintained by previous steps, the results can be used in crafting keystroke input.
All of the variables can be modified at runtime with this technique except for "repeat" which is load time construct:
- delay
- minimum
- modifiers
- special
- timeout
- value
See the attributes list below for details on the meaning of each variable.
The test developer may arbitrarily code some or all variables as attributes and some or all via substitutions. Hard coding is simpler but substitutions provide complete flexibility. Mixing and matching gives the best of both worlds.
Modifiers:
This is a comma-separated list, including any of the following values:
- CTRL
- ALT
- SHIFT
In general, these keys will be encoded as modifiers (which can occur in any combination) and will be sent with each of the keys. For example, if the value attribute is set to "rt" and the modifiers attribute is set to "CTRL,ALT", the result would be the same as if the user typed CTRL+ALT+r and then CTRL+ALT+t.
There are limitations to this processing. In particular, the base classes (vt320.java) for the Terminal class will limit how modifiers are used as does the terminal type being used.
In vt220 and vt320, the following is a summary of how modifiers are implemented:
- Special Keys
- The current implementation only has encodings to handle the following modified special keys:
- VK_TAB + SHIFT (this sends an extra escape sequence which is equivalent to VK_F1 before the TAB is sent)
- The vt320.java class has a facility to allow custom escape sequences to be defined for all special keys and the combinations of a single modifier with the special key. However, other than the above, no such encoding are present in the current implementation. Nor does the current implementation provide access to the custom encoding mechanism.
- In any case, the JTA code (vt320.java) has no support for multiple modifiers in combination with a special key. So CTRL+ALT+VK_ENTER is meaningless. Instead what happens is that if ALT is present, it is honored. If ALT is not present, then CTRL is honored. If ALT and CTRL are both not present, then SHIFT is honored.
- Except in the above documented encodings, when a modifier is present, the default encoding of "" (empty string) will be sent to the back-end.
- In the cases of VK_NUM_LOCK, VK_CAPS_LOCK and VK_PAUSE, a modified form is never sent to the server (even as ""). Even the non-modified encoding is a no-operation (it is a dead key and nothing is sent to the back-end).
- The current implementation only has encodings to handle the following modified special keys:
- Regular Keys
- ALT - since keys that are sent are from the 7-bit ASCII range, in 8-bit mode there is a single bit left to represent a modifier. If ALT is specified as a modifier, then 0x80 is OR'd into the 7-bit integer value of the key character. This resulting 8-bit value is sent to the server.
- SHIFT - There is no support for sending the shift to the back-end. If an uppercase letter or the shift-accessible alternate character is needed, just drop the SHIFT modifier and encode the exact character directly into the text string. For example, SHIFT as a modifier to "=" will NOT be equivalent to the "+" character (as it would be on a standard U.S. keyboard). However, all visible text that can be generated with SHIFT and a key can be hard coded into the text string and sent.
- CTRL - terminals see some (CTRL + character) combinations as a modified integer code (key character). The known combinations are converted and sent to the back-end as single keys (integer codes). For example, CTRL + c (or CTRL + C) is sent as the decimal integer 3 (as opposed to the numeric digit '3' which is the decimal integer 51). Note that in conversion, case is ignored. So 'c' and 'C' are the same. The following are supported (CTRL+ character) combinations and the integer value to which they are converted (after the " -> "):
- @ -> 0
- A -> 1
- B -> 2
- C -> 3
- D -> 4
- E -> 5
- F -> 6
- G -> 7
- H -> 8
- I -> 9
- J -> 10
- K -> 11
- L -> 12
- M -> 13
- N -> 14
- O -> 15
- P -> 16
- Q -> 17
- R -> 18
- S -> 19
- T -> 20
- U -> 21
- V -> 22
- W -> 23
- X -> 24
- Y -> 25
- Z -> 26
- [ -> 27
- \ -> 28
- ] -> 29
- ^ -> 30
- _ -> 31
- ? -> 127
Modifiers cannot be sent as a separate key (by themselves). Rather they are considered as pressed or not pressed during the processing of another key.
Drain Mode:
This directive offers a useful synchronization primitive, called drain mode. This facility allows the directive to detect when screen changes have been made in response to the sent keys. When all screen changes have been processed and the terminal has no more screen output to read, then the directive will complete. This draining facility is purely optional and is specified by providing a maximum timeout and the number of bytes to watch for.
If the timeout value is specified, drain mode synching will be enabled. In this mode, before any keys are sent, the terminal's counter of read bytes (the drain counter) will be reset to zero. Then after the keys are sent, the drain counter will be polled to detect when any bytes are read. Once the minimum number of bytes have been read and one polling interval has elapsed without any additional bytes being read, then the terminal will be determined to have drained all output that was
caused by the sent keys. At that point the directive will complete. This is a useful synching mechanism to use in place of a specific screen check. In particular, it allows a more complex set of key input to be specified in between screen checks without danger of overrunning the terminal or getting out of synch. It also can replace the less flexible fixed pause directive when used for the same purpose (waiting for the expected output of some sent keys before doing something else like sending more keys).
To provide some safety, a timeout is also specified. This is the maximum number of milliseconds to wait for draining to occur. If the expected bytes are not read by that time, then the step will be placed into FAILED status. It is ignored if drain mode is not active.
Contained Element(s)
substitution
Containing Element(s)
test
Attributes
| Name | Description | Required |
|---|---|---|
| delay | An integer value of milliseconds to pause after each key that is sent. Use a non-positive number to mean "no delay". | N (defaults to 0) |
| modifiers | This is a comma-separated list, including any of the following values: • CTRL • ALT • SHIFT These keys will be encoded as modifiers (which can occur in any combination) and will be sent with each of the keys. For example, if the value attribute is set to "rt" and the modifiers attribute is set to "CTRL,ALT", the result would be the same as if the user typed CTRL+ALT+r and then CTRL+ALT+t. Modifiers cannot be sent as a separate key (by themselves). Rather they are considered as pressed or not pressed during the processing of another key. For more details on modifiers, please see modifiers. |
N (by default no modifiers are sent) |
| repeat | A positive integer specifying the number of sequential duplicate instances of this step to include in the test. For example. if "5" is specified, then the step will be executed 5 times sequentially (and each step will be treated as a separate and independent step). If the 3rd repetition fails, then the reports will show that the first two instances succeeded and the 3rd failed and the last two were not run. This is a load-time construct that is not specific to this directive. The loading process will duplicate the step in the in-memory test definition and then each step (though loaded from the same definition) will be treated separately at runtime. |
N (defaults to 1) |
| special | The symbolic name of the special key that is sent after all other keys are sent. This can be useful for cases like shell command lines which always need to be finished with an ENTER key (VK_ENTER as the symbolic name). This can be used to eliminate a separate following send-special-key step. See that directive for the valid symbolic names. Note that the same modifiers are sent with the special key are are specified for the rest of the keystrokes. |
N (defaults to no special key sent) |
| timeout | Enables "drain" mode. This is a synchronization primitive. The timeout is the maximum number of milliseconds to wait for draining to occur. Use -1 for an indefinite wait (it never times out). Otherwise this needs to be a positive number large enough to safelyread the minimum number of expected bytes of output. See minimum attribute below. | N (defaults to no draining) |
| value | Any character string. Each character in the string (which by definition must be some kind of printable character that can be typed on the keyboard) will be sent to the server as a separate key. This allows any printable key on the keyboard (any of the alpha-numeric keys, punctuation, spaces) to be sent. The string has no limits on the number of characters so long as there is at least 1 character in the string. For keys where there is no printable equivalent, please use the send-special-key directive. |
Y |
Example(s)
In Linux this would be a possible bash shell command to display the contents of the current directory in long form.
<send-text value="ls -l" special="VK_ENTER" />
In Linux this would have the same effect as the last example, except directive processing will wait up to 5 seconds for 50 bytes to be read. If they are read in that time period (and the terminal is not sending any more data), then the test will complete (and it will be in a PASSED status). If less than 50 bytes are read by the 5 second timeout, then the directive will complete, but it will be placed in FAILED status.
<send-text value="ls -l" special="VK_ENTER" timeout="5000" minimum="50" />
This sends the "r" key 5 times pausing for half a second after each sent key (before the next one is sent).
<send-text value="r" delay="500" repeat="5" />
This does the same thing as the last example.
<send-text value="rrrrr" delay="500" />
This sends a CTRL-C key sequence to the server.
<send-text value="c" modifiers="CTRL" />
This has some hard coded attributes and some substitutions. It also shows that numeric, boolean and other variables can be replaced via substitution as well.
<send-text value="c" modifiers="CTRL" timeout="10540" >
   <substitution name="delay" spec="%d">
      <parameter variable="myNumericVar" />
   </substitution>
   <substitution name="minimum" spec="%d">
      <parameter variable="myOtherNumericVar" />
   </substitution>
</send-text>
This shows a more complex substitution where custom formatted data is emitted as the value. This simulates creation of a date-like piece of text which is sent to the server one key at a time and then followed by a TAB key.
<send-text special="VK_TAB" >
   <substitution name="value" spec="%02d/%02d/%04d">
      <parameter variable="myMonthNum" />
      <parameter variable="myDayNum" />
      <parameter variable="myYearNum" />
   </substitution>
</send-text>
SFTP
Element Tag
sftp
Description
SFTP processing is handled as a related set of directives that form a single SFTP "session". This directive establishes the grouping of those directives, which all must be coded as sub-elements of the sftp element.
There is no configuration of the SFTP connection parameters. Instead, the same target system and authentication data (e.g. userid and password) are used to establish the SFTP session.
As part of this directive's processing, there is an implicit SFTP connect and disconnect that get created as steps in the test. In between these two will be a step for each sub-element which are the actual SFTP commands that do useful work.
Contained Element(s)
cd
get
lcd
lpwd
ls
mkdir
pwd
put
rename
rm
rmdir
symlink
Containing Element(s)
test
Attributes
| Name | Description | Required |
|---|---|---|
| repeat | A positive integer specifying the number of sequential duplicate instances of this step to include in the test. For example. if "5" is specified, then the step will be executed 5 time sequentially (and each step will be treated as a separate and independent step). If the 3rd repetition fails, then the reports will show that the first two instances succeeded and the 3rd failed and the last two were not run. This is a load-time construct that is not specific to this directive. The loading process will duplicate the step in the in-memory test definition and then each step (though loaded from the same definition) will be treated separately at runtime. |
N (defaults to 1) |
Example(s)
Display a listing of the remote current directory. The transfer a file to the local system from the target system (in the current directory).
< sftp>
   <ls path="." />
   <get remote="subdir/some_file.txt" />
</sftp>
cd
Element Tag
cd
Description
Change the target system's current directory to the given path. This is useful to allow all subsequent commands to operate with less explicit pathing data.
Contained Element(s)
none
Containing Element(s)
sftp
Attributes
| Name | Description | Required |
|---|---|---|
| path | The absolute or relative path of the directory to make the current directory. | Y |
| repeat | A positive integer specifying the number of sequential duplicate instances of this step to include in the test. For example. if "5" is specified, then the step will be executed 5 time sequentially (and each step will be treated as a separate and independent step). If the 3rd repetition fails, then the reports will show that the first two instances succeeded and the 3rd failed and the last two were not run. This is a load-time construct that is not specific to this directive. The loading process will duplicate the step in the in-memory test definition and then each step (though loaded from the same definition) will be treated separately at runtime. |
N (defaults to 1) |
Example(s)
Move the current directory up one level (to the parent directory).
< sftp>
   <cd path=".." />
</sftp>
Move the current directory to the specified absolute directory.
< sftp>
   <cd path="/some/path/from/the/root" />
</sftp>
Move the current directory to the specified relative directory.
< sftp>
   <cd path="some/path/under/the/current/dir" />
</sftp>
get
Element Tag
get
Description
Transfer a file, a set of files (by wildcard specification in the filename) or a directory (and its contents) from the target system to the local system. Filenames can be relative or absolute and may include wildcards.
Contained Element(s)
none
Containing Element(s)
sftp
Attributes
| Name | Description | Required |
|---|---|---|
| local | Specifies the absolute or relative (to the current directory) local filename or directory name for the tranfer. If the remote file specification is a single file, this can be omitted. In that case the same file name in the current directory will be used as the local filename. If the remote file specification is multiple files, this must not be omitted. It must be a relative or absolute directory name in which the multiple files will be transferred. If the remote file specification is a directory, this can be omitted and the current directory will be used. Otherwise it should be the local directory that is the counterpart for the transferred files. In any case this is omitted, the local name will act as if it was specified as the same exact string as the remote specification. That is why when wildcards are used, the local name should be explicitly specified. |
N |
| remote | Specifies the absolute or relative (to the current directory) filename or directory name on the target system which should be tranferred to the local system. A single file can be specified. Wildcards can be used to make the specification target multiple files. A directory can be specified to copy the entire contents of that directory. |
Y |
| repeat | A positive integer specifying the number of sequential duplicate instances of this step to include in the test. For example. if "5" is specified, then the step will be executed 5 time sequentially (and each step will be treated as a separate and independent step). If the 3rd repetition fails, then the reports will show that the first two instances succeeded and the 3rd failed and the last two were not run. This is a load-time construct that is not specific to this directive. The loading process will duplicate the step in the in-memory test definition and then each step (though loaded from the same definition) will be treated separately at runtime. |
N (defaults to 1) |
Example(s)
Transfer a single file from the current directory on the target system to a file of the same name in the current directory on the local system.
< sftp>
   <get remote="some_file.java" />
</sftp>
Transfer a single file relative to the current directory on the target system to a file of the same name (and path) relative to the current directory on the local system.
< sftp>
   <get remote="path/to/some_file.java" />
</sftp>
Transfer a single absolute file on the target system to the same absolute file on the local system.
< sftp>
   <get remote="/absolute/path/to/some_file.java" />
</sftp>
Transfer a single file from the current directory on the target system to a file of the same name in the current directory on the local system.
< sftp>
   <get remote="some_file.txt" local="some_file.txt" />
</sftp>
Transfer a single file from the current directory on the target system to a file of the same name in a specified path relative to the current directory on the local system.
< sftp>
   <get remote="some_file.txt" local="some/path/some_file.txt" />
</sftp>
Transfer a single file relative to the current directory on the target system to a file of the same name in a different specified path relative to the current directory on the local system.
< sftp>
   <get remote="path/to/some_file.java" local="some/other/path/some_file.txt" />
</sftp>
Transfer a single absolute file from the target system to a file of the same name in a different absolute path on the local system.
< sftp>
   <get remote="/absolute/path/to/some_file.java" local="/absolute/other/path/some_file.txt" />
</sftp>
Transfer all files whose names end in ".log" in the current directory on the target system to the specified relative directory on the local system.
< sftp>
   <get remote="*.log" local="stuff/" />
</sftp>
lcd
Element Tag
lcd
Description
Change the local system's current directory to the given path. This is useful to establish a specific upload from or download to directory (as the default) or to otherwise reduce the amount of pathing needed for subsequent commands.
Contained Element(s)
none
Containing Element(s)
sftp
Attributes
| Name | Description | Required |
|---|---|---|
| path | The absolute or relative path of the directory to make the current directory. | Y |
| repeat | A positive integer specifying the number of sequential duplicate instances of this step to include in the test. For example. if "5" is specified, then the step will be executed 5 time sequentially (and each step will be treated as a separate and independent step). If the 3rd repetition fails, then the reports will show that the first two instances succeeded and the 3rd failed and the last two were not run. This is a load-time construct that is not specific to this directive. The loading process will duplicate the step in the in-memory test definition and then each step (though loaded from the same definition) will be treated separately at runtime. |
N (defaults to 1) |
Example(s)
Move the current directory up one level (to the parent directory).
< sftp>
   <lcd path=".." />
</sftp>
Move the current directory to the specified absolute directory.
< sftp>
   <lcd path="/some/path/from/the/root" />
</sftp>
Move the current directory to the specified relative directory.
< sftp>
   <lcd path="some/path/under/the/current/dir" />
</sftp>
lpwd
Element Tag
lpwd
Description
Output the current directory of the local system into the HTML reports.
Contained Element(s)
none
Containing Element(s)
sftp
Attributes
| Name | Description | Required |
|---|---|---|
| repeat | A positive integer specifying the number of sequential duplicate instances of this step to include in the test. For example. if "5" is specified, then the step will be executed 5 time sequentially (and each step will be treated as a separate and independent step). If the 3rd repetition fails, then the reports will show that the first two instances succeeded and the 3rd failed and the last two were not run. This is a load-time construct that is not specific to this directive. The loading process will duplicate the step in the in-memory test definition and then each step (though loaded from the same definition) will be treated separately at runtime. |
N (defaults to 1) |
Example(s)
< sftp>
   <lpwd />
</sftp>
ls
Element Tag
ls
Description
Output a detailed directory listing of the path on the target system into the HTML reports.
Contained Element(s)
none
Containing Element(s)
sftp
Attributes
| Name | Description | Required |
|---|---|---|
| path | The relative or absolute directory or file name on the target system to query. Use "." to query the current directory. | Y |
| repeat | A positive integer specifying the number of sequential duplicate instances of this step to include in the test. For example. if "5" is specified, then the step will be executed 5 time sequentially (and each step will be treated as a separate and independent step). If the 3rd repetition fails, then the reports will show that the first two instances succeeded and the 3rd failed and the last two were not run. This is a load-time construct that is not specific to this directive. The loading process will duplicate the step in the in-memory test definition and then each step (though loaded from the same definition) will be treated separately at runtime. |
N (defaults to 1) |
Example(s)
Add a detailed directory listing of the current directory (on the target system) to the HTML reports.
< sftp>
   <ls path="." />
</sftp>
Add a detailed directory listing of a path relative to the current directory (on the target system) to the HTML reports.
< sftp>
   <ls path="some/relative/dir/" />
</sftp>
Add a detailed directory listing of a absolute file (on the target system) to the HTML reports.
< sftp>
   <ls path="/absolute/path/to/query.txt" />
</sftp>
mkdir
Element Tag
mkdir
Description
Create a new directory with the specified relative or absolute path on the target system.
All path segments except for the final segment must already exist as valid directories.
Contained Element(s)
none
Containing Element(s)
sftp
Attributes
| Name | Description | Required |
|---|---|---|
| path | The relative or absolute directory path to create on the target system. | Y |
| repeat | A positive integer specifying the number of sequential duplicate instances of this step to include in the test. For example. if "5" is specified, then the step will be executed 5 time sequentially (and each step will be treated as a separate and independent step). If the 3rd repetition fails, then the reports will show that the first two instances succeeded and the 3rd failed and the last two were not run. This is a load-time construct that is not specific to this directive. The loading process will duplicate the step in the in-memory test definition and then each step (though loaded from the same definition) will be treated separately at runtime. |
N (defaults to 1) |
Example(s)
Create a directory relative to the current directory on the target system.
< sftp>
   <mkdir path="some_new_path/" />
</sftp>
Create a new absolute directory on the target system.
< sftp>
   <mkdir path="/absolute/new/path/" />
</sftp>
pwd
Element Tag
pwd
Description
Output the current directory of the target system into the HTML reports.
Contained Element(s)
none
Containing Element(s)
sftp
Attributes
| Name | Description | Required |
|---|---|---|
| repeat | A positive integer specifying the number of sequential duplicate instances of this step to include in the test. For example. if "5" is specified, then the step will be executed 5 time sequentially (and each step will be treated as a separate and independent step). If the 3rd repetition fails, then the reports will show that the first two instances succeeded and the 3rd failed and the last two were not run. This is a load-time construct that is not specific to this directive. The loading process will duplicate the step in the in-memory test definition and then each step (though loaded from the same definition) will be treated separately at runtime. |
N (defaults to 1) |
Example(s)
< sftp>
   <pwd />
</sftp>
put
Element Tag
put
Description
Transfer a file, a set of files (by wildcard specification in the filename) or a directory (and its contents) from the local system to the target system. Filenames can be relative or absolute and may include wildcards.
Contained Element(s)
none
Containing Element(s)
sftp
Attributes
| Name | Description | Required |
|---|---|---|
| local | Specifies the absolute or relative (to the current directory) local filename or directory name for the tranfer to the target system. A single file can be specified. Wildcards can be used to make the specification target multiple files. A directory can be specified to copy the entire contents of that directory. |
Y |
| remote | Specifies the absolute or relative (to the current directory) filename or directory name on the local system which should be tranferred to the target system. If the local file specification is a single file, this can be omitted. In that case the same file name in the current directory will be used as the remote filename. If the local file specification is multiple files, this must not be omitted. It must be a relative or absolute directory name in which the multiple files will be transferred. If the local file specification is a directory, this can be omitted and the current directory will be used. Otherwise it should be the remote directory that is the counterpart for the transferred files. In any case this is omitted, the remote name will act as if it was specified as the same exact string as the local specification. That is why when wildcards are used, the remote name should be explicitly specified. |
N |
| repeat | A positive integer specifying the number of sequential duplicate instances of this step to include in the test. For example. if "5" is specified, then the step will be executed 5 time sequentially (and each step will be treated as a separate and independent step). If the 3rd repetition fails, then the reports will show that the first two instances succeeded and the 3rd failed and the last two were not run. This is a load-time construct that is not specific to this directive. The loading process will duplicate the step in the in-memory test definition and then each step (though loaded from the same definition) will be treated separately at runtime. |
N (defaults to 1) |
Example(s)
Transfer a single file from the current directory on the local system to a file of the same name in the current directory on the target system.
< sftp>
   <put local="some_file.java" />
</sftp>
Transfer a single file relative to the current directory on the local system to a file of the same name (and path) relative to the current directory on the target system.
< sftp>
   <put local="path/to/some_file.java" />
</sftp>
Transfer a single absolute file on the local system to the same absolute file on the target system.
< sftp>
   <put local="/absolute/path/to/some_file.java" />
</sftp>
Transfer a single file from the current directory on the local system to a file of the same name in the current directory on the target system.
< sftp>
   <put local="some_file.txt" remote="some_file.txt" />
</sftp>
Transfer a single file from the current directory on the local system to a file of the same name in a specified path relative to the current directory on the target system.
< sftp>
   <put local="some_file.txt" remote="some/path/some_file.txt" />
</sftp>
Transfer a single file relative to the current directory on the local system to a file of the same name in a different specified path relative to the current directory on the target system.
< sftp>
   <put local="path/to/some_file.java" remote="some/other/path/some_file.txt" />
</sftp>
Transfer a single absolute file from the local system to a file of the same name in a different absolute path on the target system.
< sftp>
   <put local="/absolute/path/to/some_file.java" remote="/absolute/other/path/some_file.txt" />
</sftp>
Transfer all files whose names end in ".log" in the current directory on the local system to the specified relative directory on the target system.
< sftp>
   <get remote="*.log" local="stuff/" />
</sftp>
rename
Element Tag
rename
Description
Rename a file or directory from one name to another on the target system. Paths can be relative or absolute.
If the path portion of a name changes, then this command is equivalent to moving the file or directory.
Contained Element(s)
none
Containing Element(s)
sftp
Attributes
| Name | Description | Required |
|---|---|---|
| new | The new relative or absolute path/filename on the target system. | Y |
| old | The old relative or absolute path/filename on the target system. | Y |
| repeat | A positive integer specifying the number of sequential duplicate instances of this step to include in the test. For example. if "5" is specified, then the step will be executed 5 time sequentially (and each step will be treated as a separate and independent step). If the 3rd repetition fails, then the reports will show that the first two instances succeeded and the 3rd failed and the last two were not run. This is a load-time construct that is not specific to this directive. The loading process will duplicate the step in the in-memory test definition and then each step (though loaded from the same definition) will be treated separately at runtime. |
N (defaults to 1) |
Example(s)
Rename a file in the current directory on the target system from and old name to a new name.
< sftp>
   <rename old="some_old_filename.txt" new="a_new_name.txt" />
</sftp>
Move a file from the parent directory on the target system to the current directory on the target system.
< sftp>
   <rename old="../some_file.txt" new="some_file.txt" />
</sftp>
rm
Element Tag
rm
Description
Remote a file or a set of files with the specified relative or absolute path on the target system. Directories cannot be removed with this command (see rmdir).
Wildcards can be used to remove multiple files in one command.
Contained Element(s)
none
Containing Element(s)
sftp
Attributes
| Name | Description | Required |
|---|---|---|
| filespec | The relative or absolute file specification to remove from the target system. Wildcards can be included to target multiple files at once. | Y |
| repeat | A positive integer specifying the number of sequential duplicate instances of this step to include in the test. For example. if "5" is specified, then the step will be executed 5 time sequentially (and each step will be treated as a separate and independent step). If the 3rd repetition fails, then the reports will show that the first two instances succeeded and the 3rd failed and the last two were not run. This is a load-time construct that is not specific to this directive. The loading process will duplicate the step in the in-memory test definition and then each step (though loaded from the same definition) will be treated separately at runtime. |
N (defaults to 1) |
Example(s)
Remove an single file in the current directory on the target system.
< sftp>
   <rm filespec="some_file.txt" />
</sftp>
Remove an single file relative to the current directory on the target system.
< sftp>
   <rm filespec="some/path/to/some_file.txt" />
</sftp>
Remove an single file with an absolute path on the target system.
< sftp>
   <rm filespec="/absolute/path/to/some_file.txt" />
</sftp>
Remove a set of files that all have names ending in ".log" in the current directory on the target system.
< sftp>
   <rm filespec="*.log" />
</sftp>
Remove a set of files that all have names ending in ".log" in a path relative to the current directory on the target system.
< sftp>
   <rm filespec="some/path/to/*.log" />
</sftp>
rmdir
Element Tag
rmdir
Description
Remote a directory with the specified relative or absolute path on the target system.
All contents of that directory (including any subdirectories) must have already been removed (or moved/renamed). See rm.
Contained Element(s)
none
Containing Element(s)
sftp
Attributes
| Name | Description | Required |
|---|---|---|
| path | The relative or absolute directory path to remove from the target system. | Y |
| repeat | A positive integer specifying the number of sequential duplicate instances of this step to include in the test. For example. if "5" is specified, then the step will be executed 5 time sequentially (and each step will be treated as a separate and independent step). If the 3rd repetition fails, then the reports will show that the first two instances succeeded and the 3rd failed and the last two were not run. This is a load-time construct that is not specific to this directive. The loading process will duplicate the step in the in-memory test definition and then each step (though loaded from the same definition) will be treated separately at runtime. |
N (defaults to 1) |
Example(s)
Remove an empty directory relative to the current directory on the target system.
< sftp>
   <rmdir path="some_old_path/" />
</sftp>
Remove an empty absolute directory on the target system.
< sftp>
   <rmdir path="/absolute/old/path/" />
</sftp>
symlink
Element Tag
symlink
Description
Create a symbolic link to a specified actual file or directory on the target system. Pathing can be specified on a relative or absolute basis.
Contained Element(s)
none
Containing Element(s)
sftp
Attributes
| Name | Description | Required |
|---|---|---|
| actual | The relative or absolute file or directory on the target system which will be referenced by the new link. | Y |
| link | The new file system entry on the target system which will reference the actual file or directory. | Y |
| repeat | A positive integer specifying the number of sequential duplicate instances of this step to include in the test. For example. if "5" is specified, then the step will be executed 5 time sequentially (and each step will be treated as a separate and independent step). If the 3rd repetition fails, then the reports will show that the first two instances succeeded and the 3rd failed and the last two were not run. This is a load-time construct that is not specific to this directive. The loading process will duplicate the step in the in-memory test definition and then each step (though loaded from the same definition) will be treated separately at runtime. |
N (defaults to 1) |
Example(s)
Create a symbolic link.
< sftp>
   <symlink link="some/dir/my_new_file.txt" actual="an_existing_file.txt" />
</sftp>
soap
See Web Test Directive Reference.
stream-read
Element Tag
stream-read
Description
Reads text from underlying running process. The text is assigned into the specified variable honoring any possible conversions from text inot the type of the variable. These conversions are done in the same manner as the initial value attribute of a variable definition. The content of the variable will be completely replaced.
Its possible to read text of a fixed lenght or text terminated by end of a line.
Contained Element(s)
none
Containing Element(s)
test
Attributes
| Name | Description | Required |
|---|---|---|
| name | The variable name in which to assign the text. The content of the variable will be completely replaced. Any conversion from a string to the proper data type will be attempted. | Y |
| newline | if true read text until end of the line. | N |
| length | Expected string to read lenght as a number. Dont need to be specified if newline is true | N |
| millis | Maximum number of milliseconds to wait for the text to appear. | Y |
Example(s)
<stream-read name="myVar" newline="true" millis="10000" />
stream-wait-for
Element Tag
stream-wait-for
Description
Wait for given string to appear on subprocess output. Its possible to ignore string case.
Note both standard output and error output are analysed.
Contained Element(s)
none
Containing Element(s)
test
Attributes
| Name | Description | Required |
|---|---|---|
| value | String value expected to appear on subprocess output | Y |
| newline | True if match of a full line should be performed. Default: false | N |
| ignore-case | True if it is desired to ignore expected value case, so to do a case insensitive comparison of a value and expected value. Default false. | N |
| millis | Maximum number of milliseconds to wait for the text to appear. | Y |
Example(s)
<stream-wait-for value="Total time" millis="10000" newline="false"/>
stream-write
Element Tag
stream-write
Description
Write string to underlying running process's input.
There are 2 forms:
1. The text is hard coded into the value attribute. Whatever text is in that attribute will be output to the subprocess.
<stream-write value="Some hard coded text!" />
2. Simple substitutions. The value attribute is interpreted as a String.format() style format specification. A list of substitution sub-elements describes the variable names that are make up the parameter list to the String.format() processing of the specification. Note that each substitution element must have a variable attribute. The order of the variables is the order they will be substituted in. Just as with other substitutions, the variable data types must match the type specifiers in the format specification.
<stream-write value="My great %s spec #%d!">
   <substitution variable="myTextVar" />
   <substitution variable="myNumberVar" />
</stream-write>
If myTextVar is "format" and myNumberVar is 14, the output into the log would be "My great format spec #14!".
Contained Element(s)
none
Containing Element(s)
test
Attributes
| Name | Description | Required |
|---|---|---|
| value | String value expected to appear on subprocess output | Y |
| newline | True if it is needed to output newline characted at the end of the string. Default: false. | N |
Example(s)
    <stream-write value="cd %s" newline="true">
        <substitution variable="testDirectory" />
    </stream-write>
    <stream-write value="ls" newline="true"/>
text-file-comparison
Element Tag
text-file-comparison
Description
Compare the contents of two text files to determine if each line contains the same text. Newline characters are ignored. Excluded regions (ranges of characters specified by start and end index positions that are relative to a specified line or lines) can be specified. Any data in excluded regions is not compared (it is assumed to be the same).
The comparisons are done on a character for character basis. The data is read as characters so it is interpreted based on the character encoding of the harness process. Two files with the same content but encoded with different character sets will fail comparisons (unless all the data in the files comes from some overlapping compatible portion of both encoding schemes - an unlikely case).
The baseline file is the captured file that defines the expected data. The "actual" file is usually something generated as a result of input processing on the server.
This step will fail at the first content (non-newline) chacacter that is different between the baseline and actual files, outside of exclusion regions.
The actual file can be specified with a local file name (using the actual attribute) or it can be specified as a remote file on the target system (using the remote attribute). In remote mode, the file specified is either an absolute path on the server side or it is a relative path based on the current directory on the server side. The specified server side file will be copied from that system to the local system (in the output directory) using SFTP.
If the actual file is specified as a local file, then the file will have to have been transferred there via some previous processing during the test cycle. The SFTP test directives can be used for this purpose.
If the baseline file or the actual/remote file cannot be found or the filenames don't reference files (e.g. a name references a directory), this step will fail. Likewise, any I/O failure during step processing will fail the step.
Exclusion regions are specified by 0 or more exclude sub-elements. In each case the exclusion specifices a line in the file and the start and end indexes of the characters on that line that should be ignored. So start and end are required attributes in every exclusion. Each index is interpreted as a 0-based index relative to the beginning of the line.
There are different kinds of exclusions, which are specified by the type attribute. If the type attribute is not specified it will default to "absolute". Otherwise it may be set to one of the following:
- absolute
- each-page
- last-page
- specific-page
All of these also take a required 0-based integer attribute named row. The row is interpreted differently depending on the type.
In absolute mode the row is interpreted as a non-negative 0-based line number counted from the beginning of the file. This example ignores the 11th through 13th characters on the 6th line of the file.
<exclude type="absolute" row="5" start="10" end="12" />
All other types interpret the row relative to a page of data (e.g. 0 would be the first row on the page, 5 would be the 6th row on the page). Pages are delimited by form-feed characters.
To be more specific:
- If the row is a non-negative number it is interpreted as a line number relative to beginning of the page.
- If the row is a negative number it is interpreted as a line number relative to the end of the page. -1 specifies the last line on the page, -2 specifies the next to last line on the page and so forth.
In each-page mode, the row, start and end values are excluded on every page of the file. This example excludes the 64th through 80th characters on the first line of every page:
<exclude type="each-page" row="0" start="63" end="79" />
In last-page mode, the row, start and end values are excluded only on the last page of the file. This example excludes the first 20 characters of the second to last line of the last page.
<exclude type="last-page" row="-2" start="0" end="19" />
In specific-page mode, there is a required page-number attribute. This attribute must be a non-negative number that specifies the 0-based page number to which the exclusion applies (page-number="9" references the 10th page of the file). In specific-page mode the row, start and end values are excluded only on the specified page of the file. This example excludes the 79th and 80th characters from the 2nd line of the 4th page:
<exclude type="specific-page" page-number="4" row="1" start="78" end="79" />
All of these types can be mixed and matched together as the test developer requires. In other words, multiple types of exclusions can be used simultaneously in the same text-file-comparison element.
If there are 0 exclude sub-elements, then there are no excluded regions and every content character of every line must match.
If one of the comparison files is larger than the other file, then the step will fail without even comparing the data since by definition the contents must be different somewhere.
Likewise, if paging oriented exclusions are being used, then any page size difference (for the corresponding pages between the actual and baseline files) will cause the step to fail. It is OK for different pages to have different sizes, so long as both the actual and baseline files match. For example, if the 2nd page of the actual file has 10 lines and the 2nd page of the baseline file has 11 lines, the step would fail. But if the 2nd page of both actual and baseline files is 10 lines and the last page of both actual and baseline files is 40 lines, that is OK (not a failure).
Each compared line will be checked first to see if the actual row size (in characters) is the same as the matching baseline row's size. However, it is possible that some rows should match even if the sizes are different. This can happen in the case where the text at the end of a row is of variable length AND is part of an exclusion region. To allow this, add the ignore-size="true" attribute to the exclusion element. Any rows that match that exclusion region will bypass the size check (the size check will not fail even if the sizes are different).
Contained Element(s)
exclude
Containing Element(s)
test
Attributes
| Name | Description | Required |
|---|---|---|
| actual | The local filename of the file to compare against the baseline. If specified, the file is assumed to exist and to have been explicitly copied from the target system to the specified file before this step executes. It is the responsibility of the test developer to ensure that the file exists. | N except that at least one (and only one) of the actual or remote attributes MUST be present |
| baseline | This specifies the absolute or relative filename of the file that contains the expected characters. This file is usually pre-captured and is stored along with test definitions. The project index "baseline" search path is a list of paths to search for baseline files. The ProjectIndex.findBaseLine() method is used for that search. See Project Index Definition for more details. | Y |
| repeat | A positive integer specifying the number of sequential duplicate instances of this step to include in the test. For example. if "5" is specified, then the step will be executed 5 time sequentially (and each step will be treated as a separate and independent step). If the 3rd repetition fails, then the reports will show that the first two instances succeeded and the 3rd failed and the last two were not run. This is a load-time construct that is not specific to this directive. The loading process will duplicate the step in the in-memory test definition and then each step (though loaded from the same definition) will be treated separately at runtime. |
N (defaults to 1) |
| remote | The file name on the target system (the server) which contains the data to be compared against the contents of the baseline. This file will be downloaded at step execution via SFTP from the target system to the local system. It will be stored in the download directory of the results (output directory) which will be interrogated from the project index via ProjectIndex.getDownloadDirectory(). See Download Directory for more details. | N except that at least one (and only one) of the actual or remote attributes MUST be present |
Example(s)
Compares two local text files (some previous step must have created/copied the actual file to the proper location.
< text-file-comparison baseline="test5/details_rpt.txt" actual="results/download/test5_details_rpt.txt" />
Compares a local text file (the baseline) with a file on the target system (which is downloaded via SFTP at step execution).
< text-file-comparison baseline="test5/details_rpt.txt" remote="test5_details_rpt.txt" />
Same as the previous example, except that certain characters ranges are excluded from the comparison. Note that the 6th row on the 1st page is not only an exclusion region for column indexes 40 through 59, but the size of that row may also be different and that will not cause a failure (that is implemented using the ignore-size attribute).
< text-file-comparison baseline="test5/details_rpt.out" remote="test5_details_rpt.out">
   <exclude type="each-page" row="0" start="63" end="79" />
   <exclude type="specific-page" page-number="0" row="5" start="40" end="59" ignore-size="true" />
   <exclude type="last-page" row="-1" start="0" end="39" />
</text-file-comparison>
variable
Element Tag
variable
Description
Create a named variable that can be referenced in directive substitutions and in embedded Java source code (see run-code). Note that this same syntax is used in resource elements at the test plan and test set level.
Each variable has a name, a type and an optional initial value. When used in directive substitutions, the name can be used on a case-insensitive basis. But when used from Java code, the name must be matched case-sensitively.
Variables are scoped resources. There is a scope at the test plan level, at each test set and in each test itself. This allows variables to be shared at the level that is necessary. Any name conflicts in a more nested scope will hide the variables of the same name in more enclosing scopes.
Note that these directives are not created as test steps. When defined in a test, it just defines a resource that can be accessed by any following steps.
Contained Element(s)
none
Containing Element(s)
test
resources (only in test plan and test set definitions)
Attributes
| Name | Description | Required |
|---|---|---|
| initial | The initial value of the variable. This string data must be formatted such that a value of the appropriate type can be parsed from the text. For example, an int, Integer, long or Long must all be text that specifies a valid base-10 (decimal) number. A boolean or Boolean can be specified as true or false. | N (If not specified, the numeric data defaults to 0 and boolean data defaults to false, String data defaults to null) |
| name | A text string with the name of the variable. This is matched case-insensitively in directive substitutions and case-sensitively in embedded Java source code. | Y |
| prompt | This attribute is a text string that describes the variable in terms that can be understood by a user. More importantly, the presence of this attribute adds the variable to the list of variables that the main harness program should prompt the user for a value. After the test plan is loaded, this list will be processed. For each entry in the prompt list, the main harness program will display the prompt (along with the variable name and the initial value) and the user will be allowed to type in a replacement value OR the user can just press ENTER to accept the initial value). Whatever value is typed in, MUST be compatible with the data type of the variable, otherwise an exception will be thrown. This facility allows dynamic selection or arbitrary user input to be specified for a given test plan. Of course, it is always best to maximize the data that can be safely hard coded OR to read data from the screen OR calculate the input, so that the interactive processing of the user is minimized. |
N |
| prompt-secret | This is the same as the prompt attribute except that the current value is not displayed (instead the data type is shown) AND the user's typing is not echoed on the screen. This makes it ideal for specifying passwords or other sensitive data that can't be hard coded and which must not be shared with others. | N |
| repeat | A positive integer specifying the number of sequential duplicate instances of this step to include in the test. For example. if "5" is specified, then the step will be executed 5 time sequentially (and each step will be treated as a separate and independent step). If the 3rd repetition fails, then the reports will show that the first two instances succeeded and the 3rd failed and the last two were not run. This is a load-time construct that is not specific to this directive. The loading process will duplicate the step in the in-memory test definition and then each step (though loaded from the same definition) will be treated separately at runtime. |
N (defaults to 1) |
| type | The data type of the variable. It may be one of the following: • String • int • Integer • long • Long • double • Double • boolean • Boolean |
Y |
Example(s)
This initializes a new int variable named myVar to the value 5000.
<variable type="int" name="myVar" initial="5000" />
This initializes a new String variable named dir to the value "ls".
<variable type="String" name="dir" initial="ls" />
wait-event-sem
Element Tag
wait-event-sem
Description
Wait for the event semaphore post count to be greater than 0 (for the event to be "posted"). Return immediately if the semaphore is not in the "set" state (post count of 0). This step can fail if the wait is interrupted or if the maximum timeout is exceeded before the event semaphore is posted. Otherwise it will pass when it returns.
Event semaphores provide safe signalling and coordination of a specific event across multiple threads. It is a concurrency primitive.
Event semaphores are created using a <create-event-sem> element in a <resource> element inside a test plan or a specific test set. See Test Plan Definition for more details. When created, an event semaphore can be in a "set" state (threads that call the wait-event-sem will block) or it can be in a "posted" state (the event has occurred and any threads that call wait-event-sem will immediately return).
The event can be triggered by calling post-event-sem which will release any currently waiting threads (threads blocked in wait-event-sem). Posting can occur 0 or more times before the state is reset via reset-event-sem. Reset causes the semaphore's state to be "set" again, no matter whether it was previously in a set or posted state. A post count is kept which is the number of times the event has been posted since the last reset. Each reset clears the post count to zero. The post count can be checked via check-post-count.
Contained Element(s)
none
Containing Element(s)
test
Attributes
| Name | Description | Required |
|---|---|---|
| name | A text string with the case-insensitive name of the semaphore. | Y |
| repeat | A positive integer specifying the number of sequential duplicate instances of this step to include in the test. For example. if "5" is specified, then the step will be executed 5 time sequentially (and each step will be treated as a separate and independent step). If the 3rd repetition fails, then the reports will show that the first two instances succeeded and the 3rd failed and the last two were not run. This is a load-time construct that is not specific to this directive. The loading process will duplicate the step in the in-memory test definition and then each step (though loaded from the same definition) will be treated separately at runtime. |
N (defaults to 1) |
| timeout | The integer number of milliseconds to wait for the event to be posted. Use 0 for an indefinite wait. A negative number will be considered the same as 0. | N (defaults to 0) |
Example(s)
Wait indefinitely until the semaphore has been posted. This will return immediately if the semaphore was already posted.
< wait-event-sem name="myEventSem" timeout="0" />
Wait for up to a minute for the semaphore has been posted. This will return immediately if the semaphore was already posted. If the timeout is hit, the step will fail.
< wait-event-sem name="myEventSem" timeout="60000" />
wait-for-screen-buffer
Element Tag
wait-for-screen-buffer
Description
Directive to wait for a screen buffer to be available. If a timeout or interruption occurs before a screen becomes available, this directive will
fail.
There are 2 modes of usage: ANY and SEARCH.
In ANY mode, there is no specific text that must be matched in the screen buffer. The existence of any screen buffer (no matter what text it contains) is enough
to satisfy this directive, so long as that screen buffer is available before the timeout occurs.
In SEARCH mode, only screen buffers that contain specific text are matched. If that text does not exist anywhere in the screen, then that screen buffer is not considered a valid screen buffer for passing the directive. Note that there is no positioning information regarding this text. If the text appears at any location on the screen then it is a match.
In ANY mode, this directive should be preceded at some point with a clear-sceen-buffer directive, which will erase any currently cached screen and allow this directive to detect when a new screen is available. If the cache is not cleared first, then this directive will immediately return if there was EVER a screen received from the target system.
Contained Element(s)
none
Containing Element(s)
test
Attributes
| Name | Description | Required |
|---|---|---|
| millis | Number of milliseconds to wait for the screen buffer to become available. Use -1 for an indefinite wait and 0 for no wait. In a no wait case, only the currently available screen buffer (if any) will be checked and the results will be immediately returned. | N (defaults to 0) |
| repeat | A positive integer specifying the number of sequential duplicate instances of this step to include in the test. For example. if "5" is specified, then the step will be executed 5 time sequentially (and each step will be treated as a separate and independent step). If the 3rd repetition fails, then the reports will show that the first two instances succeeded and the 3rd failed and the last two were not run. This is a load-time construct that is not specific to this directive. The loading process will duplicate the step in the in-memory test definition and then each step (though loaded from the same definition) will be treated separately at runtime. |
N (defaults to 1) |
| value | The text to search for in the screen buffer. As a side-effect, this controls the mode of the directive. If not specified, this enables ANY mode. If specified, that enables SEARCH mode. | N (defaults to no value which is the same as ANY mode) |
Example(s)
Wait up to 15 seconds for a screen that has the specified text anywhere.
<wait-for-screen-buffer millis="15000" value="@myserver ~]$" />
Waits up to 5 seconds for any screen to be available (no matter the contents). This is only effective if a previous clear-screen-buffer was used.
<wait-for-screen-buffer millis="5000" />
Test Plan Definition
A test plan defines the overall processing for a given test run. These definitions are contained in a valid XML file. Here is the overall structure:
<?xml version="1.0"?>
<test-plan name="regression_testing_plan" description="Automated regression testing of My Application." >
   <!-- test plan contents here -->
</test>
The following attributes can be used in the <test-plan> element:
| Name | Description | Required |
|---|---|---|
| name | The short name for the test plan. There are no spaces or special characters used in this name. It will be used for filenames and HTML links. | N |
| description | The verbose description of the test plan. This can be any text that is useful for describing the plan. | N |
Inside the test-plan element, there can be the following sub-elements:
- output-directory
- project-index
- resources
- test-set
output-directory
This element is optional. If present, there may only be one of these elements. The output-directory element defines the location in which the HTML report output will be generated.
The following attributes can be used in the <output-directory> element:
| Name | Description | Required |
|---|---|---|
| path | The relative or absolute path specifying the output directory (or the "root" of the directory if unique is true). | N (defaults to ".") |
| unique | When set to true, this option causes the path attribute to be interpreted as the "root" directory of output. As such, for each testing run, a unique subdirectory is created using the current date and time in the following format (assumes that the path is set to a relative directory named results):./results/YYYYMMDD_HHMMSS This is useful since it allows a record of all test runs to be easily created without extra effort to manually create a new unique directory or to manually delete the previous results. When set to false, the path attribute is the directory in which all HTML reports will be output. |
N (defaults to false) |
Example:
<output-directory path="results" unique="true" />
project-index
This element is optional. If present, there may only be one of these elements. The project-index element defines the file that contains the Project Index Definition. If not present, there is no project index.
The following attribute can be used in the <project-index> element:
| Name | Description | Required |
|---|---|---|
| filename | This must specify the relative or absolute filename of an existing and valid XML file that contains the project index. That file will then be loaded. | Y |
Example:
<project-index filename="relative/path/to/project_index.xml" />
resources
This element is optional. There may be multiple resources elements, however there is no difference between defining all resources in one element and splitting definitions across multiple elements. The result is the same. This element allows the test developer to define named resources that are shared across the entire test plan (they are scoped to the test plan). That means that all tests in all test sets can access these resources.
These are the resources that can be defined:
- Mutex Semaphores
- Event Semaphores
- Variables (this is the same syntax as the test directive of the same name, except the the scope for the variable is the test plan)
Example:
<resources>
   <create-mutex name="mutex1" />
   <create-event-sem name="eventSem1" />
   <variable name="myIntVar" type="int" initial="14" />
   <variable name="myTextVar" type="String" initial="Hello World!" />
</resources>
create-mutex
There may be 0 or more mutex semaphore definitions. Each such definition is comprised of a create-mutex element.
The following attribute can be used in the <create-mutex> element:
| Name | Description | Required |
|---|---|---|
| name | The case-insensitive name of the mutex semaphore to create. | Y |
To use a mutex semaphore, please see acquire-mutex and release-mutex.
Example:
<create-mutex name="myMutexSem" />
create-event-sem
There may be 0 or more event semaphore definitions. Each such definition is comprised of a create-event-sem element.
The following attribute can be used in the <create-event-sem> element:
| Name | Description | Required |
|---|---|---|
| name | The case-insensitive name of the event semaphore to create. | Y |
| set | The initial state of the semaphore. Use true to force the "set" state and false to initialize the semaphore as "posted". | N (defaults to true) |
To use an event semaphore, please see post-event-sem or wait-event-sem.
Example:
<create-event-sem name="myEventSem1" />
target
There may be 0 or 1 target system definitions in a test plan or a test set, for each target type - web, terminal or stream. All rest and soap directives will use the type="web" target. Any other directive will default to the type="terminal" target. This element can be contained inside a test-plan or a test-set element. Each such definition is comprised of a target element and one or more of the following attributes:
In addition there may be remote target defined for test-plan or for each test-set.
for type="terminal"
| Name | Description | Required |
|---|---|---|
| host | The target system's hostname or IP address. | N (defaults to localhost) |
| password | The password to authenticate the given userid. | N (defaults to null which is invalid) |
| port | The port (socket number) on the target system. | N (defaults to 22) |
| protocol | This only supports SSH2 at this time. | N (defaults to SSH2) |
| prompt | A list of comma separated field names for which the user should be prompted to accept the default value or specify a replacement. At this time it can contain any of the following field names: • host • password • port • userid This example causes the user to be prompted for an override to the host and the port (as well as the userid and password since any null userid or password automatically gets prompted) <target host="localhost" port="2222" prompt="host,port" /> |
N (defaults to no prompting) |
| term-columns | The width of the terminal in columns. | N (defaults to 80) |
| term-rows | The height of the terminal in rows. | N (defaults to 24) |
| term-type | The terminal type (wither vt220 or vt320). | N (defaults to vt320) |
| userid | The userid with which to login. | N (defaults to null which is invalid) |
Example:
<target host="192.168.131.21" port="2222" term-type="vt220" />
for type="web"
| Name | Description | Required |
|---|---|---|
| endpoint | The default endoint for the web service | N (if not specified, each web service will have to specify a full URL) |
| ssl_accept_all | Boolean flag indicating if all certificates are accepted. | N (defaults to true |
| ssl_accept_self_signed | Boolean flag indicating if self-signed certificates are accepted. | N (defaults to true |
| ssl_truststore_file | The file with the trusted certificates | N |
| ssl_truststore_password | The trust store password if ssl_truststore_file is specified |
N |
An authorization element can be specified for a type="web" target. Only type="oauth1" authorization is supported at this time. See below for the parameters which can to be specified for oauth1.
Example:
   <target type="web"
           endpoint="https://localhost:7443/ws/fwd"
           ssl_accept_all="true"
           ssl_accept_self_signed="true"
           ssl_truststore_file=""
           ssl_truststore_password="">
      <authorization type="oauth1">
         <parameter name="oauth_consumer_key" value=""/>
         <parameter name="oauth_consumer_secret" value=""/>
         <parameter name="oauth_token" value=""/>
         <parameter name="oauth_token_secret" value=""/>
         <parameter name="realm" value=""/>
         <parameter name="oauth_callback" value=""/>
         <parameter name="oauth_verifier" value=""/>
      </authorization>
   </target>
for type="remote"
| Name | Description | Required |
|---|---|---|
| port | TCP SocketPort allowing access to remote API | No default value, must be specified |
| threads | Number of threads to process remote client requests | defaults to 1 |
for type="stream"
| Name | Description | Required |
|---|---|---|
| shell | Command to be used as a shell for executing subprocess commands | No default value, must be specified |
test-set
For every test-plan, there must be at least 1 test-set element, but there may be more than one. There is no limit to the number of test sets (other than the resources of the computer on which the harness is running).
The following attributes can be used in the <test-set> element:
| Name | Description | Required |
|---|---|---|
| dependency | This allows 3 possible execution modes: PRE_CONDITION, NONE, POST_CONDITION. A test set assigned a PRE_CONDITION dependency will execute before any test sets with the NONE or POST_CONDITION dependency types. All PRE_CONDITION test sets execute first and simultaneous with each other. All must complete before test sets of other dependency types are executed. This allows any environment preparation to be completed before the core testing occurs. If any PRE_CONDITION test set fails, then no NONE or POST_CONDITION test sets will be executed. The test plan will abort when all PRE_CONDITION test sets complete. After all PRE_CONDITION test sets are executed (and before POST_CONDITION test sets) and assuming they all finish without failure, all test sets with NONE dependency type will be executed (simultaneous with each other). Once all NONE dependency type test sets are finished, the POST_CONDITION test sets will execute simultaneous with each other. This is a way to ensure that cleanup processing happens at the end of the test plan run. |
N (defaults to NONE) |
| description | The verbose description of the test plan. This can be any text that is useful for describing the plan. | N |
| name | The short name for the test plan. There are no spaces or special characters used in this name. It will be used for filenames and HTML links. | N |
| threads | The number of threads in the pool which will service the job queue for this test set. | N (defaults to 1 thread) |
Inside the test-set element, there can be the following sub-elements:
- resources - the syntax is the same as for the test plan resources element, except any definitions are scoped to the test set instead of the test plan.
- target - the syntax is the same as for the test plan target element, except when specified at the test set level, only that test set will use that target definition.
- test
test
There must be at least 1 test element for every test set. Each test element defines a test that is to be executed. There may be any number of tests defined in a test set, the order of the tests is the order in which the tests appear in the job queue. If there are multiple threads in the thread pool, then depending on test timing, it is possible that tests that are dequeued later are done before tests that started earlier. For this reason, the order of the test elements will not enforce strict sequencing if the thread pool has more than 1 thread.
The same test filename can be specified in separate test elements in the same test set.
The following attributes can be used in the <test> element:
| Name | Description | Required |
|---|---|---|
| filename | The absolute or relative filename for the XML test definition file. This value will be used in a search of the paths using ProjectIndex.findTest(). This mechanism allows a partial test filename to be found somewhere in the "test search path", making it possible to encode less path-specific knowledge into the test set. To control the search paths, please see Project Index Definition. | Y |
| repeat | A positive integer specifying the number of sequential duplicate instances of this test to include in the test set. For example. if "5" is specified, then the test will be executed 5 times sequentially (and each test will be treated as a separate and independent test). If the 3rd repetition fails, then the reports will show that the first two instances succeeded and the 3rd failed and the last two were not run. This is a load-time construct. The loading process will duplicate the test in the in-memory test set definition and then each test (though loaded from the same definition) will be treated separately at runtime. |
N (defaults to 1) |
Example:
<test filename="tests/menuing/help_screen.xml" repeat="3" />
Project Index Definition
A project index defines project-level configuration and helper methods to make test development easier. These definitions are contained in a valid XML file. Here is the overall structure:
<?xml version="1.0"?>
<project-index>
   <!-- project index contents here -->
</project-index>
The project-index element contains no attributes. Inside the project-index element, there can be the following sub-elements:
- defaults
- named-rectangles
- paths
- test
- baseline
defaults
The defaults element contains a list of attribute sub-elements. Each attribute sub-element associates a unique name with a specific value. There can be 0 or more defaults elements in a project index.
The name/value pairs are stored in a map of default XML attribute values. When XML is read for the test-plan, for the name-rectangles section in the project index or whenever any test definition is read, any attributes which are search for but not found in the XML will get a default value forced from this map (if such a name/value mapping exits for that attribute name).
This provides a facility to create project-wide defaults for specific XML attribute names. There can be 0 or more attribute sub-elements in the defaults element. Here is an example:
   <defaults>
      <attribute name="millis" value="30000" />
      <attribute name="failure-mode" value="backout" />
      <attribute name="backout" value="common/backout.xml" />
   </defaults>
When an XML attribute is search for, this is the precedence order of the search:
- Explicit attribute definition (something hard coded into the XML definition itself is always honored).
- Default attribute definition (something in this project-index attribute map).
- Element-specific default value (a default for the value as specified in the test-plan, test-set, test, directive... encoding).
All attribute names are supported except the following (these will not be replaced with defaults except as noted):
- name
- description
- filename
- baseline
- actual (except in STFP where actual can be defaulted)
- no attributes will be defaulted in the:
- output-directory element of a test-plan
- defaults element of a project-index
- paths element of a project-index
Caveats
This is a very powerful facility but like any powerful tool, it can be dangerous if not used properly. Here are some general guidelines:
- Don't use this for any attribute names that are used for different purposes in different XML elements. If you choose to do this, you must either hard code values in the XML in places where the default doesn't work OR you must ensure that the conflicting attribute usage is not present (that all usage is consistent).
- Rectangle attributes (left, top...), the timeout and initial attributes are dangerous. This is hardly a complete list, so just be VERY careful.
- It is generally a good idea to use this sparingly to avoid unexpected problems.
named-rectangles
In a named-rectangles element is a list of rectangle sub-elements which each associate a unique name with a specific rectangle definition. There can be 0 or more named-rectangles elements in a project index.
The idea is that test developers can optionally refer to a named rectangle instead of hard coding a rectangle's values/coordinates. This simplifies (and centralizes) rectangle management and reduces the coding in a test definition. The named-rectangles element has no attributes. It can have 0 or more rectangle sub-elements like this example:
<named-rectangles>
   <rectangle name="screen" column="0" row="0" width="80" height="24" />
   <rectangle name="timestamp" left="63" right="79" top="0" bottom="0" />
</named-rectangles>
The rectangle elements have the following attributes:
| Name | Description | Required |
|---|---|---|
| bottom | Part of an "explicit coordinates" rectangle definition. The 0-based integer number of the row that is closest to the bottom of the screen. The origin is in the upper left of the screen so bottom is a larger number (or equal if the rectangle only covers a single row) than top. | N (defaults to -2 which is invalid) |
| column | Part of a "relative coordinates" rectangle definition. The 0-based integer number of the leftmost column. To find the rightmost column number, add (height - 1) to the column value. | N (defaults to 0) |
| height | Part of a "relative coordinates" rectangle definition. The number of rows in the rectangle. | N (defaults to -1 which is invalid) |
| left | Part of an "explicit coordinates" rectangle definition. The 0-based integer number of the leftmost column. The origin is in the upper left of the screen so left is smaller than (or equal if the rectangle only covers a single column) than right. | N (defaults to 0) |
| name | The case-insensitive text name of a rectangle as it should be looked up in the project index. | Y |
| right | Part of an "explicit coordinates" rectangle definition. The 0-based integer number of the rightmost column. The origin is in the upper left of the screen so left is larger than (or equal if the rectangle only covers a single column) than left. | N (defaults to -2 which is invalid) |
| row | Part of a "relative coordinates" rectangle definition. The 0-based integer number of the uppermost row. To find the bottom row number, add (width - 1) to the row value. | N (defaults to 0) |
| top | Part of an "explicit coordinates" rectangle definition. The 0-based integer number of the row that is closest to the top of the screen. The origin is in the upper left of the screen so top is a smaller number (or equal if the rectangle only covers a single row) than bottom. | N (defaults to 0) |
| width | Part of a "relative coordinates" rectangle definition. The number of columns in the rectangle. | N (defaults to -1 which is invalid) |
If any of left, right, top or bottom are specified, then that is the method used for specifying the rectangle. Otherwise the row, column, width, height approach is used. Since the default values for bottom, right, height and width are invalid, at least two of these MUST be specified to get a valid rectangle. So either bottom and right must be specified or height and width must be specified. For other details on how rectangles work, please see Defining Rectangles.
In test definitions, references to named rectangles are resolved using the ProjectIndex.getRectangle() method.
paths
In a paths element is a list of sub-elements which add a directory to the list of search paths. There can be 0 or more paths elements in a project index.
There are 2 kinds of search paths:
- test
- baseline
The idea is that test developers can optionally refer to test or baseline files using simpler names (with reduced pathing information). This simplifies and reduces the coding in a test definition. The paths element has no attributes. It can have 0 or more sub-elements like this example:
<paths>
   <test path="." />
   <test path="tests" />
   <test path="tests/more_tests" />
   <baseline path="screens" />
   <baseline path="reports" />
</paths>
test
The test element adds a path to the "test" search path in the Project Index. When a partial filename is passed to ProjectIndex.findTest(), the list of "test" search paths will be searched for a matching file. In particular, the partial filename is concatinated onto each of the test search paths in the same order that the paths are specified in the paths element. The first matching filename found will be returned. This allows test and include filenames to be specified using partial paths, simplifying coding of tests.
There is only one attribute of this test element:
| Name | Description | Required |
|---|---|---|
| path | The relative or absolute path specifying the search path to add. | N (searching is disabled if there are no paths listed) |
baseline
The baseline element adds a path to the "baseline" search path in the Project Index. When a partial filename is passed to ProjectIndex.findBaseLine(), the list of "baseline" search paths will be searched for a matching file. In particular, the partial filename is concatinated onto each of the baseline search paths in the same order that the paths are specified in the paths element. The first matching filename found will be returned. This allows screen and file (binary and text) baseline comparison filenames to be specified using partial paths, simplifying coding of tests.
There is only one attribute of this baseline element:
| Name | Description | Required |
|---|---|---|
| path | The relative or absolute path specifying the search path to add. | N (searching is disabled if there are no paths listed) |
Download Directory
The Project Index also contains the download directory definition. This is not explicitly configured in the project index XML file. Instead it is a calculated value. Any file that is automatically downloaded (see the remote attribute used in both binary-file-comparison and text-file-comparison) will be placed in this directory.
If no project index is configured, then the download directory will default to the current directory ("."). If a project index XML file is specified, then the output directory will be queried from the test plan and a "download" directory will be created under that directory. By default this will be a "results/download" directory.
Remote Access
Since revision 34 its possible to access Harness Mutexes and Semaphores from an external application over a TCP socket in order to enable synchronization in multi-threaded tests. It is a simple text-based socket protocol.
Remote Access Protocol
The Harness can open a TCP socket on a predefined port after providing a dedicated command line option to allow clients to connect. The protocol is text based and is optimized for environments that are biased toward text processing. Communication is in messages, both up- and downstream in the following format:
Each connected client would start a new Driver thread that would become a new actor in the test scenario, thus interact/synchronize with a test plan.
- six characters constituting a header, in the first version of the protocol it uses six ascii digits providing the number of following bytes of the message contents
- actual message as ascii string consiting of following parts separated by '|' character
- command (required)
- zero, one or more arguments
- optional end of line character to improve readibility for debugging (EOLs are ignored by servers)
The following rules apply:
- The client connects to the socket, sends a request and gets response back with possible blocking waiting for resources.
- Every command from the client is a request with two possible responses OK or ERROR from the Harness server.
- Commands may have parameters, parameters are separated from command name and each other by vertical bar ( | ) sign - ASCII code 124.
- Semaphores are identified by name as defined in a Harness Testcase.
- The executing command may block client test execution (e.g. resource is allocated and needs to be released). It does this by not sending a response until the client should unblock.
- Unexpected disconnection from the server should be treated as an unconditional error or exception.
Example messages
Example messages are listed below:
000002OK
000005ERROR
000022ERROR|With description
000012POSTES|test1
Note that newlines are not mandatory between messages, so message stream would like following (upstream and downstream):
000018POSTES|test1|false000016WAITES|sem1|1800000016WAITES|sem2|1800
000003OK000002OK000035ERROR|Timeout waiting for semaphore
The protocol allows controlling Harness Mutexes and Semaphores with following commands - please see Harness Documentation for more information about functionality of related test:
POSTES|<name>|<reset>- Post event semaphore, <reset> can be true or false, see post-event-semRESETES|<name>- Reset Event Semaphore, see reset-event-semWAITES|<name>|<timeout>- Wait Event Semaphore identified by name up to <timeout> seconds - this may block, see wait-event-semACQUIREMTX|<name>- Acquire mutex identified by name - note there is no timeout, see acquire-mutexRELEASEMTX|<name>- Release mutex identified by name - see release-mutexTEST|<name>- setHarness Remote Test Name- see needed for reporting purposes
Possible return codes:
- OK - for successful request
- ERROR|Description - in case any error happens
Remote Access Protocol configuration
In order to enable remote protocol server it is needed to setup the remote target in a test-set or test-plan section. Note in case more then one remote targets are setup each needs to be configured to use a different port. threads parameter allows specfycing number of server threads processing client request.
<target type="remote" port="8889" threads="4" />
Following
<?xml version="1.0"?>
<test-plan name="remote_test_server" description="Remote test server example" >
   <resources>
   </resources>
   <test-set name="start_test_server" description="Remote test server example" threads="2" >
      <target type="remote" port="8889" threads="4" />
      <test filename="support/harness/test/harness_server.xml" dependency="concurrent" />
   </test-set>
Reporting
Remote test execution reports are presented as part of test-set report, in case Harness Remote Test Name matches existing test name it will merged into it.
ABL client code
For a sample client as ABL code please refer to testcases/support/harness/ in project testcases
Benchmark mode (Performance test support mode)
Since revision 31 there is a new functionality available that allows for performance test support - which is called Benchmark mode.Benchmark mode introduces following changes to Harness:
- support for test skip list - a list of tests from the test suite, in order to run in Benchmark mode unrelated tests can be masked (option
-s) - all waits and delays are minimized at the cost of higher CPU load by
Harnessapplication - TestSet-s are executed in sequence
Harness.isBenchmarkMode()is public so test scenarios can check it inrun-codesections to prevent introduction of delays when running in Benchmark modePAUSEscenario elements are ignored/skipped- Text/Key output in
send-special-keyandsend-textis done with a minimal fixed delay (10ms fixed) - all screen changes in
wait-for-screenscenario elements are processes instantly as they come from application
- exclude test that have unneeded pausing inside
- exclude tests that execute too long (but it relative what that means).
- exclude implicit or explicit dependencies for above tests
Harness in Benchmark mode following command line parameters needs to be provided:
-m- to enable Benchmark mode-s skipTestFileName.txt- optionally in case some tests need to be excluded from runnin
TODOs (and Limitations)
The following are tasks that need to be completed:
- Create an example of a fully defined test plan (and the encoding of the related test sets, tests, screens, files...). This would be very useful, however it will have to be something that is essentially non-functional since otherwise a fully working application will have to be provided in order to test the example test plan.
- Add new variable types (changes would be needed in the Variable.java class and possibly in TestPlanFactory.loadVariable()):
- char[] - useful for interacting with run-code directives and also may be useful for processing of screen data
- char[][] - would be useful in order to copy/process a rectangle of screen data (more than just a string from one row)
- Rectangle - would allow dynamic processing of instances of Rectangle.java; used fpr defining areas of the screen for copying/comparing.
- Rectangle[] - used in defining exclusion regions for the screen.
- exclusion regions for the binary and text file comparisons (which would allow dynamic control over the exclusion processing)
- ExclusionRegion - used for binary file exclusions
- text file exclusion types:
- AbsoluteRowExclusion
- EachPageExclusion
- LastPageExclusion
- SpecificPageExclusion
- ScreenRegion - would allow dynamic processing of instances of Rectangle.java which are used in defining new regions for screen comparisons or possibly for allowing dynamic editing/modification of previously encoded or captured screen regions (which can then be used to alter subsequent screen comparison processing).
- Expand support for variable references (substitutions - see send-text for a useful example, note that all parameters can be dynamically substituted) in the following directives:
- binary-file-comparison
- check-screen-buffer
- SFTP
- cd
- get
- lcd
- ls
- mkdir
- put
- rename
- rmdir
- rm
- symlink
- text-file-comparison
- wait-for-screen-buffer
- Add new directives:
- read-screen-rect - similar to read-string except this would read a two dimensional rectangle of text and assign the result to a char[][] (this variable type will beed to be added - see above)
- wait-while-screen-buffer - similar to wait-for-screen-buffer (when used with the value attribute) except that it will pause so long as specific text can be found on the screen
- Enhance the run-code directive to allow direct reference named event semaphores (which are instances of EventSemaphore) and named mutex semaphores (which are instances of the java.util.concurrent.ReentrantLock) just as embedded code can access variables today. This would allow such directives to interact and control other threads in a much more granular manner.
- Enhance the run-code directive to allow direct read only reference to the SessionSettings instance for the current TestSet. This could be implemented as an additional parameter to the DynamicCode.execute() method. It would allow other arbitrary communication or user input based on reuse of the already specified configuration data (especially useful are the userid, password, host and port).
- Add failure mode support for:
- aborting an entire test set (this will require a feedback mechanism to cause threads to exit - probably best done in the Driver.run() loop; however, if certain threads did not finish in a reasonable amount of time we might have to force them to exit... otherwise the whole thing could hang/deadlock)
- run a recovery script (similar to a backout script, but the idea is to execute steps to enable the failing test to be re-run) and then retry (a configurable number of times) with an optional delay (configurable in milliseconds) in between each retry; potential issues to resolve:
- figure out how to represent both the recovery steps and the retries in the report output; it is probably best to implement this as additional steps added to the steps list of the original test (this is how it was done for backout processing)
- figure out how to reset the test state so that a retry could be successful
- Make default attributes scopeable. This would allow certain attributes to be defaulted for a test-set or for a specific test instead of only for the entire test-plan.
- Detect when the login shell in the SSH session has exited and either abort or re-connect.
- Improve failure handling in send-text and send-special-key. Provide better handling for interruptions and for when the connection itself has failed. Today these conditions are ignored.
- Implement deadlock safety code for concurrent dependencies. At load time, check if the number of configured threads is equal to or greater than the number of concurrent tests (in the same group). At runtime, check that the number remaining threads (that did not get aborted via the ABORT_THREAD failure mode)is equal to or greater than the number of concurrent tests in the given concurrent group.
- GUI for test recording. This would be a Swing emulator window with a toolbar that provides recording features.
- GUI for running the harness. This would provide much more detailed status of what is going on in the test run as well as the ability to start/stop/pause/resume the run.
- Create a DTD for test definitions and test plan definitions.
- Windows platform support. The harness is known to work well on Linux environments and is expected to work perfectly on UNIX systems. Some early testing on Windows does show there to be issues. In particular, the default Windows encoding for the JVM is not UTF-8 (as is the default in Linux). This means that test definitions, screen captures etc... that are encoded in UTF-8 will NOT be read properly on Windows. On Linux, the JVM default locale can be forced by using the LANG environment variable. It is not known (to this author) how to do this same thing on Windows which is likely to be necessary to make tests (which have been encoded on Linux) work.
- Networking improvements:
- Telnet transport support.
- FTP support as a directive (like SFTP).
- Certificate-based SSH2 support.
- Support for conditional processing (if/then/else or other branching) and looping directives. This would require a defined expression processing capability as well as arbitrarily complex structuring of the test definitions.
- Harness command line driver enhancements:
- Add options to control other SessionSettings from command line parameters (not just userid/password as we have today).
- Add support for executing an arbitrary sub-set of test sets in a test plan.
- Report % completion on the fly to give some feedback to the user.
- Reporting improvements:
- enhance the statistics (provide more than just counters)
- fixup the preformatted sections to add line breaking for content that is too wide (since it makes the width of the page very wide)
- copy the baseline in text-file-comparison directives into a unique filename (and the actual file too if it is not already in the download directory) and link both of these into the report output for the directive so that the exact comparison data can be seen
- find a way to cleanly add the expected screen to failing output from the check-screen-buffer directive
- when directives don't run, it would still be useful to resolve their descriptions as much as possible (many directives do not resolve their descriptions until they are run because of variable substitutions or because of needing to report runtime state), this is useful when failures occur so that the user can see exactly what steps were going to do when the failure occurred
- some directives could have their output improved; e.g. when a separate text file is used for screen region definition, check-screen-buffer should probably display the filename that was used
- Add support for encoding terminal-specific strings (including escape sequences) as the mapped results of a (modifier + special key) combination. The JTA code in
vt320.javahas support for this (see vt320.setKeyCodes(Properties)) but no support is provided at this time. It will only be needed if there are (modifier + special key) combinations that need to be supported which are not already handled. - Add support for comparing screen attributes/colors in addition to screen text.
- for Web test directives (
restandsoap) the response body content type must not be multipart or binary.
Credits
This project was created and is maintained by Golden Code Development Corporation. All materials in this project are owned and copyrighted by Golden Code Development Corporation.
© 2004-2026 Golden Code Development Corporation. ALL RIGHTS RESERVED.