Building FWD From Source
- Building FWD From Source
- Introduction
- System Requirements
- Choosing the Appropriate JVM
- Installation Process
- Install the Java Virtual Machine
- Install Gradle
- Install C Compiler and Native Build Utilities
- Configure JNI Linking
- Install libffi
- Install NCURSES Development Headers (Linux Only)
- Install NCURSES Binaries and Data (Linux Only)
- Install Apache Ant
- Install Pluggable Authentication Modules (a.k.a. PAM, Linux only)
- Install unzip
- NCURSES (Linux/UNIX Only)
- Install FWD Source Code
- Satisfying 3rd Party Software Dependencies
- Build FWD
- Artifacts Versioning
Introduction
FWD is implemented almost completely in Java. This means that the primary dependencies of the build environment are a Java Development Kit (JDK), Gradle 3.x and the Apache ANT build automation tools.
This Java code does use a range of open source Java modules (packaged as jar files). The corresponding jar files must be present on the build system in order to successfully compile the FWD Java code. These dependencies will be automatically downloaded during the build.
Java programs are normally platform neutral. When applications or tools are written in pure Java, it is possible for such code to be run on any operating system or hardware platform that supports the corresponding required level of J2SE (Java 2 Standard Edition).
While the vast majority of the FWD code is written in pure Java, there is a small amount of platform-specific “native” code which is required for FWD at runtime. It is not used during conversion, but this native code is used on the client and for appserver/batch/web client spawning (which can sometimes be run on the same system as the server).
This platform-specific code is written in C and is implemented using the Java Native Interface (JNI). In order to build a version of FWD that fully functional runtime A customized version of that native code is included in the FWD project. To build it, one must install a series of platform-specific C language build tools and libraries/header files.
It is highly recommended that you build FWD on the system on which you will run FWD. This is critical for the FWD Client (including the Spawner) which depends on the native code for proper execution. Any time you do not do this, you run the risk of failures due to a mismatching build between the native code and the operating system.
This chapter will provide detailed instructions for how to setup this environment. It will also explain how to run the build process once all dependencies are satisfied.
System Requirements
These are the requirements that are specific to building FWD.
Hardware
Please see the Build System Requirements for details on the FWD Build hardware requirements.
Operating System
Java processes are normally platform neutral. When applications or tools are written in pure Java, it is possible for such processing to be run on any operating system or hardware platform that supports the proper level of J2SE (Java 2 Standard Edition) required. From the software point of view, you can install the client on any operating system as long as there is a JVM implementation for it.
At this time, while the vast majority of the client FWD code is written in pure Java, there is a small amount of platform-specific code (written in C) used for character mode user interface processing, process launching, native memory access and native library calls. That platform-specific code is implemented using the Java Native Interface (JNI) and is often referred to as “native” code. A customized version of that native code is included in the FWD project. This code is currently compiled as a 32-bit or 64-bit shared library for Linux (libp2j.so) or Windows (p2j.dll).
| Linux | Windows |
|---|---|
| FWD has been successfully run on a variety of recent Linux distributions from Ubuntu, SuSE, Red Hat and CentOS. There are no specific dependencies on any particular distribution. It is expected that the native code could be easily ported to any UNIX-compatible system. Any Linux/UNIX operating system can be used as long as exists support of NCURSES, libffi and JVM implementation for it. | The client will run on any Windows OS, from XP or later. Both Windows XP and Windows 7 are well tested. |
Network Requirements
By default, the FWD build is written to download its dependencies (3rd party Java libraries) when needed. These will be cached locally and reused. The download is done by Gradle and it typically happens at the following times:
- The first time that FWD is built.
- Whenever the cache is cleared/deleted.
- When a new FWD version requires an updated version or a new dependency.
For this download to occur, Internet access is required. Once downloaded and cached, no further Internet access is needed for building FWD.
Choosing the Appropriate JVM
The core requirement for the JVM is that it must be compatible with Java 8, Java 11 or Java 17
Each FWD component (conversion, application server, client, user-defined functions running at the database) can use a different JVM. These can run on the same system or different systems. They can even run on a different operating system platform. There is no dependency between JVMs of different components, since they are separate operating system processes.
The following JVM versions have been well tested:
- Oracle JDK 1.8 on Linux
- Oracle JDK 1.8 on Windows
- OpenJDK 1.8 on Linux
- OpenJDK 1.8 on Windows
- OpenJDK 11 on Linux
- OpenJDK 17 on Linux
The specific versions of Oracle JDK 1.8.0_101 and OpenJDK 1.8.0_111 have both been tested and have been found to work well. Generally, it is safe to use any later version of the Java 1.8 platform.
In order to build FWD, you must have a JDK (Java Development Kit). It is not possible to use the JRE (Java Runtime Environment) since that is a Java distribution which lacks the necessary compiler and tools.
Installation Process
We will assume that the operating system is already installed and up-to-date.
The Linux instructions included here are written (and tested) on Ubuntu 16.04. If the target Linux system is a different distribution, the equivalent commands must be run.
The Windows instructions can be used for any Windows version from Windows XP through Windows 10.
Install the Java Virtual Machine
Please check previous paragraphs for details on how to choose the JDK to install.
| Linux | Windows |
|---|---|
Make sure the bin/ directory of the JVM installation is added to PATH variable of the operating system so the application could be executed by using java command in a terminal window: the PATH for the user should be set to include the directory containing the command line executables (e.g. java or javac) of this installation. In Linux this would be the bin/ directory of the Java installation. In other words, this should be the default installation for any shell or command prompt from which the FWD technology will be built or used.To install OpenJDK 1.8, following commands can be used: sudo apt-get install openjdk-8-jdk openjdk-8-source cd /usr/lib/jvm sudo rm default-java sudo ln -s java-8-openjdk-amd64 default-java It is also recommended to set the user's CLASSPATH to current folder (“.”):export CLASSPATH=.Please note that this will only set the variable for the current terminal session. You will need to set this each time your start a new terminal session, if it is needed. |
The Oracle JDK 1.8 is a well tested option for Windows. The JDK can be downloaded from http://www.oracle.com/technetwork/java/javase/downloads/index-jsp-138363.html. If you are planning to build FWD binaries on Windows make sure to install the accompanying JRE when installing the JDK, this is the default option of the JDK's installer. Make sure JAVA_HOME system variable exists and points to the location of the installed JDK. The variable is needed by the FWD build scripts to locate the Java build files. If not defined explicitly it would point to the location of the public JRE installed together with the JDK (or any other JRE set as the default one), which is missing the build files, and the build would fail.Add %JAVA_HOME%/jre/bin/server to the system PATH variable. This ensures that the FWD client spawner process, spawn.exe, locates jvm.dll correctly.Note: Because of a bug in how the gcc C++ compiler processes paths (please see #3273 for further information), this value cannot contain spaces!There two possible approaches to avoid this depending on the current system configuration: 1. System with no JDK yet installed. Install JDK into directory without spaces, like C:\jdk180 for example.2. System with JDK already installed into something like "Program Files\path to JDK" containing spaces and there are the reasons to keep this configuration. in this case create symbolic link to JDK that has no spaces inside:mklink /D SomePathWithNoSpaces "The target path\to JDK with\spaces inside" an example (having C:\ as current directory):mklink /D jdk180 "Program Files\Java\jdk1.8.0_121" The quotation in link creation command is mandatory for mklink to properly resolve the original directory. After link has been created it must be used in JAVA_HOME and JRE_HOME environment variables instead of original path with spaces.As alternative solution to avoid that, use the legacy 8.3 filenames for tokens that contain spaces. In a default Java installation, they are Program Files or Program Files (x86) must be replaced with PROGRA~1 and PROGRA~2 respectively, but they can differ if Windows was reinstalled. Use dir C:\ /X to see actual legacy name for each file/dir, in second to the last column. The value of this environment variable for default installation will look like this:JAVA_HOME=C:\PROGRA~1\Java\jdk1.8.0_121 The above listed environment variables must be defined system wide so that they are available to all users. On Windows 7, you can access Environment Variables... in Control Panel/System and Security/System/Advanced System Settings, Advanced tab. |
Install Gradle
The project is configured to use the Gradle wrapper script to invoke Gradle build tool. Under normal conditions, Gradle doesn't have to be installed on the build system. The wrapper downloads the appropriate Gradle distribution automatically. However, there are cases when some extra steps must be taken, for example when the build system is placed in a controlled environment behind a firewall.
If the firewalled environment allows access to the public internet through a proxy, create the file gradle.properties in the project dir (or in the home dir) and set its content according to the following template.
systemProp.http.proxyHost=www.somehost.org
systemProp.http.proxyPort=8080
systemProp.http.proxyUser=userid
systemProp.http.proxyPassword=password
systemProp.http.nonProxyHosts=localhost
More details can be found at https://docs.gradle.org/current/userguide/build_environment.html#sec:accessing_the_web_via_a_proxy.
If the firewalled environment doesn't allow access to the public internet through a proxy then Gradle must be installed on the build system manually. Follow the official Gradle installation guide at https://docs.gradle.org/current/userguide/installation.html and install Gradle on the target system. With Gradle installed manually all build commands must not be invoked through the Gradle wrapper. In other words, do not use the gradlew command but instead use gradle.
If you are in a restricted environment you may need to download the project dependencies manually. If so download the dependencies in local-repo/ form and then unzip it into the p2j/ directory. This contains all the jar files needed by the build and to run FWD. If you are using a FWD build that is different from the current latest available snapshot, then you should download the dependencies zip associated with that specific build. Do not use dependencies that are meant for a different FWD version.
The supported Gradle version is 3.x.
Install C Compiler and Native Build Utilities
FWD includes native C code that must be built for many of the build targets. The most commonly used target is all, which builds the native components. Building the native code requires a C compiler and native code build utilities.
| Linux | Windows |
|---|---|
The gcc and binutils packages can be installed using sudo apt-get install gcc (the utilities will be pulled in automatically). |
MinGW is the recommended compiler and tools suite for building the FWD native code on Windows. It is an open source Windows port of gcc and the other common build tools that exist on UNIX/Linux (the linker, make...). It is packaged in a manner that allows full WIN32 development. As this is not using the Cygwin compatibility environment at runtime, the native FWD code will link to the msvcrt library to get the basic C runtime routines.Download one of the precompiled binary distributions, for your convenience the 4.9.0 version has been stored at https://proj.goldencode.com/downloads/mingw/mingw32_4.9.0_20140425.zip for the 32-bit binary or https://proj.goldencode.com/downloads/mingw/mingw64_4.9.0_20140425.zip for the 64-bit binary. These were originally found at MinGW precompiled page ( mingw-w32-bin-i686-2013MMDD.7z or mingw-w64-bin-x86_64-2013MMDD.7z). Install 32-bit compiler in 32-bit OS and 64-bit compiler in 64-bit OS.Unpack the MinGW archive, assuming the current directory is system root: jar xf path_to_archive\mingw32_4.9.0_20140425.zipor jar xf path_to_archive\mingw64_4.9.0_20140425.zip.Include the appropriate \mingwXX\bin in the PATH system variable, i.e. C:\mingw64\bin or C:\mingw32\bin, depending on the Windows architecture in use. |
Configure JNI Linking
The JDK installation must be configured to allow linking JNI modules to the shared library that implements the JVM JNI interfaces.
JNI is a bidirectional interface between C/C++ code and the JVM. It is used by FWD:
- FWD has a native library which is used on the FWD Client to access APIs in the operating system to do things that cannot be done directly in pure Java.
- The FWD Spawner (which is called by the FWD Application Server to launch FWD Client JVM instances) loads a JVM using JNI.
| Linux | Windows |
|---|---|
Run the following commmands:sudo rm /usr/lib/libjvm.so sudo ln -s /usr/lib/jvm/default-java/jre/lib/amd64/server/libjvm.so /usr/lib/libjvm.so This will ensure that the build process for linking the spawner and the native library ( libp2j.so) will properly link to the correct JVM. |
Ensure the java link library jvm.lib is copied into the GCC lib directory so that it can be found during compilation:32-bit: copy %JAVA_HOME%\lib\jvm.lib \mingw32\i686-w64-mingw32\lib\64-bit: copy %JAVA_HOME%\lib\jvm.lib \mingw64\x86_64-w64-mingw32\lib\ |
Install libffi
In order to support the calling of native library calls from Java code, FWD depends on Portable Foreign Function Interface Library (also known as libffi). The FWD JNI library is dependent upon libffi.
The following instructions are valid for a system being used for running the FWD Client as well as for building FWD. To support both use cases, you MUST install the development version of libffi. If you do not need to build FWD, you can follow the libffi install instructions for only executing the FWD client.
In all cases, the bitness of this library must match the OS architecture and also the bitness of the JVM used by the FWD clients.
| Linux | Windows |
|---|---|
On Linux, libffi can be installed using sudo apt-get install libffi-dev. |
The third party libffi-6.dll is required for use of FWD on Windows. The DLL must be installed into the system directory (usually C:\Windows\system32).As a convenience, the 32-bit and 64-bit pre-built libffi6.dll archives are available.The library files libffi*.*a are required to build FWD native modules for Windows. Current project implementation requires the libffi-6 related libs to be installed in (GCC) compiler libraries directory. When using the prebuilt binaries, the directory for lib files is: i686-pc-mingw32\.libs for 32-bit package and x86_64-w64-mingw32\.libs for 64-bit package. The all files except *.dll must be copied into mingw32\i686-w64-mingw32\lib directory for 32-bit MinGW, or into mingw64\x86_64-w64-mingw32\lib for 64-bit MinGW. The include files from i686-pc-mingw32\include or x86_64-w64-mingw32\include must be copied into mingw32\i686-w64-mingw32\include or mingw64\x86_64-w64-mingw32\include for 32-bit and 64-bit respectively.For details on building libffi from source code, please see Building and Installing libffi on Windows. |
Install NCURSES Development Headers (Linux Only)
Note This is the optional step for the cases when dynamically linked libp2j.so is planned to be used. Not necessary for statically linked native library.
The native code on Linux/UNIX is dependent upon NCURSES. In order to properly compile and link that code, the NCURSES development headers must be installed.
In prior releases of Debian/Ubuntu distributions, the ncurses.h header file was present in a standard gcc installation, but recent versions (e.g. Ubuntu 12.10 and later) no longer provide this by default. Make sure to install the libncurses5-dev package to get the required headers.
Install it using sudo apt-get install libncurses5-dev.
Install NCURSES Binaries and Data (Linux Only)
As noted above some part of the FWD uses native calls. The Linux native library libp2j.so building requires the specific tools to be installed on development system to properly configure internal data.
Install them using sudo apt-get install ncurses-base ncurses-bin ncurses-term.
Install Apache Ant
The FWD build process (and usually the execution of the various conversion project build tasks) uses Apache Ant (version 1.9 or later).
| Linux | Windows |
|---|---|
Install it using sudo apt-get install ant. |
Download the ant binaries in the zip archive from official site: http://ant.apache.org/bindownload.cgi. Unpack it to the desired location, set the system variable ANT_HOME to point to the path where ant was unzipped, then include the %ANT_HOME%\bin in the Path.Use the ant -version command to verify that ant is properly installed. It shows the version of ant. |
Install Pluggable Authentication Modules (a.k.a. PAM, Linux only)
Pluggable Authentication Modules (PAM) is a flexible mechanism for authenticating users. It is optional and only available on Linux/UNIX. It is used to perform OS-level authentication when the FWD Server launches a FWD Client, via the spawner tool.
This can be easily installed using:
sudo apt-get install libpam0g-dev
To use it during native task build, add this property to the gradlew build command:
./gradlew ... -Dhave.pam=yes
Install unzip
The commonly available unzip utility can be used to extract files from a ZIP archive. This may be needed to extract the source code from the FWD archive or from some of the other downloaded software (in the case of Windows).
| Linux | Windows |
|---|---|
Install it using sudo apt-get install unzip. |
Windows does not have the command line unzip.exe tool. To unzip all archive files in ZIP format it is possible to use either Windows GUI zip extractor (zip support is already included in the Windows XP (and above) File Explorer) or if the JDK is already installed the command jar xf some_zipped_file.zip can be used as an equivalent to unzip. |
NCURSES (Linux/UNIX Only)
FWD relies upon a native library libp2j.so (on Linux/UNIX) and p2j.dll (on Windows). Native code in that library is required to support terminals (Linux/UNIX) / console applications (Windows). On Linux/UNIX, that terminal support requires the NCURSES library.
As part of building FWD from source code, the libp2j.so native library is built. The preferable way is to make statically linked thread-safe library. The big advantage of this approach is to be completely independent on system-wide version of NCURSES. By keeping the system-wide NCURSES untouched, it ensures that other applications are unaffected by the installation of FWD. In the preferred approach, private NCURSES modules are specially compiled enabling multi-threading capabilities not available in the default system-wide NCURSES. See option 1. below in this section. Using this option is strongly recommended.
1. Using Thread-Safe NCURSES with Static Linking
With this option, libp2j.so is built using static linking to a version of NCURSES which has been recompiled to enable multi-threaded support (PTHREADS). If at all possible, use this option. It is available starting in FWD v4 revision YYY.
This approach avoids having to patch NCURSES and it only requires recompiling NCURSES on the system on which FWD is built.
2. Patching NCURSES Using Static Linking
In this approach, libp2j.so is built using static linking to a version of NCURSES which has been patched and recompiled. Use this as a fallback if option 1 is not possible. It is available starting in FWD v4 revision 14616.
This only requires patching NCURSES on the system on which FWD is built, avoiding patching the NCURSES on the system which runs libp2j.so.
In this option, the systems-wide NCURSES library is patched and the libp2j.so will dynamically link to that library when it is loaded at runtime. This approach is available in all versions of FWD but should only be used if the other options are not available.
Install FWD Source Code
The FWD project code is available as a ZIP format archive file in the downloads section of this site. This archive should include all of the source code and supporting files needed to build the FWD project on a given system.
The archive filename is normally in the form fwd_<branch_name>_revision_<revno>_<date>.zip. For this example, assume that the fwd_trunk_revision_11145_20170324.zip is in your home directory and that the FWD code is to be installed in a directory named ~/projects (Linux) or c:\projects (Windows). Given these assumptions, installation is as simple as the following commands to extract the zip file:
| Linux | Windows |
|---|---|
cd ~/projects unzip ~/fwd_trunk_revision_11145_20170324.zip |
First install JDK to use jar tool as zip extractor.cd c:\projects jar xf c:\PathToBundle\fwd_trunk_revision_11145_20170324.zip |
A directory ~/projects/p2j (Linux) or c:\projects\p2j (Windows) will be created with the source tree of the FWD project. For the remainder of the chapter, the environment variable $FWD (Linux) or %FWD% (Windows) will be a reference to that directory. The "p2j" is a historical name for "Progress 4GL to Java". References to that name are still present in the code. Those references will be removed and/or replaced with references to "fwd", but that work is not yet complete.
This can be "saved" into the environment to simplify subsequent commands:
| Linux | Windows |
|---|---|
export FWD=~/projects/p2jPlease note that this will only set the variable for the current terminal session. You will need to set this each time your start a new terminal session, if it is needed. |
Go to the Control Panel/System/Advanced System Settings/Environment Variables and add system environment variable with name FWD and value c:\projects\p2j. This will set it persistently for all future command prompts.You can create and assign the environment variable for the current command prompt using set FWD=c:\projects\p2j. This will be valid within current session only. |
Satisfying 3rd Party Software Dependencies
FWD project depends on a handful of 3rd party software dependencies, for the complete list see the page Software Dependencies. The Java dependencies don't have to be fetched manually, the standard FWD build process takes care of retrieving them automatically.
It is possible to use local versions of jar files on which FWD depends. The build script fetches dependencies from multiple artifact repositories. The first repository it checks is the local project directory local-repo. In order to give the build a local dependency, create the directory $FWD/local-repo (Linux) or %FWD%\local-repo (Windows) and then copy the dependencies in. The expected file structure is /$groupId[0]/../$groupId[n]/$artifactId/$version/$artifactId-$version-$classifier.$extension. So for the artifact com.goldencode:fwd-hibernate-core:4.1.8 the Linux file structure would be $FWD/local-repo/com/goldencode/fwd-hibernate-core/4.1.8/fwd-hibernate-core-4.1.8.jar.
Build FWD
FWD automates the build process with the help of Gradle and Ant. The original build environment for FWD was implemented as an Ant build.xml and many of the available tasks are still implemented in that form. The overall build process is now implemented in Gradle, and Gradle will invoke Ant as needed to execute tasks that have not yet been migrated to the Gradle build script. In addition to other build tasks, Gradle handles dependency resolution and downloading of all the Java dependencies.
The project uses the Gradle wrapper, which is an executable script that is included in the source tree itself. This script will download and cache the correct version of Gradle on first usage (or whenever needed). This is why it is not necessary to install gradle manually.
The most common way to build FWD is to use the all target.
| Linux | Windows |
|---|---|
Use the gradlew script to build:cd $FWD ./gradlew all |
Use gradlew.bat to build:cd %FWD% gradlew.bat all |
This will fetch all the Java dependencies, javac compile all Java source code, create the FWD jar files and compile/link the native code.
All of the FWD conversion and most of the runtime tools are stored in a file called p2j.jar. That file in turn is dependent upon other jar files, which have been specified in the p2j.jar file's manifest. This means that as long as the p2j.jar can be found in the Java CLASSPATH and those other jar files exist in the same directory, the tools will work properly.
The p2j.jar can be found in the $FWD/build/lib/ directory, along with each of the dependent jar files which are shipped with the FWD project. It is best to use those versions since they are tested and are known to work.
When running FWD commands, it will be necessary to use the -classpath $FWD/build/lib/p2j.jar:. parameter on the java command line.
Besides p2j.jar the build process also produces:
- the shared library
libp2j.so(on Linux/UNIX) orp2j.dll(on Windows), which provides native support for i.e. child process creation at runtime via Java Native Interface (JNI), native API calls, etc. It resides in$FWD/build/lib/directory and is only used at runtime for the FWD Client (it is not used on the FWD Server nor is it used for the user-defined functions at the database server) - the spawn tool, a file named
spawn(on Linux/UNIX) orspawn.exe(on Windows). It resides in$FWD/build/nativeand is used by the FWD Server runtime to automatically launch FWD Clients, in cases when web clients, batch processes or appserver Agents are launched from FWD Server side.
Should (re)building of the FWD native library and spawn tool be necessary for any reason, the native build task can be run:
| Linux | Windows |
|---|---|
cd $FWD ./gradlew native |
cd %FWD% gradlew.bat native |
The above compiles libp2j.so/p2j.dll and copies it to $FWD/build/lib/ directory. From there it can be picked up when setting up the runtime environment.
Cross-Compiling
It is highly recommended that you build FWD on the system on which you will run FWD. This is critical for the FWD Client (including the Spawner) which depends on the native code for proper execution. Any time you do not do this, you run the risk of failures due to a mismatching build between the native code and the operating system.
Check the version you have built:
| Linux | Windows |
|---|---|
This command will display details about the shared library:file build/native/libp2j.so The result will display something like this when you are running a 64-bit version: build/native/libp2j.so: ELF 64-bit LSB shared object, x86-64, version 1 (SYSV), dynamically linked, BuildID[sha1]=... |
In Windows use the MinGW tool objdump to check the p2j.dll bitness:The result will display something like this when you are running a 64-bit version: objdump -f build\native\p2j.dll p2j.dll: file format pei-x86-64 architecture: i386:x86-64, flags 0x0000013b: HAS_RELOC, EXEC_P, HAS_DEBUG, HAS_SYMS, HAS_LOCALS, D_PAGED start address 0x0000000065ac13e0 |
If you are running on a 32-bit operating system then things are quite simple: you can only have 32-bit JVM and there is no need to cross-compile. Use the libp2j.so/p2j.dll as built on that system.
Things are more complicated on a 64-bit operating system:
- It is possible to use a 32-bit JVM, but you would need to recompile the native code. To do this you must add the
-m32switch to C compiler (gccon Linux). To add this you will have to edit the$FWD/src/native/makefile. This will cross-compile and generate the code to fit the JVM bitness as the default target for the compile is the native, 64-bit. In Windows it is recommended to follow the rule:the same bitness for OS, JVM, MinGW, libffi*.dll and p2j.dll. - When using a 64-bit JVM it is mandatory to use the default version (64-bit) of the library.
On Linux/UNIX you will also need to have the ncurses library already patched and recompiled with the same bit-size as the one you want to target.
Available Build Tasks
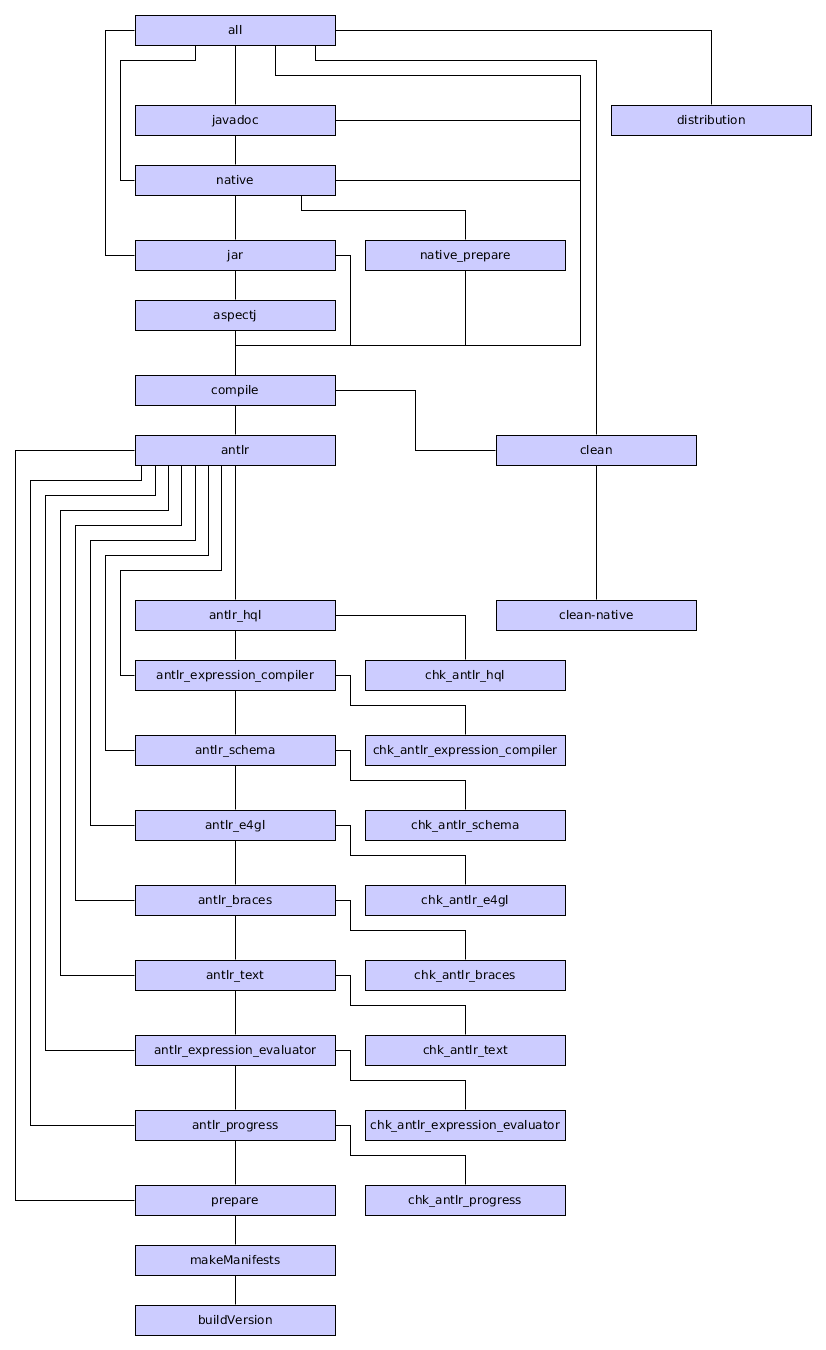
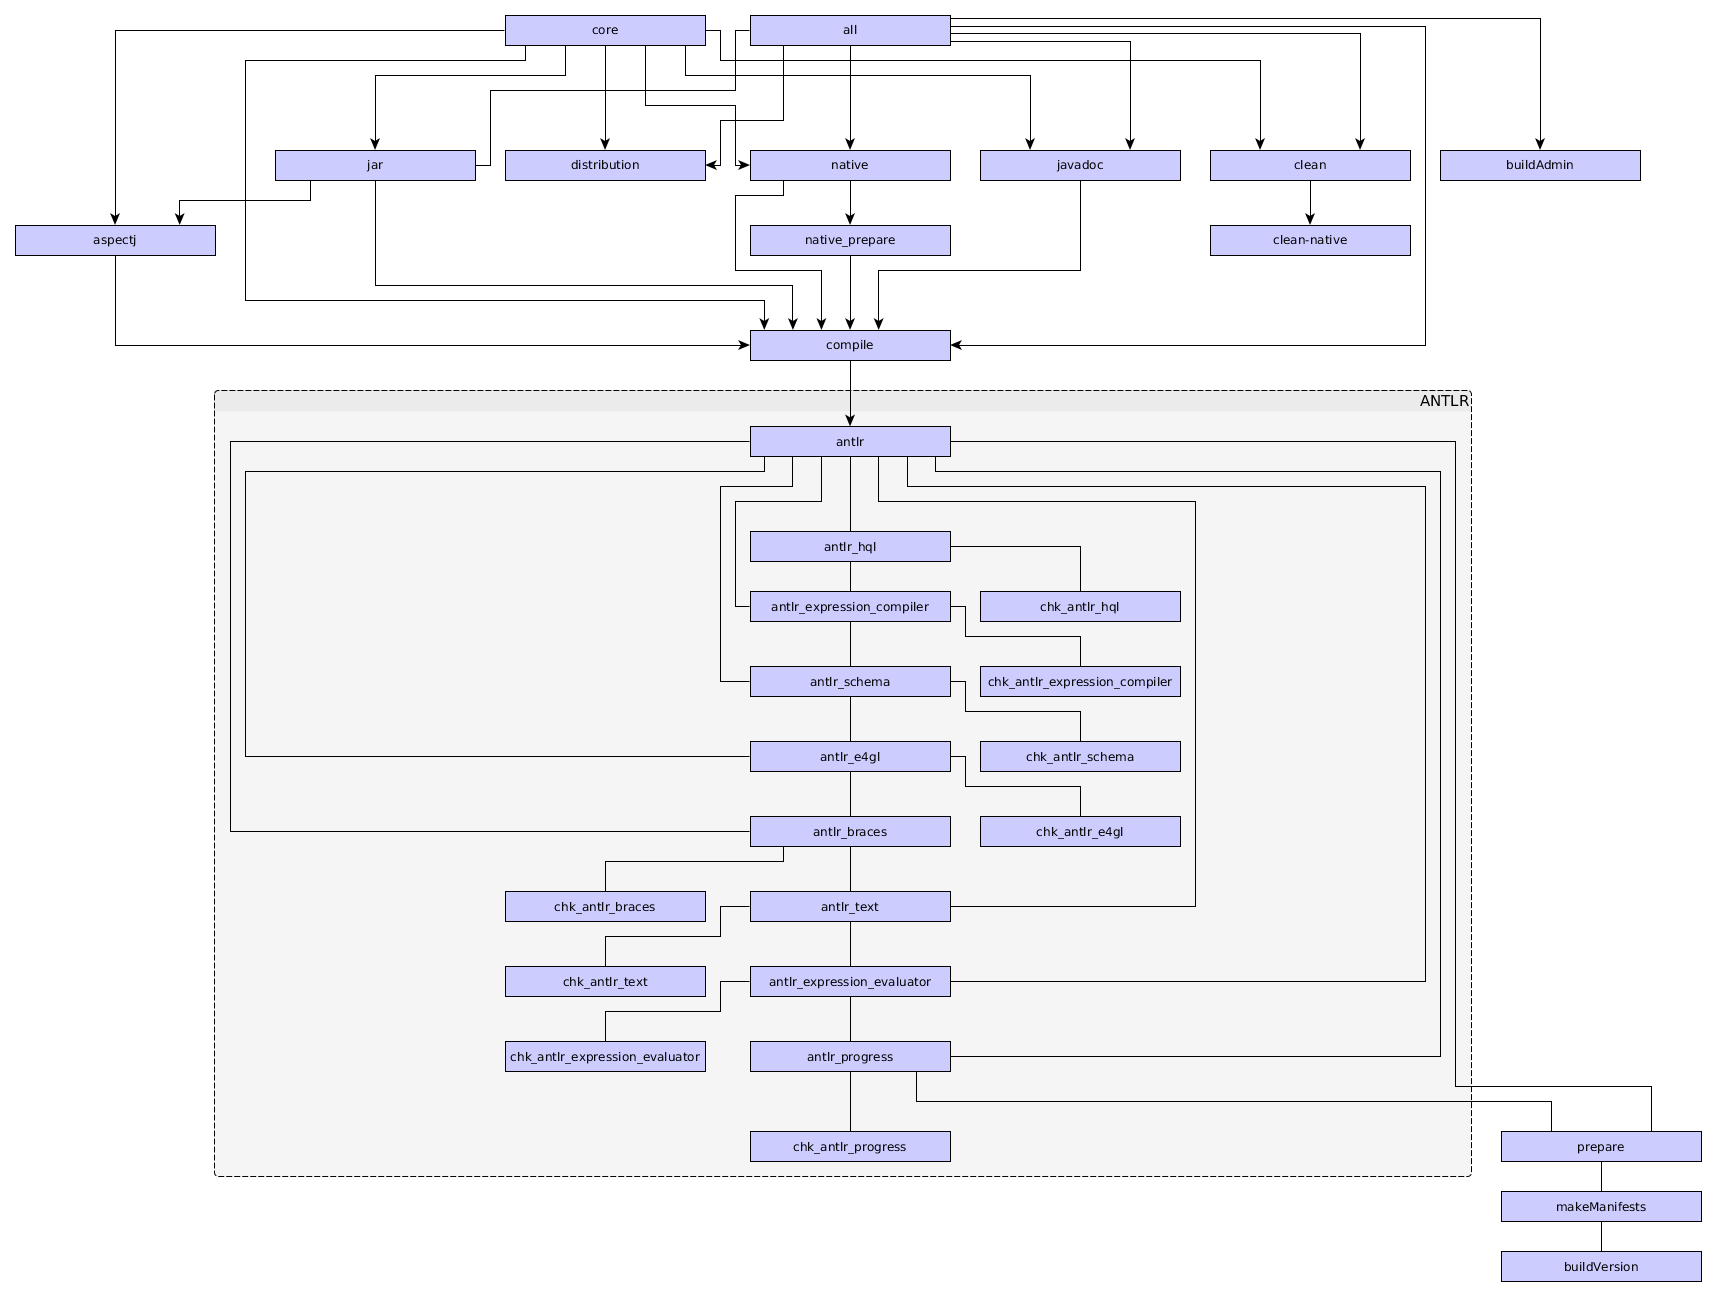
Following is a graphical representation of the build tasks defined by the FWD's build files:

from which:
all- this is the main build task that safely rebuilds all the FWD components, we recommend to use this task when build integrity is required. This target includesbuildAdminwhich compiles some classes using GWT, adding some minutes to the build process. If the admin UI is not needed, then one could build using thecoretarget which will allow faster builds. This might be useful on developer systems.core- this task is the same asallexcept it excludesbuildAdmin(available since FWD v3.1). This is faster thanallbecause it avoids the GWT compilation steps frombuildAdmin. This might be useful on developer systems.clean- will remove the entirebuild/anddist/folders, plus all files generated by theantlrandnativetasks.clean-native- will remove only thebuild/native/folder plus the header files generated in thesrc/native/folder, by thenativetask.buildVersion- assembles the FWD version string.makeManifests- creates the final jar manifests packaged in the jar targets.antlr- is responsible for running ANTLR transformer against all grammars used by FWD conversion engine or FWD runtime.compile- will compile the entire java source code and save them in thebuild/classes/folder.buildAdmin- compiles FWD Admin (available since FWD v3.1). This target compiles the admin client classes using GWT, which will add some minutes to the build process. If the admin UI is not needed, then avoiding this target (e.g. build using thecoretarget instead ofall) will allow faster builds. This might be useful on developer systems.native- will compile the native shared library (to be called via JNI) and also build the spawn tool. This will create, in the build/native/ folder:- the
libp2j.soorp2j.dllfile, holding the FWD's native API. - the
spawnerorspawner.exefile, the tool used for spawning FWD clients from server side.
- the
jarwill create the FWD jar files and place the in thebuild/lib/folder:p2jadmin.jar- is the jar downloaded by the applet running the FWD Administration Console.p2j.jar- is the main FWD file which contains both the FWD conversion and runtime infrastructure.p2jrt.jar- this jar is supposed to hold only the FWD runtime, but the subset of FWD packages contained by this jar are not fully tested. We don't recommend using this file, the p2j.jar file needs to be used for both conversion and runtime.p2jpl.jar- this jar is used exclusively on the database server to support custom, server-side functions implemented in Java.p2jspi.jar- includes service provider interface (SPI) classes for FWD collator support.
javadocwill create Javadoc API documentation from the FWD source files, and place it under thedist/folder. It can be accessed using thedist/docs/api/index.htmlfile.distribution- copies all the required runtime Java dependencies for FWD conversion, FWD server and FWD client tofwd_project_dir/dist.
schema- The target uses Hibernate ORM mapping documents to generate Database Definition Language (DDL) statements to create the matching schema in a PostgreSQL database.install_p2jpl- Builds jar targets by invoking thejarbuild target and copies the builtp2jpl.jarto the destination denoted byp2jpl_locationbuild property.fetchLibs- A helper target that copies all the compile time dependencies to the directoryfwd_project_dir/lib. This is particularly useful when building FWD by an IDE or any other tool that processes the sources which doesn't speak Ant and Gradle.createLocalRepo- Downloads the Java depenencies and stores them in thelocal-repo/directory. This will allow resolution of all dependencies without network access (e.g. in the presence of network errors or in--offlinemode). Available since FWD v3.1.0.
Build Properties
There are several build properties that drive the build outcome. The following table provides description of all the available ones. To set a build property use the -D command line parameter, i.e. gradlew all -Dpost.build=yes -Dspawn.install.folder=/opt/spawner -Dsrv.certs=/opt/app/deploy/server/srv-certs.store.
| Property | Expected Values | Default Value | Description |
|---|---|---|---|
post.build |
Boolean | 'no' | When set to 'yes' the native part of the build process deploys spawner to the directory defines in the property spawn.install.folder. |
spawn.install.folder |
A directory path. | '' | spawner deploy directory. The value is required when post.build is set to 'yes'. |
srv.certs |
A file path. | '' | The server certificate store file that is copied to spawn.install.folder and used by spawner. The value is optional. |
have.pam |
Boolean | 'no' | When 'yes' forces the build process to use PAM libraries. |
cfg.dir |
A directory path. | '' | This is the directory which contains the Hibernate configuration file used during schema build target. |
target.db |
A DB schema name. | '' | Used together with cfg.dir, holds the DB name for which the schema should be generated. |
p2jpl_location |
A directory path. | '' | Used by install_p2jpl build target. The value represents the destination directory where p2jpl.jar should be installed. |
javadoc.verbose |
Boolean | 'false' | Used by ant-javadoc build target. When true, all warnings are shown. |
Troubleshooting
By default the build script provides only brief log output. If the build fails for any reason use the --info command line parameter to get more detailed log output of the failure.
The build fetches dependencies from remote repositories and the fetched artifacts are stored in Gradle's local cache. If for whatever reason are the remote repositories not accessible, you may try to use the --offline command line parameter in order to only touch the local cache, i.e. ./gradlew all --offline.
Another option allowing offline work is fetching all the dependencies locally in the project directory by invoking ./gradlew createLocalRepo. The build always looks into the local repository first when it resolves dependencies. Beware that the task deletes all your Gradle cached files and re-downloads them again. The createLocalRepo target is available starting with FWD v3.1.0.
Artifacts Versioning
All the jar artifacts created by the build tasks are marked with a version string put into the jar manifests. The version string format is <major>.<minor>.<release>_<repo>_<branch>_<rev>. The components major, minor and release are defined in the file $FWD/version.properties.
By default, the values for repo, branch and rev are retrieved from the bzr code repository when building using a direct check-out of the project. When using code from a downloaded archive, then the repo, branch and rev will be defined in $FWD/version.properties.
The version string is stored in the manifests of the built jar files p2j.jar, p2jpl.jar, p2jspi.jar and p2jadmin.jar. All the jars also contain a main class that prints the version string to the standard output. You can invoke it with the standard java command: java -jar p2j.jar. FWD Server uses this to log its version when it starts. There is also a user-defined function getFWDVersion() that prints out the version of the jar file providing the user-defined functions (p2j.jar in case of H2 and p2jpl.jar for PostgreSQL databases), the function is called by FWD server when it connects to a database (and its output is printed to the server log) or it can be invoked manually by an SQL: SELECT getFWDVersion();.
© 2004-2017 Golden Code Development Corporation. ALL RIGHTS RESERVED.