IntelliJ Idea Configuration
- IntelliJ Idea Configuration
This guide explains how to set up your project in IntelliJ IDEA using two methods: using preconfigured project files or creating a project from existing files.
FWD since trunk revision 12126 contains a preconfigured IntelliJ Idea module. It can be found in tools/ide/idea. Use it directly in your own Idea project or indirectly through a converted project. The following sections will guide you through using these preconfigured files or creating the project manually from existing files, depending on your development needs.
Project Setup from Scratch
If you prefer to set up the project manually, follow these steps to create a project in IntelliJ IDEA from existing files:- When the main menu opens, press
Ctrl+Shift+Aand search and selectImport Project from Existing Sourcesfrom the popup. Alternatively, go toFile | New | Project from Existing Sources. - Select the folder containing the converted project you want to set up (e.g., dataset/hotel).
- In the
Import Projectwindow, selectCreate project from existing sources. - Next set the project name and verify the path.
- On the next page, unmark all sources and manually select
p2j/srcandsrcfolders. - When prompted to search for libraries, unmark all, then select
deploy/libanddeploy/lib/spi. - In the module page, two modules will be detected: the converted project and p2j. Ensure that the library paths appear in the right panel for module dependencies.
- Select the JDK you want to use, then
Create Project. - IntelliJ will now index the project. You can monitor the progress in the bottom-right corner.
Note: For steps 5 and 6 you can just leave everything marked but the indexing will take a lot longer. What is mentioned are the only ones needed.
Running/Debugging FWD
1. Using remote JVM debug- Run the server in detached mode using
./server.sh -d. This will open a port for the debugger to attach to. The port will be printed in the terminal or in stdout log: the default is 2080. - Open
Run/Debug Configurationswindow from the top right corner and add a new configuration by pressing the+sign in the top left of the window. - Select
Remote JVM Debugwindow from the top right corner and add a new configuration by pressing the+sign in the top left of the window. - Modify the port according to the debug port the server opened, usually 2080. Name and save the configuration.
Note: This method is simple to set up, but it has a significant drawback. It can be challenging to catch the debugger at the server startup because the server may have already passed the point you want to debug by the time you attach the debugger. If this happens, you can use the run configuration method described next.
- Open
Run/Debug Configurationswindow from the top right corner and add a new configuration by pressing the+sign in the top left of the window. - Select
Applicationwindow from the top right corner and add a new configuration by pressing the+sign in the top left of the window. - Click on modify options in the top right and select/deselect as such:
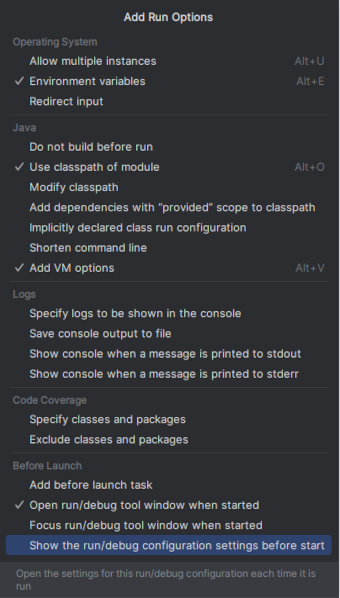
- You should end up with something like this:
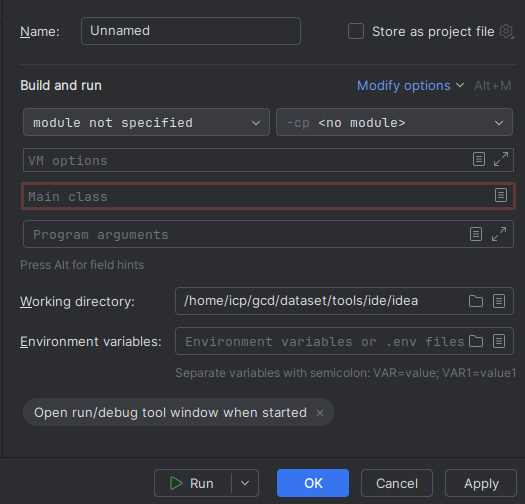
- Choose a name for this run configuration like FWD Server.
- Select the desired Java version you would like to use instead of
module not specified. - Select the converted project instead of
-cp no module. - For Main class:
com.goldencode.p2j.main.ServerDriver - For Working directory:
<project_root>/deploy/server - For VM options and Program arguments: Navigate to
<project_path>/deploy/serverand run./server.sh -t. This will print in the terminal the exact command the script is running to start the server. Below is an example output: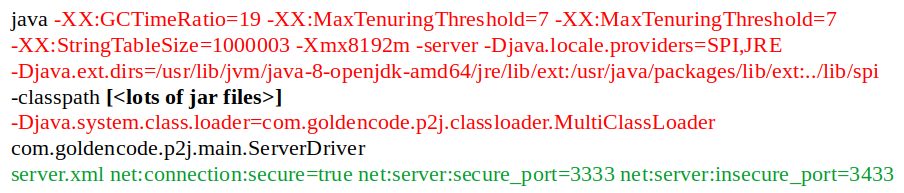
Program arguments are the ones highlighted in green, VM options with red. Add the identified values in the run configuration.
Project set up using preconfigured IntelliJ files
Prerequisites: Ensure that your project is built and can be run from the terminal.We will use 2 placeholders here: <project_root> for the path of the converted project you want to set up and <project_name> for the name of the project. Navigate to
<project_root>/build/lib and there you will find <project_name>.jar. That is the name you need to use.
- Step 1: Fetch IDE Dependencies: This step is required only once or when the dependencies change.
- Open a terminal and navigate to your project’sp2jdirectory:cd <project_root>/p2j
- Run the following command:./gradlew fetchDependencies
- Step 2: Create IntelliJ IDEA Configuration Files:
- Navigate to your project’s directory:cd <project_root>
- Create the folder structure for the config files:mkdir -p tools/ide/idea/and navigate therecd tools/ide/idea/.
- Here we need to create 3 configuration files, you can create them usingnano <file_name>command. - Configuration file for the converted project module:
<project_name>.iml<?xml version="1.0" encoding="UTF-8"?> <module type="JAVA_MODULE" version="4"> <component name="NewModuleRootManager" inherit-compiler-output="true"> <exclude-output /> <content url="file://$MODULE_DIR$/../../.."> <sourceFolder url="file://$MODULE_DIR$/../../../src" isTestSource="false" /> <excludeFolder url="file://$MODULE_DIR$/../../../.bzr" /> <excludeFolder url="file://$MODULE_DIR$/.." /> <excludePattern pattern="*.class" /> </content> <orderEntry type="inheritedJdk" /> <orderEntry type="sourceFolder" forTests="false" /> <orderEntry type="module-library" exported=""> <library name="<project_name>"> <CLASSES> <root url="jar://$MODULE_DIR$/../../../build/lib/<project_name>.jar!/" /> </CLASSES> <JAVADOC /> <SOURCES /> </library> </orderEntry> <orderEntry type="module" module-name="fwd" exported="" /> </component> </module>
Make sure to replace <project_name> in<root url="jar://$MODULE_DIR$/../../../build/lib/<project_name>.jar!/" />and in<library name="<project_name>">. - Configuration file for IDEA project:
<project_name>.ipr<?xml version="1.0" encoding="UTF-8"?> <project version="4"> <component name="CompilerConfiguration"> <option name="BUILD_PROCESS_HEAP_SIZE" value="1000" /> </component> <component name="InspectionProjectProfileManager"> <profile version="1.0"> <option name="myName" value="Project Default" /> </profile> <version value="1.0" /> </component> <component name="ProjectModuleManager"> <modules> <module fileurl="file://$PROJECT_DIR$/../../../p2j/tools/ide/idea/fwd.iml" filepath="$PROJECT_DIR$/../../../p2j/tools/ide/idea/fwd.iml" /> <module fileurl="file://$PROJECT_DIR$/<project_name>.iml" filepath="$PROJECT_DIR$/<project_name>.iml" /> </modules> </component> <component name="ProjectRootManager" version="2" languageLevel="JDK_1_8" default="true" project-jdk-name="1.8" project-jdk-type="JavaSDK"> <output url="file://$PROJECT_DIR$/out" /> </component> </project>
Make sure to replace <project_name> in<module fileurl="file://$PROJECT_DIR$/<project_name>.iml" filepath="$PROJECT_DIR$/<project_name>.iml" />.
Here we reference our 2 modules: the converted project, which .iml file we just created and the p2j module that already has an .iml file. - Run configurations file:
<project_name>.iws<?xml version="1.0" encoding="UTF-8"?> <project version="4"> <component name="AutoImportSettings"> <option name="autoReloadType" value="SELECTIVE" /> </component> <component name="ChangeListManager"> <list default="true" id="af460eca-b594-4753-b642-ce4dbeab42b4" name="Changes" comment="" /> <option name="SHOW_DIALOG" value="false" /> <option name="HIGHLIGHT_CONFLICTS" value="true" /> <option name="HIGHLIGHT_NON_ACTIVE_CHANGELIST" value="false" /> <option name="LAST_RESOLUTION" value="IGNORE" /> </component> <component name="PropertiesComponent"><![CDATA[{ "keyToString": { "Application.FWD Server.executor": "Run" } }]]> </component> <component name="RunManager" selected="Application.FWD Server"> <configuration name="FWD Client Swing GUI" type="Application" factoryName="Application"> <option name="MAIN_CLASS_NAME" value="com.goldencode.p2j.main.ClientDriver" /> <module name="fwd" /> <option name="PROGRAM_PARAMETERS" value="net:server:host=localhost net:connection:secure=false net:server:secure_port=3333 net:server:insecure_port=3433 client:driver:type=gui_swing ./client.xml" /> <option name="VM_PARAMETERS" value="-XX:+HeapDumpOnOutOfMemoryError -Djava.library.path=../lib/" /> <option name="WORKING_DIRECTORY" value="$ProjectFileDir$/../../../deploy/client" /> <method v="2"> <option name="Make" enabled="true" /> </method> </configuration> <configuration name="FWD Server" type="Application" factoryName="Application"> <option name="MAIN_CLASS_NAME" value="com.goldencode.p2j.main.ServerDriver" /> <module name="<project_name>" /> <option name="PROGRAM_PARAMETERS" value="server.xml net:connection:secure=true net:server:secure_port=3333 net:server:insecure_port=3433" /> <option name="VM_PARAMETERS" value="-XX:GCTimeRatio=19 -XX:MaxTenuringThreshold=7 -XX:MaxTenuringThreshold=7 -XX:StringTableSize=1000003 -Xmx8192m -server -Djava.locale.providers=SPI,JRE -Djava.ext.dirs=/usr/lib/jvm/java-8-openjdk-amd64/jre/lib/ext:/usr/java/packages/lib/ext:../lib/spi -Djava.system.class.loader=com.goldencode.p2j.classloader.MultiClassLoader " /> <option name="WORKING_DIRECTORY" value="$ProjectFileDir$/../../../deploy/server" /> <method v="2"> <option name="Make" enabled="true" /> </method> </configuration> <list> <item itemvalue="Application.FWD Server" /> <item itemvalue="Application.FWD Client Swing GUI" /> </list> </component> <component name="TaskManager"> <servers /> </component> </project>
- Make sure to replace <project_name> in<module name="<project_name>" />.
In the example above, in the <configuration> tag, we include a Server Run Configuration and a Client Run Configuration. Depending on your needs you can only keep the one for the server.
We need to modify PROGRAM_PARAMETERS and VM_PARAMETERS <option> tag accordingly. - Follow the steps above at IntelliJ Idea Configuration: Project setup from scratch - Running/DebuggingFWD - Step 2, last bullet, where it is explained how to identify them.
- Repeat the steps for the client configuration by running
./client.sh -tin<project_path>/deploy/client, identify the parameters and update the .iws file.
- Step 3: Open IntelliJ Project: From Idea open the project file
<project_root>/tools/ide/idea/<project_name>.ipr.
Running/Debugging FWD
To run (or debug) the project from Idea:
1. Start FWD Server run configuration.
2. Wait for the server to finish its initialization. Make sure there are no exceptions or error messages in the run/debug output window and wait for the output message "Server ready".
3. Start FWD Client Swing GUI run configuration.
4. The application window will come up.
To automate the launch process feel free to install Multirun Idea plugin or similar.
Hotel Setup
Hotel GUI Demo Application, since bzr revision 228 contains a complete Idea project.
Quick start
1. Checkout or download Hotel GUI Demo Application revision 228+.
2. Build the sample project by following the wiki page at least up to the point Hotel GUI Demo Application: Build Your Application.
3. Fetch the IDE dependencies (this is needed only once or after the dependencies change):
cd <hotel_gui_root>/p2j
./gradlew fetchDependencies
4. Run Idea.
5. Configure Java 8 in Idea, FWD requires this particular version.
6. From Idea open the project file
<hotel_gui_root>/tools/ide/idea/hotel.ipr.
Project layout
The Hotel GUI Idea project contains two Idea modules. One for the core FWD itself and second for the Hotel GUI generated code and related resources. The modules point to the needed set of Java dependencies located in <project_root>/p2j/.lib/ and resolved by fetchDependencies Gradle target. The project is configured to write build outputs in <project_root>/tools/ide/idea/out.
The project has two run/debug configurations. FWD Server and FWD Client Swing GUI. As the names imply, the former is used to start FWD server, where all the converted business logic runs and the latter is the client Java process for presenting the program outputs and for handling user input.
FWD utilizes AspectJ framework. When built with Gradle the code is compiled with AspectJ compiler and all aspect-related code magic (weaving) is performed during compile time. Idea has only limited support for AspectJ and so the project is setup to perform the weaving on runtime, when the Hotel GUI application starts. For this reason both run/debug configurations supply -javaagent JVM arguments with the AspectJ weaver jar file and reference aop.xml in <project_root>/p2j/tools/ide/res/META-INF with all the needed AspectJ configurations.
The class path dependencies for both modules are declared in a particular order so that the expected class or resource is correctly resolved. For instance the class path for the Hotel GUI module must contain hotel.jar (to satisfy some of the FWD requirements on resource jars), which already contains the compiled converted legacy Java classes. For this reason the jar must appear on the class path after the project sources so that any edited Java classes are resolved first.
The classpath dependencies of both modules are defined as follows:
FWD
1. Java 1.8 classes
2. Module sources
3. FWD jar file dependencies
Hotel GUI
1. Java 1.8 classes
2. Module sources
3. hotel.jar
4. FWD module
Running/Debugging FWD
To run (or debug) the Hotel GUI project from Idea:
1. Start FWD Server run configuration.
2. Wait for the server to finish its initialization. Make sure there are no exceptions or error messages in the run/debug output window and wait for the output message "Server ready".
3. Start FWD Client Swing GUI run configuration.
4. The Hotel GUI login window will come up.
To automate the launch process feel free to install Multirun Idea plugin or similar.
Editing the code
Any Java source code changes in Idea will be correctly compiled by the IDE, no need to run Gradle. However certain changes do require jars to be rebuilt with Gradle (with the ant jar command). These changes include changes in the bitmap files used in the GUI, certain XML files, and so on. If your change doesn't show up in the launched application instance, rebuild with Gradle.
Obviously any changes to the ABL code must be reconverted following the CLI conversion process. This can't be currently handled by the IDE. Also make sure you backup any manual changes to the converted classes before reconversion.
Code Style
The file GCD_code_style.xml contains code style definitions for IntelliJ Idea exported from version 2022.2.3. To import press Ctrl+Alt+S to open the IDE settings and select Editor | Code Style.
Switching JDKs in IntelliJ
IntelliJ allows you to install and manage multiple JDKs. To switch the JDK version used, follow these steps:
- Go to
File | Project Structurein the Project section, under Project SDK, click New and select the JDK version you need. - Select the desired JDK under Project SDK and apply.
Note: Make sure that p2j is built using that JDK: run ./gradlew all in p2j, and ant.deploy.prepare in the converted project root.
Importing Ant Scripts
When setting up your project in IntelliJ, theProject from Existing Sources wizard should automatically detect and import any Ant scripts included in your project. If the scripts are not automatically detected, you can manually add them:
- Open the Ant Build tool window from the right-side toolbar.
- Click on the
+icon to add a new build file. - Navigate to your Ant build file (usually
build.xml) and select it.
The Ant build targets will now be available within IntelliJ and you can run them directly from the IDE.
Reference Card
For those who prefer to use keyboard shortcuts in IntelliJ IDEA, you can download the official IntelliJ IDEA Reference Card. This card provides a comprehensive list of shortcuts that can significantly speed up your workflow.
Other configurations which will make your life easier on IntelliJ
- By default, the
.rulesTRPL are not recognized as XML files, so enhanced support for editing these files can be enabled by:- Open
File | Settings, type in search boxFile Type(or go directly to it inEditor); - Look for
XMLinRecognized File Typesand click+inFile name patternsto add:*.rules,*.ast,*.jast,*.hints,*.p2o,*.ext-hints,*.schema,*.dict. Order is irrelevant, they will be sorted, anyway.
- Open
- To get a bit of 'highlighting' and better auto-complete for 4GL source files, import the
Progress files.xmlattached
Issues
TT:
For me the idea configuration could not run. After analyzing the server.sh script, I figured out that I had to change the VM options to
-Xmx4768m -server -Djava.ext.dirs=/usr/lib/jvm/java-8-openjdk-amd64/jre/lib/ext:/usr/java/packages/lib/ext:../lib/spi -Djava.system.class.loader=com.goldencode.p2j.classloader.MultiClassLoader
and the CLI arguments to
server.xml net:server:insecure_port=3333 net:connection:secure=true net:server:secure_port=3334
© 2004-2021 Golden Code Development Corporation. ALL RIGHTS RESERVED.
GCD_code_style.xml  (11.5 KB)
Progress files.xml
(5.32 KB)
identify_parameters.png (42.4 KB)
modify_options_screen.png (116 KB)
run_config.png (41.3 KB)