Spawner Setup and Configuration
To allow the launching of clients by the FWD server, a tool called the spawner is provided with FWD. This tool is responsible for spawning a new FWD client in a distinct process at the OS level, using specific credentials (which are “read” depending on the type of client being spawned).
The spawner relies on the spawn (on Linux/UNIX) or spawn.exe (on Windows) tool, which is automatically invoked by the FWD Server, in situations when it needs to automatically launch a client.
The spawner infrastructure allows different kind of clients to be silently started by FWD; this includes:
- remote P2j Clients associated with a web clients session, when the user needs access the FWD Client from a web browser;
- automatically start the Agents associated with an appserver (legacy OpenEdge Application Server) exposed by a FWD Server'
- automatically start batch processes, either via the scheduler or from the
ServerDriver's-b <process-id>argument.
Considering these cases, the spawner will allow password-less logins (when a new batch process or appserver Agent is started) or user-specified logins, in case of web clients. This chapter will provide details about how to build, install and configure the spawner tool, regardless of how it is intended to be used.
Installing the Spawn Tool
The spawn tool is automatically built by the FWD native task, from the build.xml file. Complete details about how to fully build FWD (and the external dependencies) are found in the Building FWD From Source chapter of this book.
Linux
On Linux, installing the spawner can be done automatically when building the native task, by passing some special properties to the ant command; the user who launches this command needs to have sudo rights, required by the special permissions set for these files. Also, these properties depend on how the spawn tool is expected to be used:
1. For spawning appserver agents, batch processes (and optionally web clients).
If the FWD Server is configured as an appserver or batch processes are expected to be launched from FWD Server side (regardless if web clients are used or not), then this command needs to be used:
ant jar native -Dpost.build=yes -Dspawn.install.folder=$P2J/build/spawner -Dsrv.certs=<path-to-server's-trust-store>/srv-trust.store
2. For spawning only web clients.
If only web clients are used, then this command needs to be used:
ant jar native -Dpost.build=yes -Dspawn.install.folder=$P2J/build/spawner
The jar task is specified in the above commands because the spawn tool relies on p2j.jar to launch the clients. The meaning of these properties is:
-Dpost.build=yesenables automatic setup of the spawner tool-Dspawn.install.folderis used to specify a folder where the files needed by the spawner tool will be installed-Dsrv.certsis used to specify a trust store containing the root CA and trusted server certificates. This is required when automatically launching a FWD process from server side: as the spawner can be instructed to automatically start a OS process using some supplied OS user ID by anyone who launches the tool, this will ensure that the requests will be accepted only from the trusted FWD servers specified in this trust-store. The file will be copied in the folder specified by thespawn.install.folderproperty and renamed tosrv-certs.store.
After the post-build part of the native task is done, the files copied in the target folder will all be owned by root and will have these permissions:
p2j.jar- the FWD jar file, with the permissions set to0550.spawn- the spawn tool, with the permissions need to be set to4755.srv-certs.store- the server trust-store, with the permissions need to be set to0550.
If the spawner files installed in the folder specified during post-build are manually moved to another folder, it is important for the names, permissions and ownership of these files to be maintained; otherwise, the spawner tool will not work, as it can't guarantee the security of the tool.
3. Reinstall when FWD is rebuilt.
In non-local spawning approaches, the spawner creates a temporary session from the client to the server using the jar file on the client. If that jar is not the same one as the server jar, then it will cause problems/failures. With each new FWD revision, the build will change the serialization version numbers of the various Java classes used for network communication. This means that deserializing objects will fail during network transmission, if their class version ID does not match. For this reason, when FWD is rebuilt for whatever reason, the spawn tool needs to be reinstalled.
Windows
On Windows, it is required to manually copy and configure the spawner.
1. Copy files.
Copy the following files (with these exact names) into a folder of your choosing (for example, p2j/spawner/):
p2j.jar- the FWD binary.- a file named
srv-certs.store, which contain the server trust store. This is needed only when launching batch processes or appservers via the FWD Server. spawn.exe- the FWD spawn tool, which launches a FWD Client using a specific OS user. Can be found in thep2j/build/native/folder, after thenativetask is executed.spawn.ini- a property file, needed only if launching batch processes or appservers.
2. Configure spawn.ini.
On the Windows operating system, it is not possible to launch a process as another user without knowing that user's OS password. As the user's OS password has to be saved in the directory, the spawn.ini file allows the encryption of the passwords, using a master password. The structure of this file is (all are mandatory):
# Encryption section. Contains encryption options.
[Encryption]
# Enable/Disable (1/0) encryption. Default disabled (0)

enabled=0
# Encryption keys values. Each key MUST be 128 bits long (16 characters)
# All 3 key values key1, key2 and key3 MUST be provided.

key1="<random-pass1>"
key2="<random-pass2>"
key3="<random-pass3>"
where:
enabled- sets how the user OS passwords are kept in the FWD directory. 0 specifies to keep the passwords in clear text and 1 to keep them encrypted.key1,key2,key3- random passwords, each of them exactly 16 chars long.
The idea of the spawn.ini is to provide enough information to decrypt passwords sent by the FWD server. It also provides information to the spawn.exe in encrypted password generation mode, so that the given plain text passwords can be encrypted.
3. Encrypt Passwords
If needed, the user OS passwords can be encrypted using the command spawn.exe 9 <user-password> command, which writes the encrypted password to STDOUT; note that the enabled property is required to be set to 1, to use this feature. It is required to run the spawn.exe such that the spawn.ini can be found in the current directory. The spawn.exe reads .\\spawn.ini to get the encryption configuration. Then it encodes the password and prints it out.
At that point the encrypted version should be added to the directory. See Web Client Setup for details.
4. Install Microsoft Visual C++ runtime if not already present.
On Windows, the spawn.exe uses the JVM.DLL to launch a new JVM instance. The java.exe and JVM.DLL must be located in the system PATH as noted in Install the JVM. Usually it is located in jre\bin\server subdirectory of the main JDK tree.
Do not put jvm.dll into spawner directory instead. Such an approach will not work and it will be quite difficult to diagnose the failure.
5. Install MS CRT dependencies.
As seen in the following listing, the JVM.DLL has dependencies on system DLLs and also has a dependency on MSVCR100.DLL which does not ship with the OS.
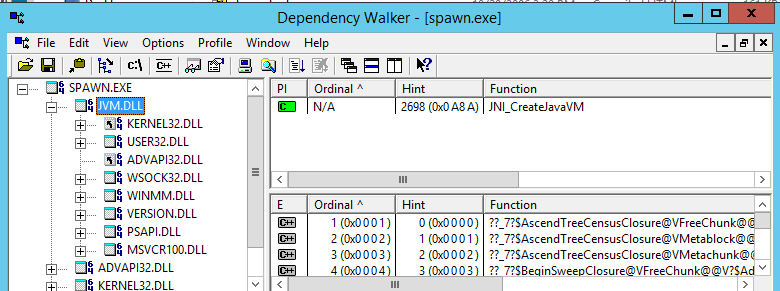
For spawn.exe to work properly, it is required to install Microsoft Visual C++ 2010 Redistributable Package if the system does not yet have it. The respective packages can be found here:
| FWD mirror | Original Microsoft downloads |
|---|---|
| vcredist_x86.exe, 32-bit | vcredist_x86.exe, 32-bit |
| vcredist_x64.exe, 64-bit | vcredist_x64.exe, 64-bit |
Just download respective package and install it before usage of the Web Client.
6. Configure AntiVirus exceptions, if needed.
The spawner is a tool that runs processes on behalf of a user other than current one. Some antivirus software can consider this program/action as virus activity preventing normal execution. If this is an issue, after check-summing spawn.exe it can be added to exception list for Windows Defender (or other antivirus software) to avoid this issue.
7. Allowing java program to execute.
When the spawn.exe running very first time with java.exe the user see the another Security window asking to allow(or not) the execution for java program. Allowing is important because if not to do so the java programs will not work. This is one time action per fresh Windows system. No need to do this every time of the spawn.exe + java.exe combination.
For example in Windows 7 the following screen will be shown:

8. Reinstall when FWD is rebuilt.
In non-local spawning approaches, the spawner creates a temporary session from the client to the server using the jar file on the client. If that jar is not the same one as the server jar, then it will cause problems/failures. With each new FWD revision, the build will change the serialization version numbers of the various Java classes used for network communication. This means that deserializing objects will fail during network transmission, if their class version ID does not match. For this reason, when FWD is rebuilt for whatever reason, the spawn tool needs to be reinstalled.
Directory Configuration
Client Config
The directory configuration for the FWD Clients automatically started from the FWD server side reside in clientConfig nodes. This node can be specified either per-server or per-account. The following list specifies the order on which a certain clientConfig/ node will be searched:
/server/<server-id>/runtime/<subject-id>/clientConfig/<node>/server/<server-id>/runtime/default/clientConfig/<node>/server/default/runtime/<subject-id>/clientConfig/<node>/server/default/runtime/default/clientConfig/<node>/server/<server-id>/clientConfig/<node>/server/default/clientConfig/<node>
On first match, it will return the node's configured value. This allows some configuration to be specified globally (like the location of the spawn tool, the classpath and library paths, etc) and other configuration to be specified per-account (like bootstrap config overrides, special JVM args, etc).
The following table shows all the possible configurations which can be specified for a FWD client automatically spawned from server side, and how this maps to the command used to launch the OS process, for the remote FWD client:
| clientConfig/<node> | Type | Mandatory | Default Value | ClientDriver argument | Description |
|---|---|---|---|---|---|
appArgs |
string | no | n/a | -a <appArgs> |
This represents any application arguments passed to the FWD Client. |
cfgOverrides |
string | no | n/a | <parameter_overrides> |
Allows override of the default bootstrap configuration specified in an external client.xml file. |
systemUser |
string | no | The authenticated FWD subject ID | n/a | Represents the system user ID, under which the OS process will be launched. |
systemPassword |
string | yes (only on Windows) | n/a | n/a | On Windows, this represents the system password used to authenticate the specified user. This can be encrypted using the spawner tool, as specified in the Installing the Spawn Tool section. |
secure |
boolean | no | true | net:connection:secure=<value> |
Flag indicating if the FWD Client needs to connect in secure or insecure mode. |
spawner |
string | yes | n/a | n/a | The location of the spawner tool. This should be in sync with the folder where the spawner was installed. |
jvmArgs |
string | no | -Xmx512m -Djava.awt.headless=true |
n/a | Any JVM arguments which will be automatically added to the java process launch command. The -Djava.awt.headless=true needs to be specified even when this configuration is explicitly set in the directory. |
classpath |
string | no | $P2J_JAR_FOLDER/p2j.jar |
-classpath=<classpath> |
The classpath passed to the java command. By default, this will use the same jar file used to launch the FWD server. Is recommended that this points to a FWD Client installation. |
libPath |
string | no | $P2J_JAR_FOLDER/ |
-Djava.library.path=<libPath> |
The java library path passed to the java command. By default, this will use the folder in which the server's p2j.jar file is located. Is recommended that this points to a FWD Client installation. |
workingDir |
string | yes | ./ |
If omitted, this defaults to the same folder as where the FWD Server is running. Needs to be a full path to a folder for which the specified systemUser has the proper permissions. |
|
configFile |
string | no | n/a | <config1> | An explicit bootstrap config file, for the FWD Client. If a relative name is specified, then this name will be relative to the specified workingDir.If missing, the default standard_client.xml file will be used. |
command |
string | no | java |
n/a | The command to launch the java process. |
outputToFile |
string | yes (for appserver Agents) | n/a | n/a | The name of a file on which the FWD Client output will be written to this file. Used only when launching FWD batch processes or appserver Agents. Mandatory when launching appserver Agents, as their output needs to be redirected to a file. The specified filename is processed so that: • the %userid% substring is replaced with the FWD process ID.• the %timestamp% substring is replaced with the current timestamp (in millis).• the %appserver% substring is replaced with the appserver's name, if the FWD process is associated with an appserver. |
security:certificate:validate |
boolean | no | false |
net:connection:secure=<value> |
Flag indicating if the server's certificate needs to be validated or not. |
In this table, the $P2J_JAR_FOLDER represents the folder where the FWD Server's jar is located (computed automatically at runtime). Also, keep in mind that for nodes which work with system file paths or commands, it is important to specify these files and paths using the operating system's file and path separators (the OS on which the FWD client will be spawned).
Following is an example of a fully configured node:
        <node class="container" name="clientConfig">
          <node class="string" name="appArgs">
            <node-attribute name="value" value="val1 val2 val3"/>
          </node>
          <node class="string" name="cfgOverrides">
            <node-attribute name="value" value=""/>
          </node>
          <node class="string" name="systemUser">
            <node-attribute name="value" value="bogus"/>
          </node>
          <node class="string" name="systemPassword">
            <node-attribute name="value" value="bogus"/>
          </node>
          <node class="boolean" name="secure">
            <node-attribute name="value" value="TRUE"/>
          </node>
          <node class="string" name="spawner">
            <node-attribute name="value" value="/home/bogus/spawner/spawn"/>
          </node>
          <node class="string" name="jvmArgs">
            <node-attribute name="value" value="-Xmx512m -Djava.awt.headless=true -Xdebug -Xnoagent -Djava.compiler=NONE -Xrunjdwp:transport=dt_socket,address=2998,server=y,suspend=n"/>
          </node>
          <node class="string" name="classpath">
            <node-attribute name="value" value="/home/bogus/p2j/build/lib/p2j.jar"/>
          </node>
          <node class="string" name="libPath">
            <node-attribute name="value" value="/home/bogus/p2j/build/lib"/>
          </node>
          <node class="string" name="workingDir">
            <node-attribute name="value" value="/home/bogus/run/client/"/>
          </node>
          <node class="string" name="configFile">
            <node-attribute name="value" value="client.xml"/>
          </node>
          <node class="string" name="command">
            <node-attribute name="value" value="java"/>
          </node>
        </node>
In some cases, the FWD Client or the spawner needs to obtain a secure connection back to the FWD Server, for some additional data or work. To allow this, the environment on which the spawner tool is launched is populated with properties holding the the subject ID and password of a temporary FWD user account. The user IDs for these temporary accounts are re-generated on each server startup and added to a pool: each time a temporary account is polled from the pool, its password is randomly generated. Also, they are very short lived: a temporary account is enabled only just before the FWD Server needs it, otherwise being disabled. All these user accounts are automatically added to the temps group, so they can be easily distinguished in the Administrative Console.
The number of these temporary accounts depends on the FWD application server usage: the expected number of users which will use web clients simultaneously, the number of FWD batch processes or appserver Agents being automatically launched, etc. This is configured via a tempClient/ node, set at the per-server configuration, under either the /server/<server-id>/ or /server/default/ node. The possible configurations are:
- the pool size, via the
tempClient/poolSizenode. This represents the number of temporary accounts accessible for the spawner tool. - the pool poll timeout, via the
tempClient/timeoutnode. When the temporary account pool is empty (i.e. all temp accounts are in use), this is the number of milliseconds to wait before giving up on retrieving a temporary account from the pool (thus failing to start a FWD client). Due to the nature of how these accounts are expected to be used, a value of 30 seconds should be enough for most use cases.
A configured node looks like:
<node class="container" name="tempClient">
   <node class="integer" name="poolSize">
      <node-attribute name="value" value="10"/>
   </node>
   <node class="integer" name="timeout">
      <node-attribute name="value" value="120000"/>
   </node>
</node>
where a pool with 10 temporary accounts is configured, and a 2 minute wait is used when polling an account from the pool.
To allow the FWD server process to create the temporary accounts, it is required for the FWD server's subject ID to have read/write access to the /accounts/groups/ and /accounts/users/ namespaces, if the AdminResource plugin is configured. Also, if the SystemResource plugin is used, the FWD Server's subject ID must have access to the admin and accounts resource instances. Finally, to allow the spawner APIs to be invoked via network proxies, it is required to add access to the com.goldencode.p2j.main.Spawner and com.goldencode.p2j.main.RemoteSpawner interfaces if the NetResource plugin is used; additional interfaces might need to be configured, if remote process launching or appserver launchig is used. See the Access Control List chapter of this book for details about how to setup these permissions.
Access Control Lists
TBD: Document the "net" resource Spawner and RemoteSpawner entries.
TBD: Document trustedspawner entry.
Windows Configuration
For Windows, it is required to specify the system password for each system user used. This is recommended to be specified on a per-FWD account basis, in either the /server/<server-id>/runtime/<subject-id>/clientConfig/ systemPassword or the /server/default/runtime/<subject-id>/clientConfig/systemPassword node, i.e.:
<node class="container" name="clientConfig">
   <node class="string" name="systemPassword">
      <node-attribute name="value" value="<encrypted-password>"/>
   </node>
</node>
For security reasons, the password is recommended to be kept encrypted.
Under the Hood
The steps take by the spawn tool to launch a FWD Client depends on how the client is started (password-less or not) and the operating system on which the FWD Client will be started. Following list describes these steps:
1. A temporary account is polled from the temporary account pool and added to the spawner process environment.
2. The spawner is launched using one of these two syntaxes:
- for password logins, using the
spawn 1 <user> <workdir> <command> [args]syntax. In this case, the user's system password is written to the standard output, from where the spawner will pick it up. The other arguments are:
-1represents the spawner's mode, to use the user/password to authenticate on the system
-<user>represents the system user-password
-<workdir>represents the working dir where the<command>will be launched
-<command>represents the command launched by the spawner (usually java).
-[args]represents other arguments for the launched command.
After checking the received user/pass are valid credentials for the system, the command will be launched using that user's context.
- for password-less logins, using the
spawn 0 <secure-port> <host> <server-alias> <uuid>syntax. In this case, the spawner needs to establish a connection to the FWD server specified in the arguments, and get the retrieve the actual command to be launched. Thesrv-certs.storetrust-store has a major part here, to validate that the target FWD Server is trusted to use the spawner. The arguments are:
-0reperesents the spawner's mode, to connect to the FWD Server and get the real command.
-<secure-port>represents the secure port on which the FWD server is listening.
-<host>represents the host on which the FWD server is running.
-<server-alias>represents the server's certificate alias, in the trust store.
-<uuid>represents a random-generated ID, so that the FWD server can send the correct command back to the spawner.
The spawner will create a JVM instance and call Java code to retrieve the real command from the specified server. The authentication on the FWD server side will be done using the temporary accounts set at the spawner's environment, in theP2J_SUBJECTandP2J_PASSWORDsystem properties.
If the remote client is launched on Windows systems, the user's password will be included in the command received from the FWD Server, as Windows does not allow launching a command on behalf of another user, without specifying that user's password.
3. The FWD Client is started by the spawner, in a child process which has the security context of the specified user. In this case, as the launching is done automatically, the FWD Client will connect to the remote FWD server using the temporary FWD credentials and check if it needs to do any additional work before launching the actual client; this includes:
- for web clients, it will retrieve the server's key store and start the client's embedded web server.
- for batch processes or appserver Agents, it will retrieve from the server side any security configuration for this FWD process; this includes: the server's trust store and the process key store, if the process certificate and private key are kept in the directory.
4. The FWD server which initiated this request is notified that the FWD client was started successfully.
Debugging Spawning
1. Make sure the spawner dir is created. Updating a project to a newer version of FWD requires a new spawner to be built. The files in the spawner directory should be present and updated. Some install_spawner.sh/install_spawner.cmd scripts only copy the spawner executables instead of building the latest native code beforehand. So verify if the directory p2j/build/native/ has spawn/spawn.exe recently updated.
2. Enable full spawner logs and look for obvious errors, issues with arguments (os user, workingDir path), or temp JVM logs indicating a problem. To enable all spawner logs update directory.xml:
<node class="container" name="logging">
  <node class="container" name="loggers">
    <node class="string" name="spawner">
      <node-attribute name="value" value="ALL"/>
    </node>
  </node>
</node>
3. All operating system accounts used for spawning new web / appserver / scheduled batch clients need to have rights to write in the workingDir and logging/file/path (if configured), and read rights for -Djava.library.path (that is the default path to p2j.jar). Avoid using /home/user/ type of paths.
4. Enable additional debug log files (spawn_native_$pid.log) for each spawn attempt to find any JVM errors with the new process:
<node class="container" name="clientConfig">
  <node class="boolean" name="enableSpawnerDebug">
    <node-attribute name="value" value="TRUE"/>
  </node>
</node>
Some wrong / deprecated / debug JVM arguments can cause the process to fail. Verify the values in clientConfig/jvmArgs.
5. If the server logs indicate the spawner has exited with code 0, there could be other issues hiding themselves around the spawning process. Look for any client crash logs in workingDir or client logs (in their expected dir). The client process may start well, but another issue may crash its initialization and appear as a non-spawned client.
6. Ports exhaustion can manifests itself as a spawn issue with web clients. There is a port range specified in directory.xml that is used for spawning a new web client instance, but with many simultaneous spawns there might be no more ports available for new clients. When a web client is closed in the browser tab without a logout, the session is not ended immediately, but a configurable timeout applies, which may create a situation where more sessions are live than the number the customer is aware of. So the issue can be debugged by looking at the Sessions page in Admin UI, where all currently live sessions are tracked and presented in a table. Also after ports are allocated, it takes time to be made available again.
© 2004-2024 Golden Code Development Corporation. ALL RIGHTS RESERVED.