Hotel ChUI Demo Application for FWD v3.0.0
- Hotel ChUI Demo Application for FWD v3.0.0
- Downloads
- Screen Shots and Video
- Get Started
- Setup, Convert and Run the Hotel Application Using FWD
- Download and Unpack the Project Code
- Ensure FWD is Installed and Built
- Create the FWD Directory Symlink in the Hotel Project Directory
- Prepare the Hotel Project's Configuration
- Convert and Build Using FWD
- Running the Reports
- Install the Root CA in Your Browser
- Start the FWD Server and Connect to the Application
- Running the Hotel Application on an OpenEdge System
- Use the Hotel Project as a Template for a Different Application
- ABL Features in Use
Downloads
| Download | Revision | Date | Description |
|---|---|---|---|
| ABL Source Code and FWD Project | 45 | 04/04/2017 | This is the original ABL source code and schema for the application. It also includes all the configuration files and build scripts needed to convert and run the application using FWD. |
| Converted Java Source Code | 45 | 04/04/2017 | This is the converted Java application code generated by FWD. |
| Reports | 45 | 04/04/2017 | Standard reports generated using the FWD reporting engine. These reports provide a deep look inside the ABL code of the original application. |
Screen Shots and Video
See Screen Shots and Video for the latest release of the Hotel ChUI project.
Get Started
Following are details about how to configure and run the Hotel project on FWD and on Opendge and also details on how to use this project as a starting point to convert and run your application.
This document does not address how to install/build/setup FWD on your system. Please refer to the official FWD Documentation for those details.
You will find steps on what input you need (as OpenEdge sources), how to configure the project for conversion, import the database, and finally build and execute your application using the FWD server.
The conversion process is automated using bash or Windows command scripts and also using ANT, with various tasks provided in the existing build.xml file. The ANT version used is 1.9.6 or later.
Setup, Convert and Run the Hotel Application Using FWD
To run the Hotel application using FWD, there are some steps required to prepare the conversion configuration and runtime for your operating system. The next sections will detail how to use the existing scripts to configure the project and also a description of all the configuration changes made by these scripts.
Download and Unpack the Project Code
These instructions assume that there is a directory structure as follows:
| Purpose | Linux | Windows |
|---|---|---|
| Top level project directory. | ~/projects/ |
c:\projects\ |
| FWD project location | ~/projects/p2j/ |
c:\projects\p2j\ |
| Hotel conversion project location | ~/projects/hotel/ |
c:\projects\hotel\ |
In the table of the Downloads section, download the .zip file labeled "ABL Source Code and FWD Project".
Unpack the project (assumes the downloaded file is named ~\projects\hotel_project.zip on Linux and c:\projects\hotel_project.zip on Windows):
| Linux | Windows |
|---|---|
cd ~/projects unzip hotel_project.zip -d hotel/ |
First install JDK to use jar tool as zip extractor.cd c:\projects mkdir hotel cd hotel jar xf ..\hotel_project.zip |
Ensure FWD is Installed and Built
Make sure that you have a system on which FWD can be built. The most common way to do this is to follow the instructions in Development Environment Setup. At the end of those instructions, the system will have a fully built FWD installation that can be used for conversions, reporting and for the execution of the Hotel project. Complete those instructions before continuing here.
Create the FWD Directory Symlink in the Hotel Project Directory
The standard conversion project configuration can use a local FWD installation directly. This would be done inside the top level of the conversion project.
| Linux | Windows |
|---|---|
The most common approach is to use a symlink from the conversion project directory to the FWD directory. The following instructions assume that the FWD sources have been built in ~/projects/p2j/ and the conversion project being setup is in ~/projects/hotel/ (we are using the Hotel sample application as the example here).cd ~/projects/hotel/ ln -s ../p2j/ p2j |
Since Windows Vista, symlinks (soft links) are available using the mklink utility. The command is(it is required to run command line as Administrator to complete this task):cd c:\projects\hotel\ mklink /D p2j ..\p2j If you encounter You do not have sufficient privilege to perform this operation. you may need to run mklink with elevated privileges (Right-click the Command Prompt shortcut and Run As Administrator). Make sure there aren't any explicit Deny permissions set for the Administrators group on the target directory.In Windows XP this does not work so it requires copying the full c:\projects\p2j directory instead of making a link. Alternatively, the FWD install can be placed directly on the conversion project directory. |
The result is a p2j/ directory in the top level conversion project directory. This is sufficient to support all other conversion processing which is usually automated via an Apache Ant build script.
The "p2j" is a historical name for "Progress 4GL to Java". References to that name are still present in the code. Those references will be removed and/or replaced with references to "fwd", but that work is not yet complete.
Prepare the Hotel Project's Configuration
In order to convert and run the Hotel ChUI sample application, some configuration is necessary.
The project contains a script which will automatically prepare that configuration for you. Alternatively, you can manually configure the project.
To prepare the project using the script, execute prepare_hotel.cmd on a Windows OS or prepare_hotel.sh on a Linux OS. This script will read predefined settings for the Hotel ChUI project or compute values which are dependent on your installation, updating configuration files as necessary to convert and run the Hotel application. For the web client, it is required to have some manual edits done, specific to your OS installation - follow the Manual Configuration section if you plan to test or use the web client(s).
If you want to better understand what the script configures on your behalf, continue reading this section. Otherwise, you can go directly to the following section, to learn how to convert and build the project.
Manual Configuration
Open thedeploy/server/directory.xml file with a text editor and change these settings, which are required to use the FWD ChUI Web Client:
- Search for
[spawner-path]and replace it with the full path to the spawn executable. On UNIX systems, we recommend to install this program in/opt/spawner/spawn(Linux) orc:\hotel\deploy\spawner\spawn.exe(Windows). - Search for
[client-start-dir]and replace it with the full path to thedeploy/clientfolder. Assuming your project is in~/hotelfolder on Linux and inc:\hotel\on Windows, it will look like:/home/<username>/hotel/deploy/client, where<username>is your Linux OS user namec:\hotel\deploy\deploy\client, if running on Windows
- Search for
[os-user]and replace it with your OS username (case sensitive). The prerequisite here is that[os-user]must have access to the[spawner-path]and the[client-start-dir].
Database Choice
By default, the Hotel sample project is configured to use the H2 database. H2 was chosen for the demo because it is implemented in Java and when used in embedded mode (as it is in this case), it requires virtually no deployment effort. Since there is no installation or configuration of an external database, this is the simplest way to go if you are trying to get the demo up and running quickly.
The project build also provides the option to use a PostgreSQL database as the back end. If this is your first look at FWD and you just want to get the sample application going, we recommend staying with the default of using H2 as the back end. However, if you already have gotten the sample application running and now you want to confirm that a PostgreSQL back end can be used, here is what you need to do:
- Install and configure the PostgreSQL database server, create a database cluster, and install the base support for PL/Java. This process is documented in Database Server Setup for PostgreSQL on Linux (note: these instructions are for Linux only at this time). Go only as far as restarting the database cluster. The sample application project build will do the rest.
- Enable PostgreSQL as a backing database in the project build. There are two ways to do this:
- modify
build.xmlto change thedb.postgresqlproperty fromfalsetotrue; or - do not modify
build.xml, but instead add the linedb.postgresql=truetobuild.properties(this will override the default setting for the same property inbuild.xml).
- modify
- Optionally, you can disable the H2 database in a similar manner:
- modify
build.xmlto change thedb.h2property fromtruetofalse; or - do not modify
build.xml, but instead add the linedb.h2=falsetobuild.properties.
- modify
If the PostgreSQL server was installed successfully and a FWD database cluster was created and configured properly, a PostgreSQL database for the sample application will be created and populated with data when you next deploy the project (see below).
Convert and Build Using FWD
At this point, all the configuration is done and is time to convert and build the Hotel application. This must be done with the current directory set to ~/projects/hotel/ (Linux) and c:\projects\hotel\ (Windows).
ant deploy.all, which will:
- convert the application source code in the
abl/folder - build the hotel application; and
- create and import a H2 database, in the
deploy/db/folder
Once conversion is done, run the install_spawner.sh or install_spawner.cmd script (if you have Windows OS). If you are running under Linux, the current user must have sudo rights, to make some configurations for the FWD Web Client; the spawner will be installed in the /opt/spawner folder on Linux or in deploy\spawner on Windows.
There will be a cvt_${LOG_STAMP}.log and a build_${LOG_STAMP}.log file where you can see details of the conversion and build process. The ${LOG_STAMP} will be a timestamp in the yyyyMMdd_hhmmss format.
Running the Reports
Reports can be run at any time, by using theant rpt task. This will execute the front conversion phase (which consists of parsing, fixups and gap analysis) and after that the schema and code reports; these will be found in:
rpt/code/code_profile.htmlfor the code resultsrpt/schema/schema_profile.htmlfor the schema results
There will be a rpt_schema_${LOG_STAMP}.log and a rpt_code_${LOG_STAMP}.log file where you can see details of the report generation process. Also, the cvt_f2_${LOG_STAMP}.log will show you the results of the front conversion phase. The ${LOG_STAMP} will be a timestamp in the yyyyMMdd_hhmmss format.
Install the Root CA in Your Browser
The Hotel GUI application uses a self-signed root CA for the certificates which are used for https sessions or for SSL communication between the FWD Application Server and the FWD Clients. When accessing a FWD Web Client, unless the self-signed root CA is imported in your browser as a trusted root CA, you will be prompted by your browser to add an exception for the certificate. You can solve this by importing the hotel root CA into your browser. Also, note that this will work only if you access the FWD Web Client and the FWD Embedded App Demo via localhost - the SSL certificates have been created for localhost.
Depending on your browser, follow the steps below to install the root certificate. In all cases, the root CA is saved in the deploy/server/hotel-root.der file.
Installing the Root CA in Mozilla Firefox
For Firefox, follow these steps:- Open the
Preferencesmenu, look for theAdvancedsub-menu. - Select
Certificatesand click onView Certificates.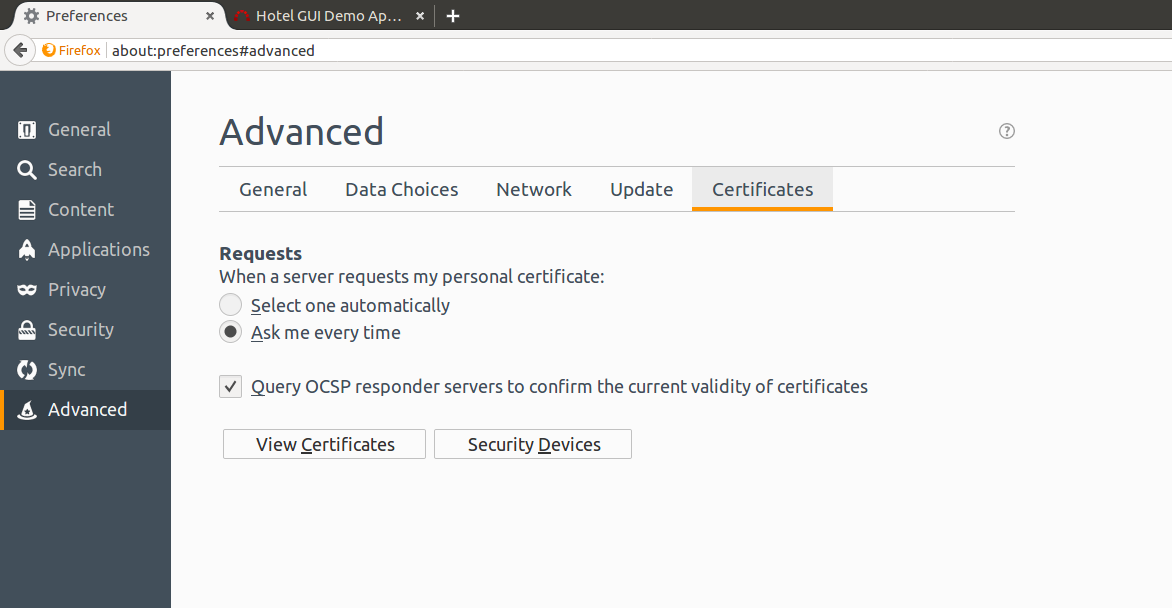
- Select
Authorities.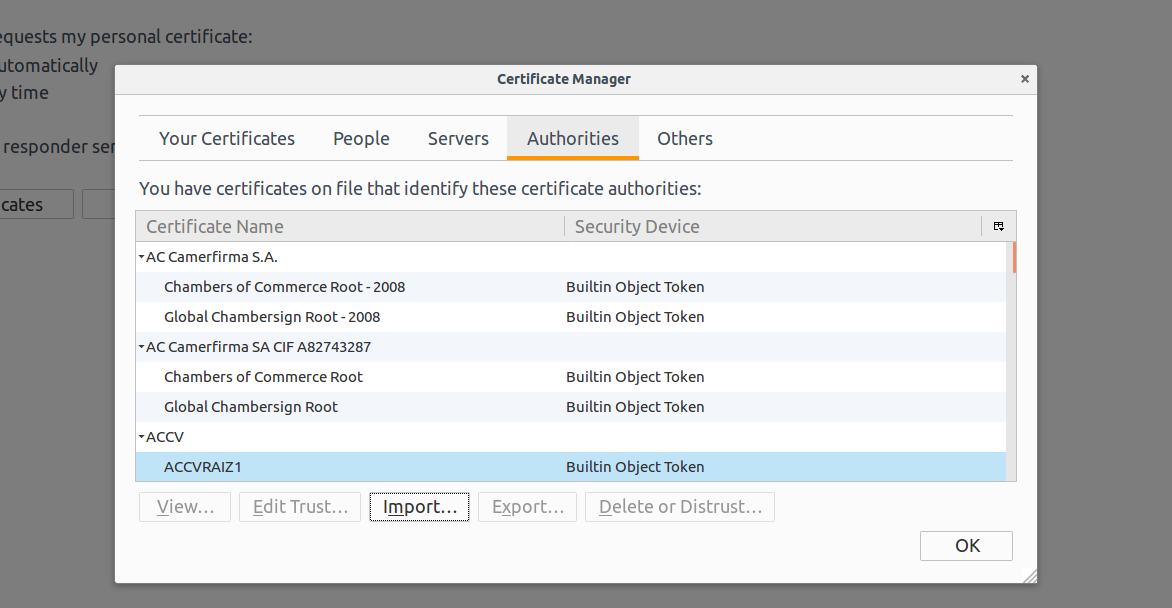
- Click the
Import...button. - Search for and select the
deploy/server/hotel-root.derfile. - Select the first option,
Trust this CA to identify websites..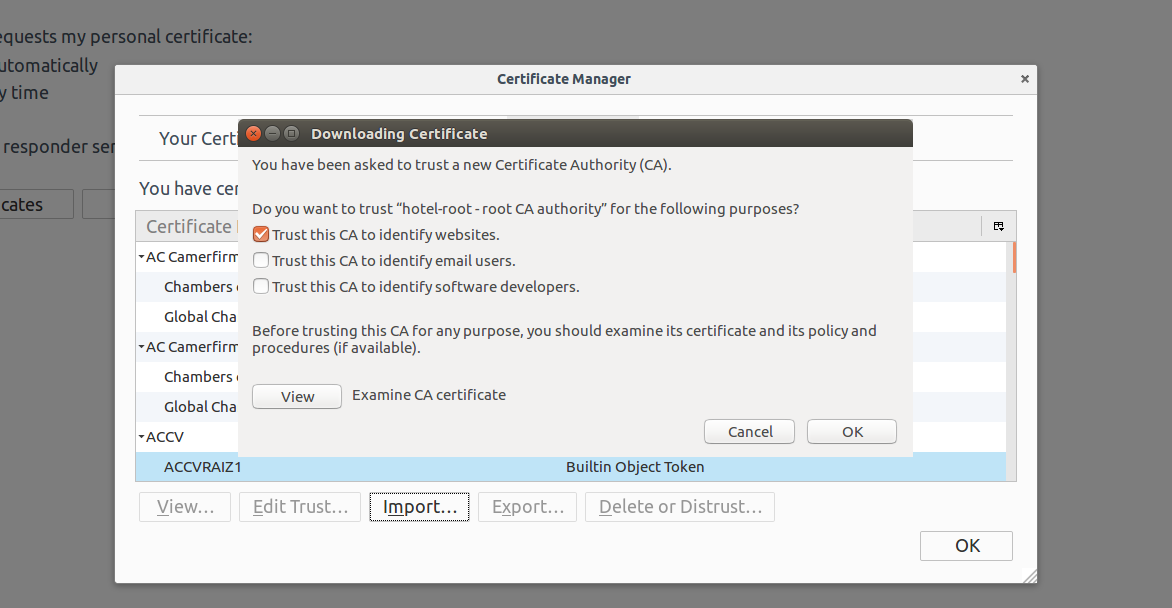
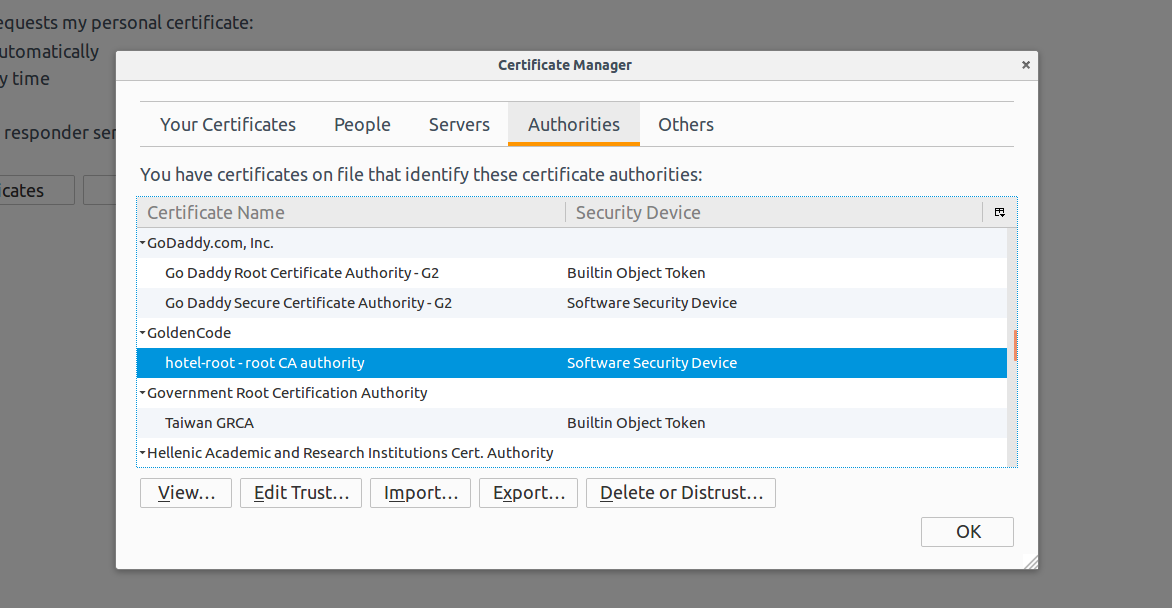
- Click OK and the root CA will be imported, and you will find it in this list.
Installing the Root CA in Google Chrome on Ubuntu
For Google Chrome on Ubuntu, follow these steps:- Open the
Settingsmenu, click onShow Advanced.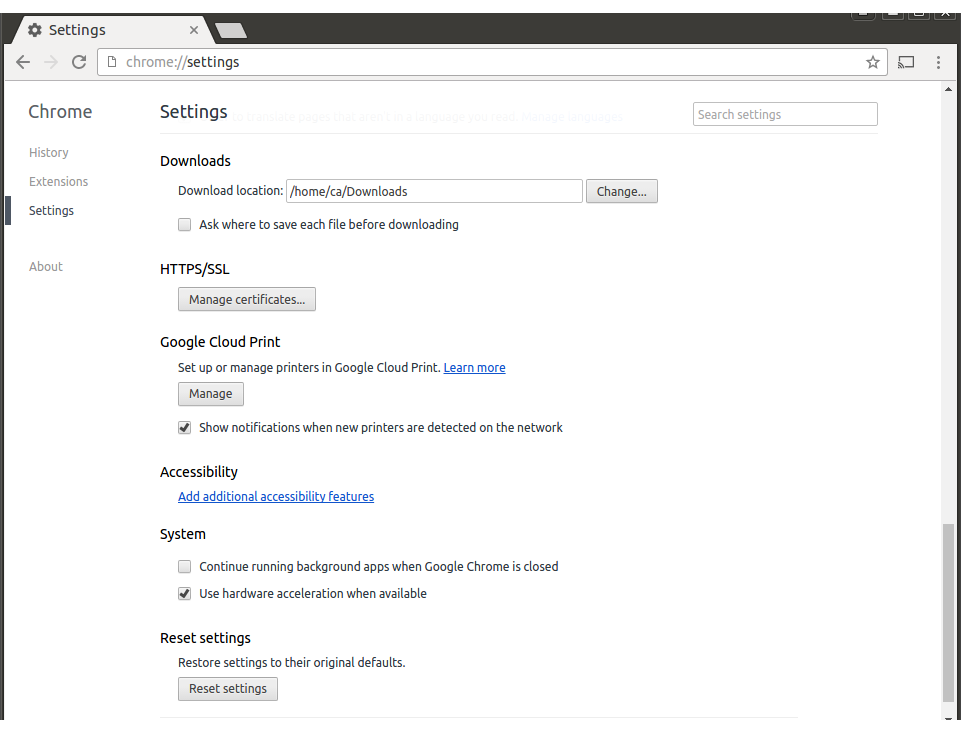
- Click on
Manage Certificates, then selectAuthorities.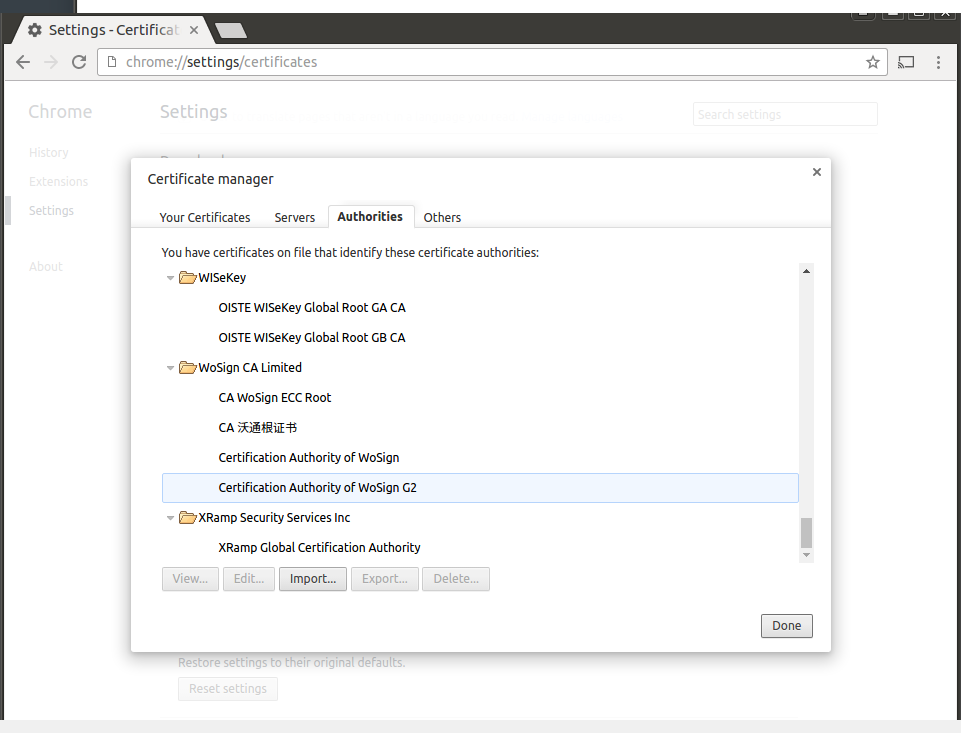
- Click on
Import..., traverse the folders to find thedeploy/server/hotel-root.derfile. If the selection dialog doesn't show it, select theDER-encoded binary, single certificatefrom the lower-right selection list. ClickOpenafter you've selected the.derfile. - Select the first option,
Trust this certificate for identifying websites..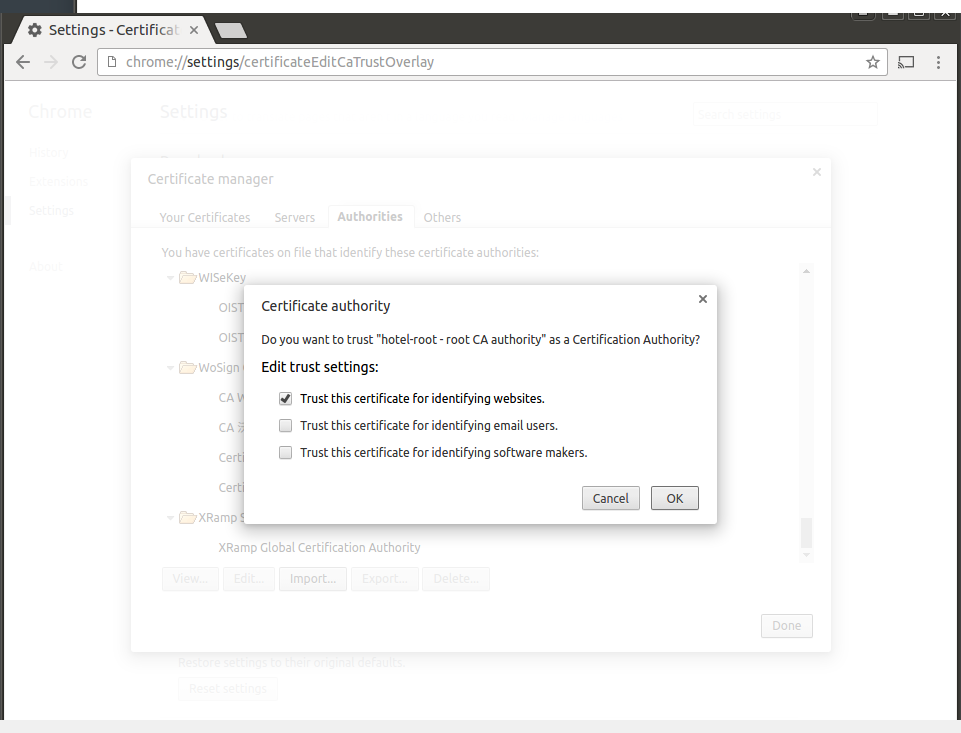
- Click OK and the root CA will be imported, and you will find it in this list.

Installing the Root CA in Google Chrome on Windows
- Like in Linux, open the
Settingsmenu, click onShow Advanced, then click onManage Certificates. - This
Certificatesdialog opens.
- Click on
Import.... The Certificate Import Wizard opens.
- Click
Next >.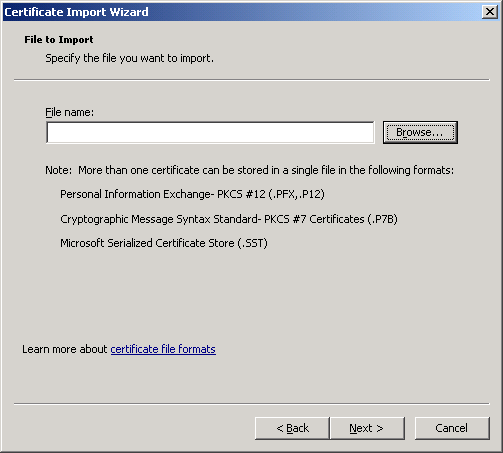
- Type in the path to the certificate (
c:\projects\hotel\deploy\server\hotel-root.der), or use theBrowsebutton to navigate and select the certificate. Then clickNext >.
- Select
Place all certificates in the following storeif not already selected.Trusted Root Certification Authoritiesshould be selected as in screen-shot. ClickNext >.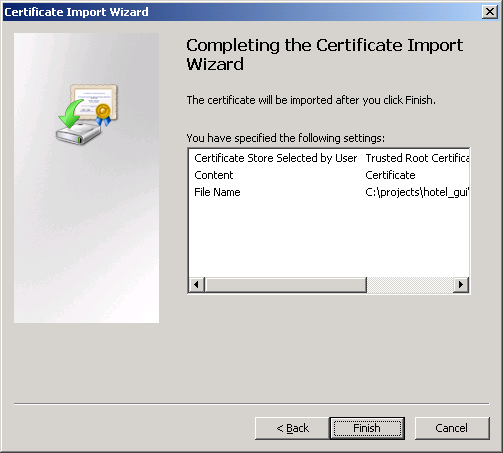
- Confirm the import by pressing
Finish. The certificate is imported and you can see it in the list.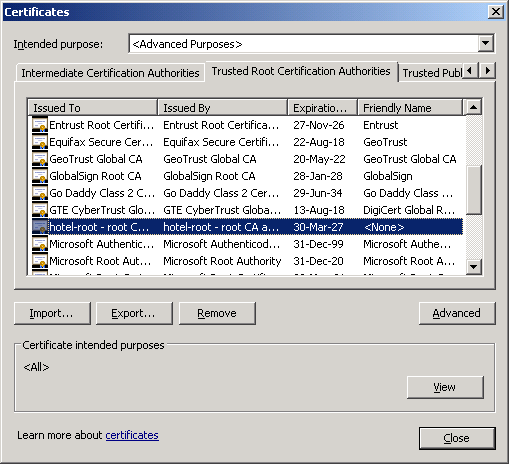
Start the FWD Server and Connect to the Application
The scripts required to run the Hotel application are found in the deploy/server and deploy/client folders.
To start the server, open a terminal (if on linux) or a command line (if on Windows) and go to the deploy/server folder. From here, start either the ./server.sh or server.cmd scripts. The server will be started when you can find a line like this, in the server's log file (deploy/server/server.log):
[01/19/2017 14:07:54 EET] (SessionManager.listen():INFO) {00000000:00000001:standard} Server ready
You can now connect a client to the server.
Console Client
The FWD Console Client runs in the terminal and is fully compliant with original Progress 4GL user interface, under both Linux and Windows OS. To start this FWD ChUI Client, go to the deploy/client folder and execute ./client-terminal.sh or the client-terminal.cmd script if on Windows OS. On Linux, the Hotel sampel UI is hard-coded to a terminal size of 80 columns by 24 rows (in characters).
Swing ChUI Client
The Swing driver is an alternative to using the console-based client, which is fully functional with only minor limitations. For Swing clients to work, the OS must support a graphics environment. To start the FWD ChUI client in this mode, go to the deploy/client folder and execute ./client-swing.sh or the client-swing.cmd script if on Windows OS.
Web ChUI Client
In this FWD client mode, the application's user interface appears essentially as the original, only the 'console' is presented within the client area of a web browser.
To start the FWD ChUI web client, you need to open the https://localhost:8443/chui link in your browser (recommended are Chrome or Mozilla Firefox). If prompted, accept the certificate, and after that enter your OS credentials on the machine where the FWD server is running. After pressing Login, you might need to accept the certificate again; after this step, the Hotel Login screen will appear. Please note that due to the bug #3272 the password field must not be left empty.
When the Hotel login screen appears, enter hotel as username and hotel as password to login into the application. Note that this login screen is different from the OS login page above. Here the application user name and password are expected, while on the OS login page system account credentials must be used.
All the client log files and reports from the Hotel application will reside in the deploy/client/ folder.
Running the Hotel Application on an OpenEdge System
Using the Existing Scripts to Automate Distribution and Startup
If you are running OpenEdge 10.2B on a Linux machine, you can have the Hotel application ready and running using these simple steps:- if your machine has OpenEdge 10.2B and is running a Linux OS, just execute the
./start_hotel_abl.shscript - otherwise, you need to:
- execute
ant dist.ablto create a zip archive with all the needed files - copy the
hotel/distribution/hotel-abl-YYYYMMDD.zip, whereYYYYMMDDis the current timestamp, to a Linux machine with OpenEdge 10.2B, in a~/hotel/folder - extract the archive using
unzip hotel-abl-YYYYMMDD.zip, while in the~/hotel/folder - run the
./start_hotel_abl.shscript
- execute
If you are using a Windows OS or if you want to know more details about what the script does and how to manually import the database, see the next section.
Details on How to Import the Database and Run the Hotel Application Manually
The Hotel project is a ChUI application built on OpenEdge 10.2B. To run the application on your legacy system, you need these files:abldb/folder contains an already-imported Hotel database, in ABL format, but for Linux OS - you will need to manually create and import the database if you are running Windows OS - see bellow fo details.data/hotel.dfis the database schemadata/dump/hotel/folder contains the.dexport files with the table records for the Hotel database.abl/folder contains the ABL sources- the
start_hotel_abl.shis a script which automates the DB server startup/shutdown and to start the application
- run the
ant dist.ablto create a zip archive; this archive will contain all the files listed above. The archive will be found inhotel/distribution/hotel-abl-YYYYMMDD.zip, whereYYYYMMDDis the current timestamp. Copy this file to a machine with OpenEdge environment in a~/hotel/folder and extract it, usingunzip hotel-abl-YYYYMMDD.zip. - copy the files and folders listed above manually on a machine with OpenEdge environment, in a
~/hotel/folder
- delete all the files in the
~/hotel/abldb/folder - while in the
~/hotel/folder, run the OpenEdge Procedure Editor and openTools/Data Dictionary. - create a database with the
abldb/hotel.dbphysical name and the logical namehotel. - open
Admin/Load Data and Definitions/Data Definitions (.df file)and import thedata/hotel.dfschema - open
Admin/Load Data and Definitions/Table Contents (.d file)and:- select all the hotel-related tables
- press
Show Hiddenand select the_Usertable, too - set as
Input Directorythedata/dump/hotel/folder
- once the import is complete, exit the
Procedure Editor
./start_hotel_abl.sh script (make sure for this script to be executable, chmod +x start_hotel_abl.sh); otherwise, you can follow the same steps as the ones this script will execute:
prostrct repair abldb/hotel abldb/hotel.st- required if you didn't create the Hotel database manually and used the existing one in theabldb/folderproserve abldb/hotel.dbto start a database servercd ablto change the directory to the ABL sources folder andmpro -db ../abldb/hotel.db -p login.pto execute the applicationcd ../to switch back to the parent folder and shutdown the database server viaproshut -by abldb/hotel.db
If your OS is a Windows OS, follow the same steps as above, but execute the server startup/shutdown and program startup manually.
Use the Hotel Project as a Template for a Different Application
This section will explain how to use the existing Hotel application to configure a new application for conversion, database import and runtime setup. You will find details on how to use the existing scripts to automate this process or how to make these changes manually, if you wish so.
Please note that this just covers the most common tasks. While it will be suitable for getting started or for a POC, it is likely that a large application would require some of the other options and advanced techniques documented elsewhere. Please see the Conversion_Handbook for full details.
1. Prepare Your Application Sources, Schema and Database Export
Remove all the existing files from the abl/ folder and place the legacy sources of your Openedge ABL application in the abl/ folder. This must include all your sources, uncompiled: programs (all .p and .w files, and any other files which act as OpenEdge programs) and all the include files, while preserving the folder structure.very
Export your database schema and copy the generated .df file in the data/ folder. There, you can find the existing hotel.df schema and also the standard.df schema, associated with the OpenEdge meta tables. The name of the schema file for your database needs to have the <dbname>.df format; if the DB name is myapp, then this file is named myapp.df.
Create a dump of your table records and place all the .d files in the data/dump/<dbname> folder; also, export the _User meta table for your database and place the _User.d file in the same folder.
2. Configure Your Project Using the prepare_template Script
Once you have the OpenEdge sources, exported database schema and a dump of your database table records, it is time to configure the FWD conversion and runtime. This section will explain how to do this using the existing scripts; for a more details description of the required configuration (or if you want to do this manually), see the FWD project configuration requirements section.
prepare_template.sh script or prepare_template.cmd script and execute it. This will ask you for the following input:
Enter your application name (only letters or digits, first character a letter):
This is the name of your application, how will be known by FWD; it must include only letter or digits, with the first character being a letter, all lowercase. If your application name isMy App, entermyapp.Edit the regex which matches all your include files (enter for default):
FWD needs to know a regular expression which matches all your include files; this can be of the*.[fhi]format. If you are running the conversion on an operating system where file names are case-sensitive, make sure to match upper case extensions, too, with a regex like*.[fFhHiI]. The default value for this entry will be*.[fhi].Edit the regex which matches all your program files (enter for default):
Same with include files, FWD needs to know a regular expression which matches all your program files. The default value for this entry will be*.[pPwW].Edit the root package name - Java format (enter for default):
All your converted Java sources need to be placed in a root package - this must follow the Java format for package names; the default value will betest.<appname>, where<appname>will be the value you entered in the first step. If you want to change it, you can use something likecom.mycompany.myapp.Enter the PROPATH from your progress.ini file (enter for default):
At this step, FWD needs to know the PROPATH you are using, from yourprogress.inifile; by default, this will be set to.:.Enter the legacy database name:
Here, you must enter the legacy database name, the same name you used to export the.dffile.Enter the SQL admin for your imported database:
Provide the name of the SQL admin for your database.Enter the SQL admin password for your imported database:
Provide the password associated with your SQL admin, for your database.Enter the SQL user for your imported database:
You must provide a SQL user for your imported H2 database - this will automatically be created by FWD.Enter the SQL user password for your imported database:
You must provide a password for the SQL user specified above.Does your ABL application currently run on the Windows OS (answer yes/no):
This question refers to where your OpenEdge ABL application is running, not the OS where you run FWD conversion. If your application was run under Windows OS, enteryes; otherwise, enterno. FWD will be able to run your converted application on a Linux system, even if the legacy application was Windows-based.Enter the date format from your progress.ini (enter for default):
Enter the date format used by your OpenEdge installation; by default, this will bemdy, but can bedmyor any other version.Enter the number group separator from your progress.ini (enter for default):
Enter the number group separator used by your OpenEdge installation; by default, this will be,.Enter the number decimal separator from your progress.ini (enter for default):
Enter the decimal separator used by your OpenEdge installation; by default, this will be..Enter the full class name associated with the entry point for your application:
Enter the name of the program used to start the legacy OpenEdge application. This name must be a converted Java class name. If you don't know it know, enter something likecom.mycompany.myapp.TODOand you can edit it later. Otherwise, if your name is (for example)start.p, entercom.mycompany.myapp.Start- the requirement is to use the full Java class name.
After this (or after checking the reports), open the cfg/p2j.cfg.xml and check the metadata node: here, provide a list of all your meta-table names used by your application.
3. Run Reports
Before generating the reports, you will need to have an already built copy of the FWD project (or a symbolic link to the installation location), named p2j/, inside this project folder. Once you have this, use ant rpt (and ant clean.rpt to clean previous outputs) to generate the reports. For the reports to provide an accurate description of your application, all your sources will be parsed and prepared (the "front conversion phase", in FWD, will be executed) - this might take a while, so be patient. To see the progress, look into the cvt_f2_${LOG_STAMP}.log file - here, you will find also any errors FWD encountered during the parsing and prepare phase.
rpt/code/code_profile.html- the reports for your entire code set, which includes statement, built-in methods, functions, type usage, variables and many-many more - you will have a deep insight on what OpenEdges feature are in use by your application and the level of support in FWD.rpt/schema/schema_profile.html- it contains details about your physical database schema, static temporary tables or work files in use by your application
If the front phase passes successfully, you can run a full conversion - see next section for details.
4. Run Conversion
At this point, all the configuration is done and is time to convert your application. Before conversion, you will need to have a built copy of the FWD project (or a symbolic link), named p2j/, inside this project folder.
First step is to run the convert task using ant convert from the command-line. This will start the conversion process of all your entire application, from start to finish. The output is logged in a cvt_${LOG_STAMP}.log file. If all goes well, your entire code set will be converted and, depending on its size, may take from minutes to hours.
In the conversion log, you can find the list of all files picked up and converted by FWD; the conversion will not stop if there are failures in the front phase, but it will stop if there are issues in the middle/back phases. The front phase is the most important: you can see if this has finished after all these lines are output in the log (the Elapsed job time will vary depending on your application size):
     [java] ------------------------------------------------------------------------------
     [java] P2J Conversion Driver
     [java] ------------------------------------------------------------------------------
...
     [java] ------------------------------------------------------------------------------
     [java] SchemaLoader
     [java] ------------------------------------------------------------------------------
...
     [java] ------------------------------------------------------------------------------
     [java] Scanning Progress Source (preprocessor, lexer, parser, persist ASTs)
     [java] ------------------------------------------------------------------------------
...
     [java] ------------------------------------------------------------------------------
     [java] Elapsed job time:  00:00:01
...
     [java] ------------------------------------------------------------------------------
     [java] Post-Parse Fixups
     [java] ------------------------------------------------------------------------------
...
     [java] ------------------------------------------------------------------------------
     [java] Gap Analysis Marking
     [java] ------------------------------------------------------------------------------
...
     [java] ------------------------------------------------------------------------------
     [java] Schema Fixups (data dictionary)
     [java] ------------------------------------------------------------------------------
...
     [java] ------------------------------------------------------------------------------
     [java] Schema Fixups (Progress source file schemas)
     [java] ------------------------------------------------------------------------------
...
     [java] ------------------------------------------------------------------------------
     [java] Elapsed job time:  00:00:04
5. Build Your Application
Once you have a successful conversion, you can compile and build the application using FWD: use ant jar to generate the application jar file and ant deploy.prepare to prepare the project for database import and running the FWD server. There will be a build_${LOG_STAMP}.log file where you can see details of the build process.
6. Import the Database
If you have more than one database, make sure all database are configured in build.xml as specified in the Setup of additional databases section.
Importing the database(s) is as easy as running ant import.db (use ant clean.db to delete any previous imported database) - this will create, import and index your database. The ANT script is currently configured only for the H2 database, which runs in embedded mode, so you will not need to install any DB server. If your database is large, make sure to have enough disk space for the import.
Once this is finished, the database will be created in the deploy/db folder.
The DDL generated for your database (for all specified dialects) can be found in the ddl/ folder.
7. Run the FWD Server and Connect to Your Application
Before running the FWD server, make sure FWD knows the correct entry point into your application. Open the name_map.xml file with a text editor and look for the full name of your OpenEdge program which acts as an entry point in your application; if your program is named start-my-app.p and resides in abl/my/app/ folder, look for my/app/start-my-app.p name. You will find a line like this:
<class-mapping jname="my.app.StartMyApp" pname="my/app/start-my-app.p"/>Now, open the
deploy/server/directory.xml file with a text editor, search for p2j-entry text and you will find a XML node like this:
            <node class="string" name="p2j-entry">
              <node-attribute name="value" value="com.mycompany.myapp.TODO.execute"/>
            </node>
Now, make sure the
com.mycompany.myapp.TODO.execute text is set to com.mycompany.myapp.my.app.StartMyApp.execute:
com.mycompany.myappis what you specified at theEnter the root package name - Java format (enter for default)question during configurationmy.app.StartMyAppis the value of thejnamenode you found inname_map.xml.
The server startup scripts are found in the deploy/server folder. To run the FWD server, change your directory to deploy/server and execute the server.sh or server.cmd script, depending on your OS. The FWD server's log will be captured in the server.log and stdout.log files.
To terminate the FWD server, use the -k option, as in ./server.sh -k.
Starting the FWD client is the same as described in the section for the Hotel application: go to the deploy/client folder and execute the client-terminal or client-swing scripts.
8. FWD Project Configuration Details
This section describes the files changed by theprepare_template script and the meaning of these changes. First step is to make a copy of the following files and place them in the specified folder, overwriting any existing version:
- copy
build.properties.templatetobuild.properties - copy
deploy/server/directory.xml.templatetodeploy/server/directory.xml - if you are running conversion on Windows OS, copy
cfg/p2j.cfg.xml.windows.templatetocfg/p2j.cfg.xml - if you are running conversion on a Linux OS, copy
cfg/p2j.cfg.xml.linux.templatetocfg/p2j.cfg.xml
- related to converting your application:
[appname]- the application name, only letters or digits, lowercase, first character a letter. If your application name isMy App, usemyapp.[include-spec]- a regular expression to match all your include files. Use*.[fhi]for example; if your application was run on Windows OS, and conversion is done under a Linux OS, use the*.[fFhHiI]expression, to match the uppercase extension, too.[program-spec]- a regular expression to match all your program files. Use*.[pPwW]for example.[pkgroot]- the package root where converted sources will be placed, in Java format. Use something likecom.mycompany.myapp.[pkgrootfolder]- the same semantic as the[pkgroot], except that the dots are replaced with a/character[propath]- the PROPATH as it appears in yourprogress.inifile.
- incfg/p2j.cfg.xml- prefix all your propath entries with the${P2J_HOME}/abltext; if your propath is something likefoo:bar, inp2j.cfg.xmlthe propath must be${P2J_HOME}:${P2J_HOME}/abl/foo:${P2J_HOME}/abl/bar@ (note the first entry is${P2J_HOME})
- indeploy/server/directory.xml, use the exact PROPATH as in yourprogress.inifile.[opsys]- the value of the{&OPSYS}preprocessor constant, from your OpenEdge installation where the application was ran. This can be for exampleUNIXorWIN32.[winsys]- if your application was using a window system, change it to<parameter name="winsys" value="[MS-WINDOWS]" />. Otherwise, delete this entry.[path-separator]- enter the path separator for the OS where your OpenEdge application used to run::for Linux-based OS or;for Windows OS.[file-separator]- enter the file separator for the OS where your OpenEdge application used to run:/for Linux-based OS or\for Windows OS.[case-sensitive]- if the OS where your OpenEdge application used to run is case-insensitive (like Windows OS), useTRUE; otherwise, useFALSE.[dateFormat]- enter the date format used by your OpenEdge installation; can bemdyordmyor any other version.[numberGroupSep]- enter the number group separator used by your OpenEdge installation.[numberDecimalSep]- enter the number decimal separator used by your OpenEdge installation.
- related to database import:
[dbname]- the name of your legacy OpenEdge database[dbuser]- provide a SQL user for your imported database; in case of H2, this will automatically be created by FWD. In case of PostgreSQL, it needs to be an existing user.[dbuserpass]- provide a password for the SQL user specified above.[dbadmin]- provide a DB admin name for your imported database, used only for PostgreSQL backend.[dbadminpass]- provide a DB admin password for the user specified above.[dmoindex]- provide the location of the DMO index: these will be the[pkgrootfolder]/dmo/dmo_index.xml, where[pkgrootfolder]is replaced with the value you determined above.
- related to runtime:
[spawner-path]- the full path to the spawner installation folder (something like/home/<user>/hotel/deploy/spawner/spawn)[client-start-dir]- the full path to thedeploy/clientfolder[p2j-entry]- the converted, full class name, of the program used as an entry point into your application.
- in
build.properties:[appname][program-spec][dbname][dbuser][dbuserpass][dbadmin][dbadminpass][pkgrootfolder]
- in
deploy/server/directory.xml:[spawner-path][client-start-dir][dmoindex][dbname][dateFormat][numberGroupSep][numberDecimalSep][p2j-entry][pkgroot]- use the PROPATH as specified inprogress.ini[propath][path-separator][file-separator][case-sensitive][dbuser][dbpass]
- in
cfg/p2j.cfg.xml:[propath][include-spec][pkgroot]- use the "prepared" PROPATH, for conversion[dbname][path-separator][file-separator][case-sensitive][opsys][winsys]- delete this entry, if your project is not a GUI project.
ABL Features in Use
This ChUI application uses quite a wide range of ABL features. This is just a high level summary. For the full details, please see the reports that can be downloaded above.
Don't assume that FWD does not support an ABL feature just because it isn't listed here. This is just the list of what we used in this "simple" application. For a better understanding of what FWD supports, please see Supported ABL Features.
TBD: Check this with the generated reports!
- base language
- block types
- external procedures
- internal procedures
- user-defined functions
- triggers
DO(blocks and loops)REPEATFOR
- super procedures
PUBLISH/SUBSCRIBE- variables of many different types (including at least integer, decimal, character, date, logical)
- shared variables
- extent variables
- transaction and subtransaction processing
- undo
- condition processing
- default block properties
- implicit raising of conditions (in response to key events like
F4or based on program events like a query being off-end) - explicit ON condition phrases (e.g.
ON ERROR UNDO, RETRY) - explicit raising of conditions using statements like
QUIT)
- stream output
- block types
- database
- permanent database usage
- temp-tables
- many different data types (including at least integer, decimal, character, date, logical)
- query types
FINDOPEN-QUERY/GETFOR EACHFOR EACH, EACH, EACH- dynamic queries (e.g.
QUERY-PREPARE())
BREAK BY
- user interface
- frames
- non-down
DOWNframesOVERLAYVIEW-AS DIALOG- nested (parent/child)
- widget types
- FILL-IN (many different data types)
- BROWSE
- COMBO-BOX
- TOGGLE-BOX
- BUTTON
- VIEW-AS ALERT-BOX
- EDITOR
- TEXT
- statements
DISPLAYVIEWENABLEONWAIT-FORUPDATECHOOSEPUT SCREENREAD-KEYMESSAGE(just for output but alsoMESSAGE UPDATE)STATUS
- output to redirected terminal (e.g. file)
- @-base fields
- dynamic widgets (e.g.
CREATE <widget>) - widget pools
- frames
© 2004-2017 Golden Code Development Corporation. ALL RIGHTS RESERVED.