Custom Reports
Introduction
The Custom Reports screen enables the creation of persistent, custom code analytics reports to augment the standard reports provided with FWD.
To better understand this chapter, we recommend first reading the following chapters:
The FWD Code Analytics reporting engine uses TRPL expressions to match 4GL code patterns. Each time a match is found, information about that match is added to the report being generated. Reports are persisted to a database for later viewing. When an application's source code is analyzed as a batch (see Calculating Report Results), all reports are generated at once.
When a custom report is first defined and run, the report engine creates that report on the fly and persists only that report. It also saves the definition into a list that is added to the standard/predefined reports. The next time you run report generation (e.g., you changed the application source code and are needing the latest reports), all the custom reports will be generated at the same time as the predefined reports. That means it will always be available for viewing alongside all the other reports which were generated previously. A custom report is like any standard report, in that it is stored in the master list of reports and provides the same views, statistics, sorting, filtering, and drill-down capabilities.
The creation of a custom report is based on the same TRPL pattern matching expression techniques used for the Search feature. In addition, custom reporting provides:
- persistence of the report, including across report server restarts and report regeneration;
- a custom title;
- multiplexing (i.e., grouping) for the summary report level;
- customization of the data recorded/displayed for each pattern match.
At this time, the Custom Reports user interface does not provide a way to delete or edit custom reports. This capability will be added in a future version. As a workaround, one can edit a configuration file directly while the report server is not running, then regenerate all reports. This is an advanced operation which is discussed in more detail below.
User Interface
The Custom Reports screen allows a number of options to define a new report:

Report Type

Select the type of report to generate. Selecting code generates the report using the application's source code; selecting schema generates the report using the database schemata.
Note that, unlike the Search feature, a custom report runs against the full set of source code or schemata. The active file list filter is ignored.
Report Title
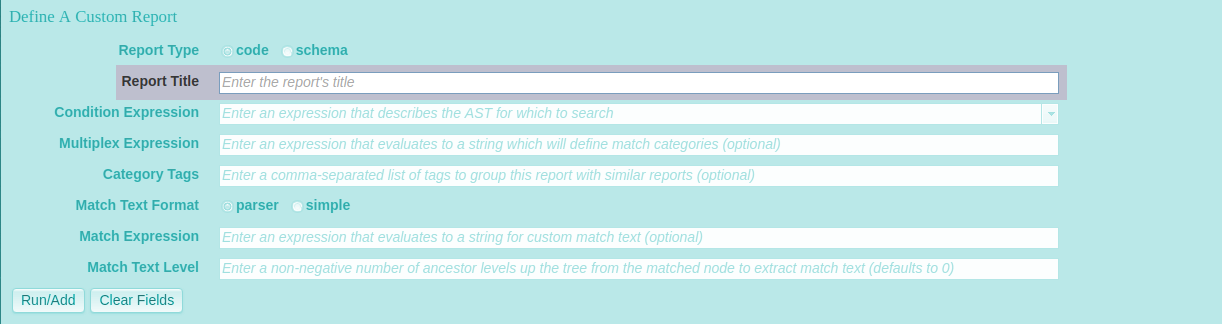
Next, select a report title. This should be unique among all standard and custom reports. While this is not a hard requirement, it will make it easier to identify the report when selecting a report to view from the top level Code Reports or Schema Reports screens.
Condition Expression

The condition expression the heart of the report definition. This is the TRPL pattern matching expression which is used by the report engine to gather the report data.
Although you can type an expression directly into this field, we highly recommend you instead define and refine the condition expression using the Search feature (preferably with a file list filter active if your code set is large). This will cut down on mistakes which create unwanted custom reports. While the Search feature uses the report engine to match code patterns, the results are not persisted to the analytics database. This makes the Search feature ideal for experimenting with a TRPL pattern match expression, before enshrining that expression as the basis of a custom report, and building a persistent report with it.
When you create a valid TRPL expression using the Search feature, it is stored in the drop-down list that is available here. Thus, once you are satisfied that the pattern match expression you have defined with the Search feature produces the desired matches, you can simply select it here.
Multiplex Expression
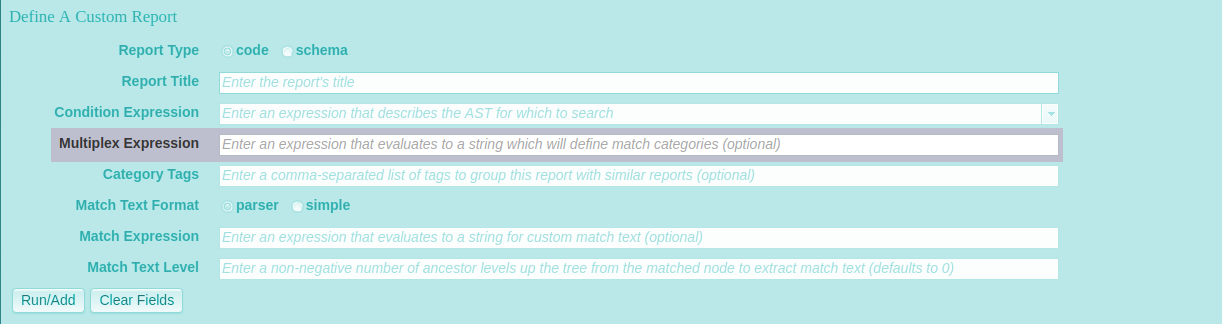
The multiplex expression is a TRPL expression which evaluates to a string value. The string value is used to group report results in the report's summary view. It is roughly equivalent conceptually to a GROUP BY clause in SQL, or a BREAK BY expression in 4GL code.
As the report engine finds pattern matches using a report's condition expression, it evaluates the multiplex expression upon the matched AST node. Matches for which the multiplex expression evaluates to the same string are grouped together in the report's summary view.
Some examples:file- resolves to the helper functionCommonAstSupport.Library.getFile(); group results by the name of the source file in which the matches were found.name- resolves to the helper functionCommonAstSupport.Library.getName(); group results by the token name of the matched node.parent.symbolicTokenType- group results by the token name of the matched node's parent node.getNoteString("schemaname")= resolves to the helper functionCommonAstSupport.Library.getNoteString(String); group results by the canonical schema name (only valid for database record and field references).parent.parent.text- group results by the token text of the matched node's grandparent node.
It bears repeating that the multiplex expression is evaluated in the context of the node which is matched by the condition expression. So, if your condition expression matches on a particular node, but you want to group results by some properties of that node's grandparent, the multiplex expression will have to dereference the grandparent node. This is what is happening with the parent.parent.text example above.
Category Tags
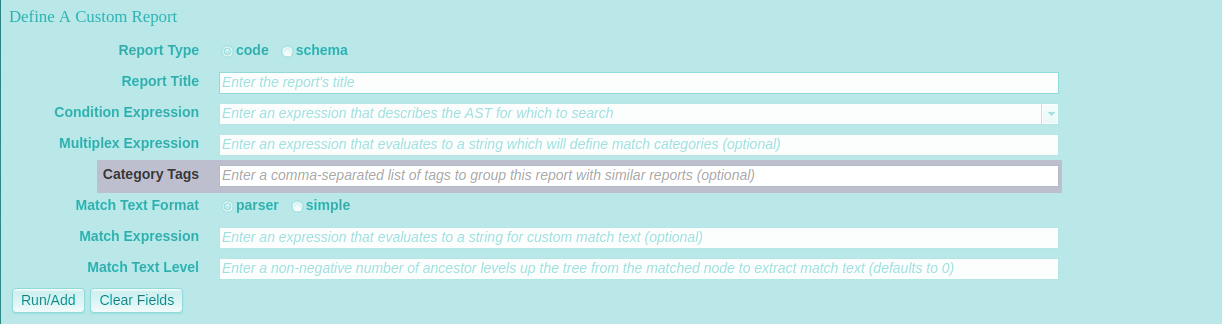
Enter one or more comma-separated category tags under which to organize the report in the master list of reports of the same type. The report title will appear in the top level reports view (Source Code Reports or Schema Reports, depending upon the Report Type selected). For example, the default Source Code Reports view is:
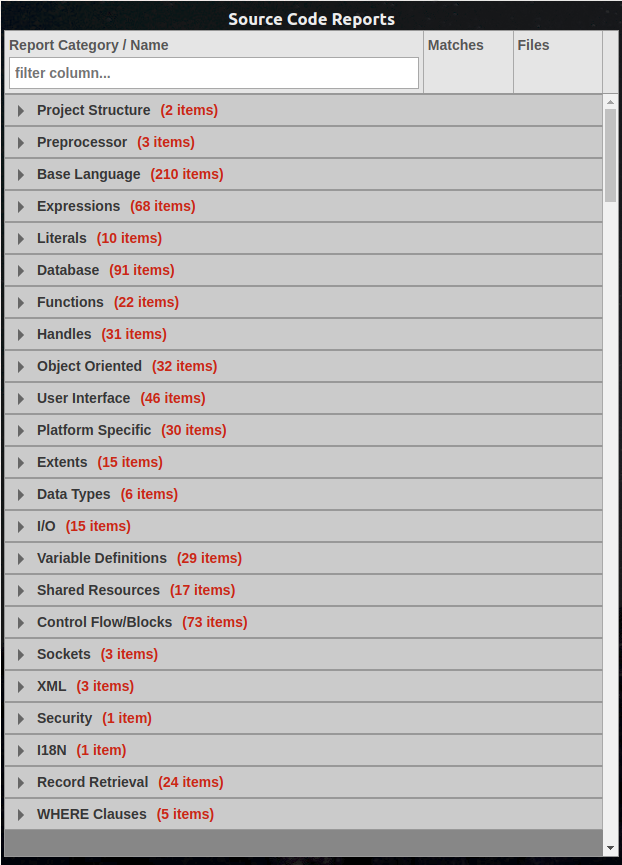
To choose an existing category, be sure to match the category name exactly (without the "(N items)" portion), including case and spaces. If you specify a new category name, it will be added to the list, and the custom report will be available under that new category. If you specify no category at all, an unlabeled category will be added to the list.
To file the report under multiple categories, separate the category names you specify with commas.
Match Text Format
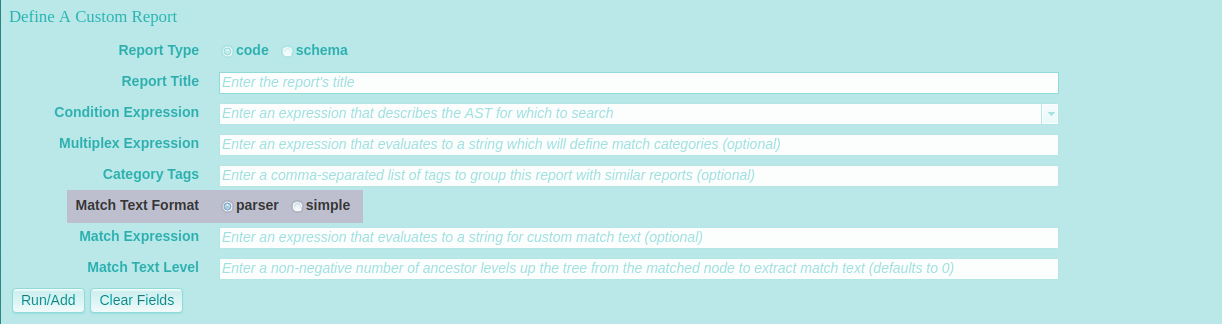
The match text is a textual representation of a pattern match which appears in a report's detail view. There are three different types of match text:
- simple - a basic textual representation of only the node which was being visited when the pattern match occurred. It consists of the token text and token name of the matched node.
- parser - a textual representation of the matched node and all of its descendant nodes; essentially a "branch" of the tree, starting at the matched node. For each node in the branch, token text, token name, unique ID, and the line and column number of the original 4GL code are included.
- custom - a string generated by a custom match expression supplied by the report's designer (see Match Expression below).
This set of radio buttons lets you select between parser match text (the default) or simple match text. If a custom match expression is supplied in the next extry field, it is always used, and this selection is ignored.
Match Expression
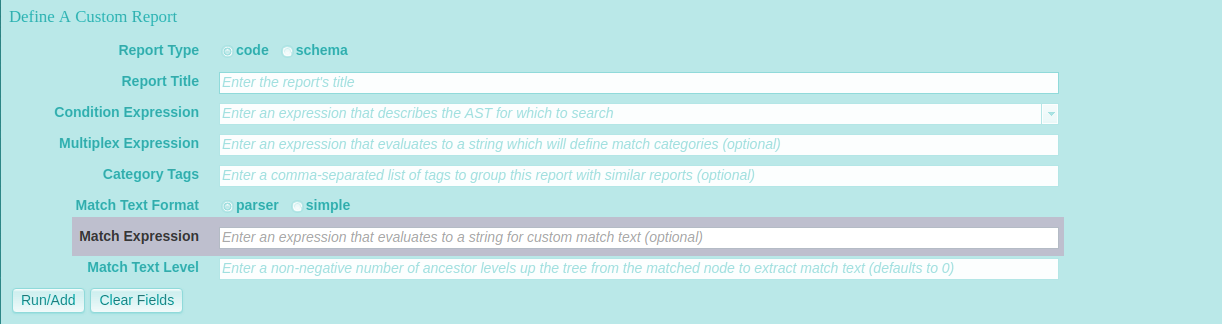
A match expression is a TRPL expression which evaluates to a java.lang.String. The report engine executes this expression for every pattern match detected, and the resulting text is displayed in the report's detail view.
This field is optional. If a valid TRPL expression is supplied here, the selection of parser or simple match text in the radio buttons above this field is ignored.
Match Text Level

The match text level is an optional field. If supplied, it must be a non-negative integer value. If no value is supplied, 0 is used by default. This value is only relevant when the match text format is parser or simple. If a custom match expression is supplied, this setting is ignored.
When this value is 0, the report engine uses the matched node to generate the match text used in the report's detail view. If the value is a positive number, the report engine looks that number of ancestor levels up the tree to find the node from which to generate the match text. This setting is useful in the case where the tree structure makes it easier to write a condition expression to match on a node which is at a lower level of the tree, but dumping match text from an ancestor node would provide useful context for the matched node. For instance, given the AST node hierarchy:
DEF [DEFINE_BUFFER]
  b-ttEmployee [SYMBOL]
  FOR [KW_FOR]
    ttEmployee [TEMP_TABLE]
...one might write a condition expression to match DEFINE BUFFER statements for all types of records (not just temp-tables) like this:
type > prog.begin_recordtypes and type < end_recordtypes and upPath("DEFINE_BUFFER/KW_FOR")
This will match not only buffers for temp-tables, but also buffers for tables, work-files, etc. Since the most complex part of the pattern match is to express the various allowable token types of the lowest leaf node, the condition expression is written to detect a match upon visiting the lowest leaf node (ttEmployee [TEMP_TABLE] in the example above). By default, the match text will be generated at the same level as the match occurred, so we will only have match text information for this leaf node.
However, it may be preferable to generate the match text from the perspective of the DEFINE_BUFFER node. This would expand the context of the match to include the buffer name (from the b-ttEmployee [SYMBOL] node) and information from the node representing the DEFINE BUFFER statement itself. To accomplish this, we would set the match text level to 2. This would tell the report engine to generate the match text at the ancestor node up 2 levels (i.e., at the DEFINE_BUFFER node) relative to the matched leaf node.
Run/Add and Clear Fields
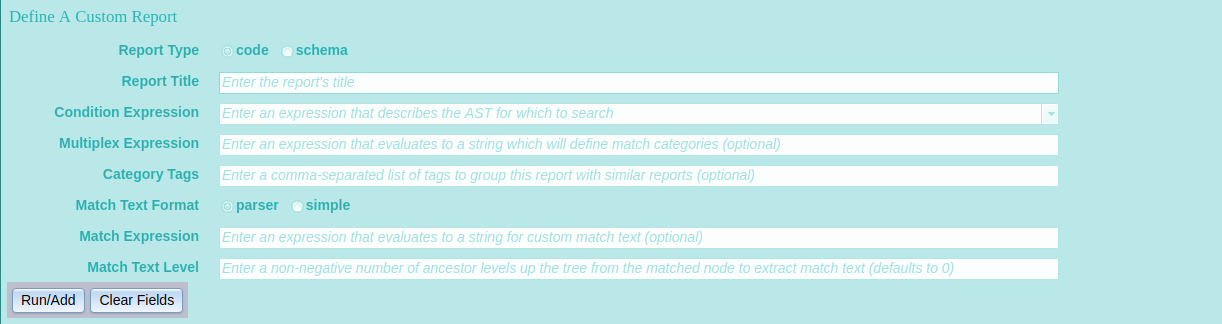
Once you have defined a report to your satisfaction and you want to generate and save it, click the Run/Add button. If your settings are valid, the report will begin running immediately. Upon completion, the report will be added to the master list of reports of its type and you will see the message:

Note that for a large code base, source code reports can take quite some time to complete (many minutes). Consider that every AST node for every bit of source code in the project must be visited and inspected for a pattern match. The more efficient the pattern match expression, the faster this will be, but for large code bases, this can mean visiting many tens of millions of AST nodes, so be patient. If you want to monitor progress and you have the proper authority, you can tail or check the report_server.log which is generated in the project's deploy/server/ directory. An entry is logged for each external procedure visited by the report engine.
To clear all fields and start over, click the Clear Fields button.
Examples
Suppose we want to create several custom reports on all DEFINE BUFFER statements in an application.
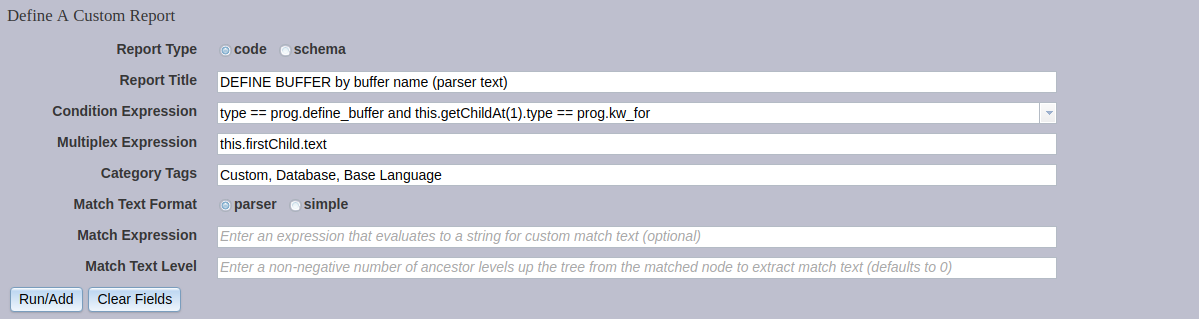
1) DEFINE BUFFER by buffer name (simple text)
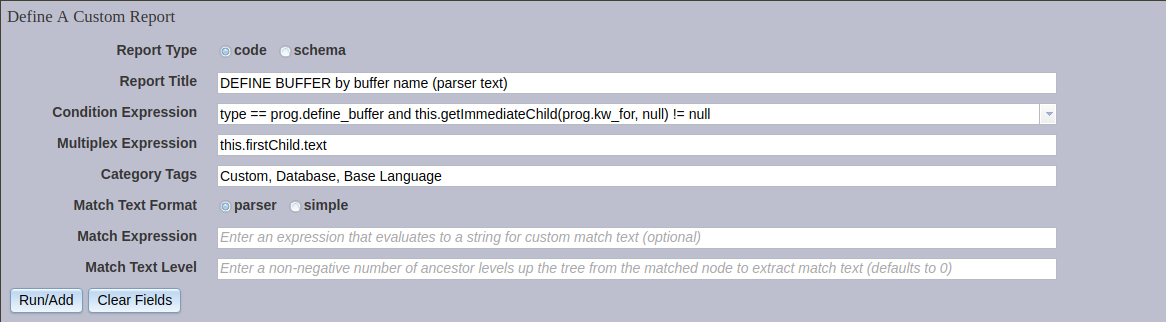
For the first, we will group the results by the name of the buffer created, and the format of the match text in the detail report view will be simple. One way to accomplish this is with the following settings:

We want to run the report against the application's source code, not schemata, so the Report Type is left as the default, code.
An example of the AST structure we are trying to find is:
DEF [DEFINE_BUFFER]
  b-ttEmployee [SYMBOL]
  FOR [KW_FOR]
    ttEmployee [TEMP_TABLE]
The Condition Expression is written to match at the DEFINE_BUFFER node, when that node has a direct child of type KW_FOR. We could be more precise and test the type(s) of the first (and only) child of the KW_FOR node as well, to make sure it represents some sort of table. However, the structure expressed by the condition expression is unique enough to identify the patterns in which we are interested.
The Multiplex Expression is simply the text of the DEFINE_BUFFER node's first child (the SYMBOL node). This text represents the name of the buffer being defined. This means all DEFINE BUFFER statements across the code base which define a buffer with the same name will be grouped together in the report's summary view, regardless of the table type or table name for which the buffer is defined.
The Category Tags we have specified will cause the report to be organized within the standard Database and Base Language code report categories, as well as in a non-standard category named Custom. The latter category will be created if it does not already exist.
The Match Text Format has been set to simple, which means only the matched node (DEFINE_BUFFER) will be described in the match text of the report's detail view.
No Match Expression is provided, and the Match Text Level is allowed to default to 0.
When run against the FWD Hotel GUI demo's code base, the summary view for this report looks like this:
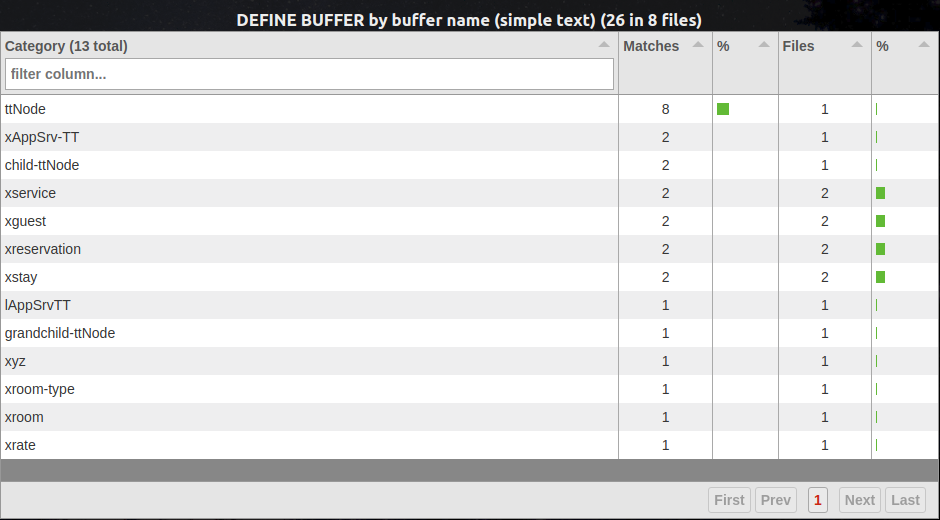
We can see that this summary view is grouped by the various buffer names defined across the application, as specified by our multiplex expression. Drilling down into one of the entries, we see the following detail view:

We see the simple match text of DEF [DEFINE_BUFFER] for both entries, which is not terribly descriptive or unique. Let's see if we can do better.
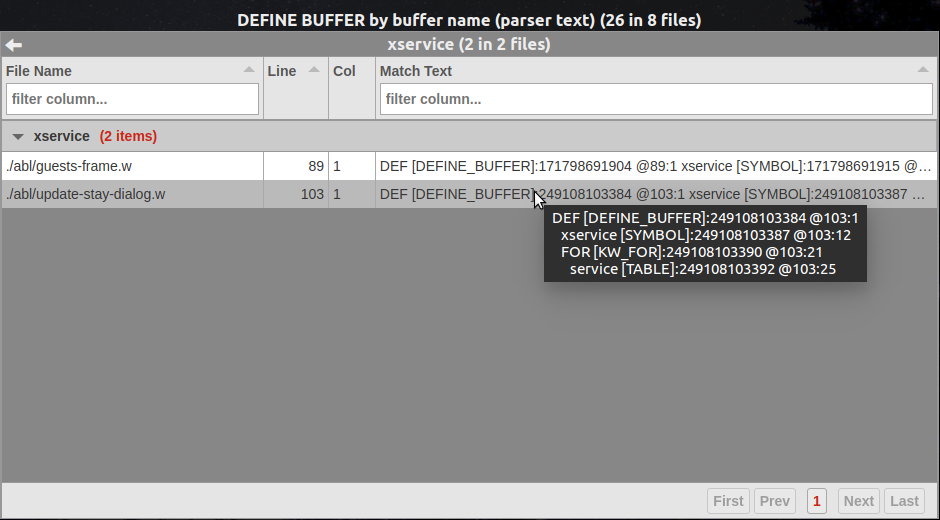
2) DEFINE BUFFER by buffer name (parser text)
This report has all the same settings as the previous one, except for a single change: Match Text Format now is set to parser.
The summary view is the same as for the previous report, but the match text in the detail view is much richer:
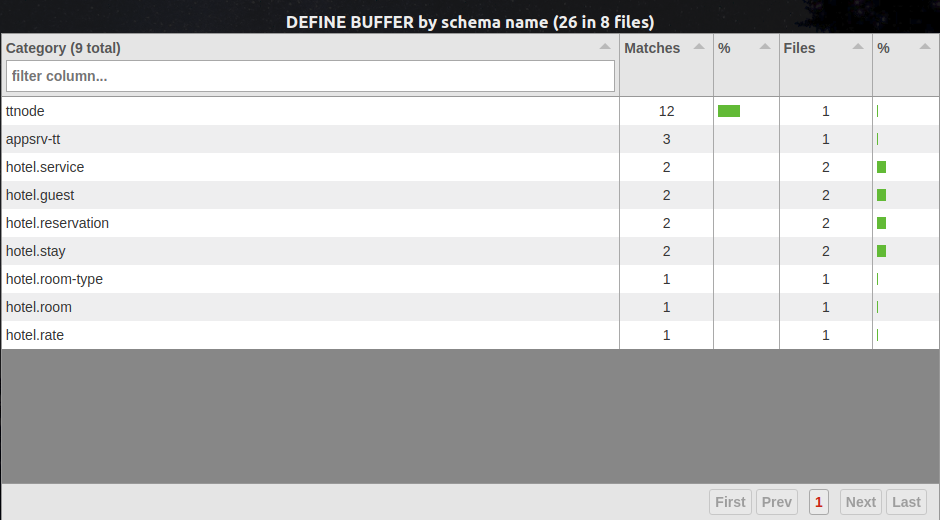
3) DEFINE BUFFER by schema name
Now we will create a report which still finds DEFINE BUFFER statements, but by matching on a different node and grouping the results differently. Here are the settings:

Recall the example of the AST structure we are trying to match:
DEF [DEFINE_BUFFER]
  b-ttEmployee [SYMBOL]
  FOR [KW_FOR]
    ttEmployee [TEMP_TABLE]
In this case we have changed the Condition Expression to situate the match on the lowest leaf node, representing the table for which the buffer is being defined (ttEmployee [TEMP_TABLE] in our sample). This means that the Multiplex Expression must be defined relative to this leaf node. This actually is quite natural, because we want to group the summary results by the canonical schema name of the table for which the buffer is defined (i.e, the table represented by the lowest leaf node). The ease of expressing this multiplexing is in fact a major advantage to redesigning the condition expression to match on the lowest leaf node.
The Category Tags are the same as for the previous two reports.
The Match Text Format is allowed to remain as the default, parser.
The Match Text Level is set to 2. This means the report engine will use the DEFINE_BUFFER node, which is 2 levels up the tree from the match node, to generate the match text. This will give us more context in the match text than if it were to be generated on the lowest leaf node alone.
The summary view with the new multiplexing looks like this:
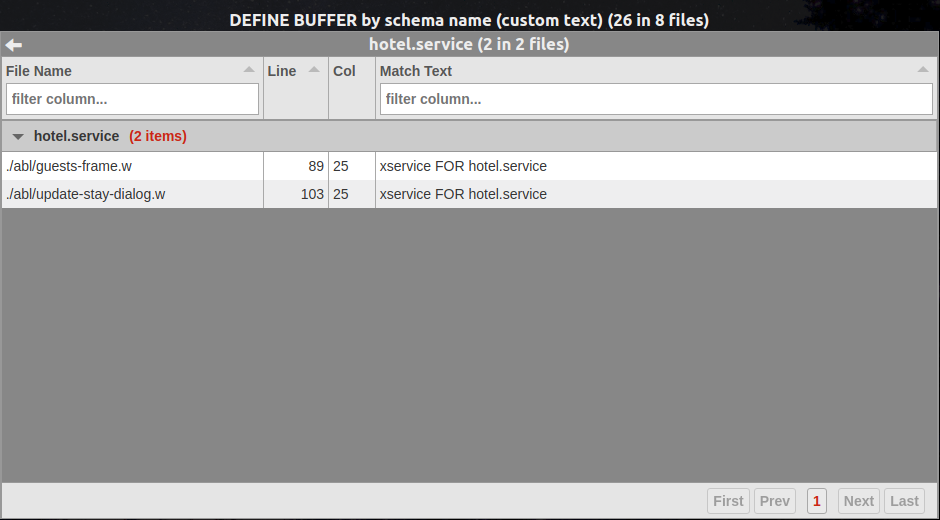
Here is the detail view with the match text from 2 levels above the matched node:
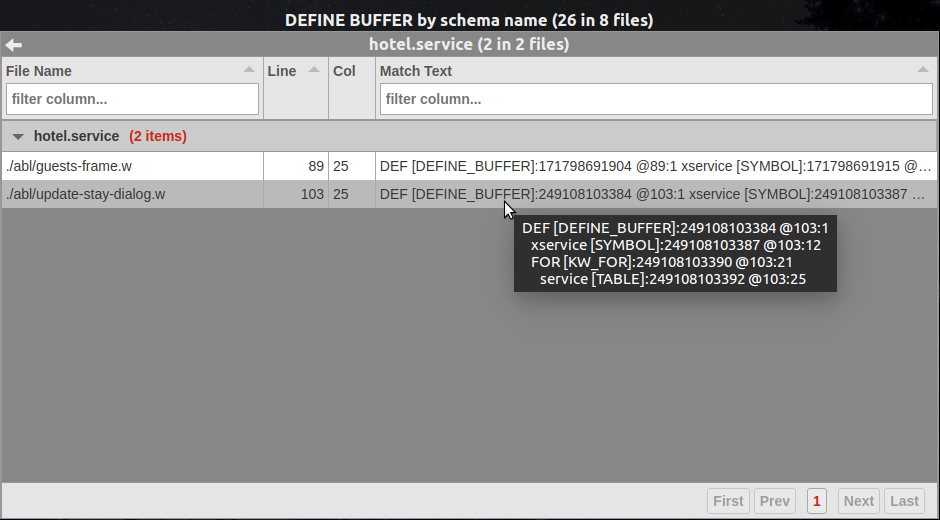
The match text is richer than it would have been for the match node alone, but it is quite verbose. We have to hover over each entry with the mouse in order to see all the data in a tool tip. This would be tedious for a large report. Let's try one more refinement...
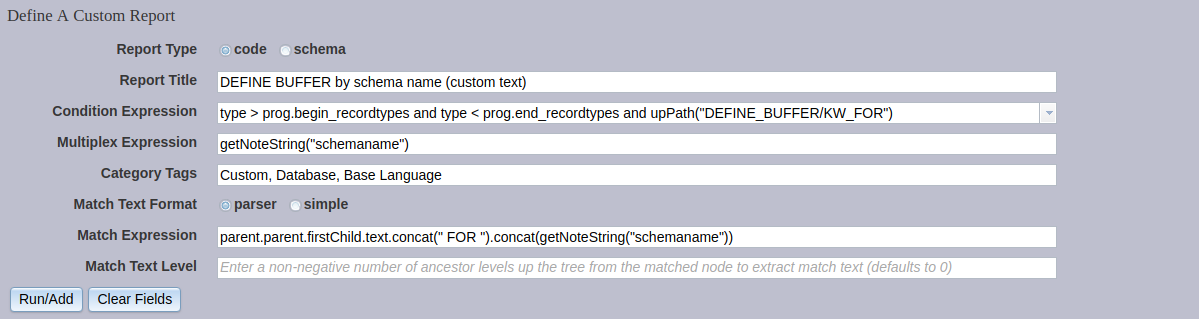
4) DEFINE BUFFER by schema name (custom text)
In this final example, we build off the previous report, but we generate more succinct and informative match text, using a custom match expression.
Here are the settings:

The Condition Expression, Multiplex Expression, and Category Tags remain unchanged from the previous example.
The Match Text Format is again allowed to remain as the default, as is the Match Text Level. These settings are ignored, because we now specify a Match Expression. The match expression takes the name of the buffer being defined, concatenates the text " FOR ", and then concatenates the canonical schema name of the table.
The summary view is the same as for the previous report.
The detail view's match text now provides a useful and brief summary of the the buffer name and the table for which it is defined:
This custom match text makes it easier to scan a larger number of report results and quickly determine the key information about the matches.
Manually Editing and Deleting Custom Reports
Currently, the Custom Reports graphical interface does not provide a way to edit and delete existing custom reports. We realize this is inconvenient and we plan to address this in a future release.
However, as a workaround, you can:
- stop the report server;
- edit the relevant configuration file (
rpt/auto_export_code_reports.xmlfor code reports,rpt/auto_export_schema_reports.xmlfor schema reports) directly; - re-run batch report generation;
- restart the report server.
Be forewarned:
- This is an advanced activity. Do not do this unless you are very comfortable with XML markup and with TRPL, if you are going to edit TRPL expressions in the file.
- Always make a backup of this file before editing it. If you get something wrong, it can break your next report generation run and disable your custom reports.
- DO NOT DO THIS WHILE THE REPORT SERVER IS RUNNING! At minimum, your changes will be overwritten when the server is stopped. At worst, you may corrupt the file.
Within the top-level <list> element (do not edit this), the XML file contains a <report> element for each custom report that has been created. Attributes of that <report> element hold the settings of the custom report as defined in the Custom Reports user interface.
To delete a report, remove the associated <report> element in its entirety.
To edit an individual report setting, modify the relevant attribute of the report's <report> XML element. The attributes map to the user interface fields as follows:
| UI Field | XML Attribute |
|---|---|
| Report Title | title |
| Condition Expression | condition |
| Multiplex Expression | multiplexExpr |
| Category Tags | tags |
| Match Text Format | dumpType |
| Match Expression | dumpExpr |
| Match Text Level | dumpLevel |
When you are satisfied with your changes, save the file and re-run batch report generation (see Calculating Report Results). It is not enough to edit the file and restart the report server. The custom reports that were deleted/edited in the configuration file will still exist in the analytics database until the batch process is re-run. Once the database is regenerated, restart the report server as usual.
© 2004-2018 Golden Code Development Corporation. ALL RIGHTS RESERVED.